Introduction
Thank you for picking Cablecast and thank you for choosing Tightrope! We appreciate your business, not only because we depend on it, but because we really believe in Cablecast as a uniquely powerful tool that has changed the lives of our customers since 1999. Your choice inspires us to keep going.
This is the Cablecast Manual and it is intended for anyone who will be involved in the automation of your station. This manual does not include:
- Instructions on installing and configuring the system for first-use. New systems include commissioning service for this purpose.
- Instructions on installing or upgrading the Cablecast software. New systems ship with the software pre-installed.
- Specific information about 3rd party device configuration. This is covered in the Cablecast Control Module Reference Guide.
Customer Service
For customer service, please contact your dealer or Tightrope Media Systems directly:
- Email: support@cablecast.tv
- Support Request Form : An online support request form is at https://support.cablecast.tv/s/contactsupport
- Knowledge Base: http://support.cablecast.tv/
What's New in Cablecast 7.8
Cablecast 7.8 includes support for Multiple Audio Programs, publishing server output to thrid party platforms, a new way to run events with Control Rooms, and a cleaner Run Details UI for your schedule items.
Multiple Audio Programs
Shows with Multiple Audio Programs are now supported through their Videos on Demand and Cablecast Closed Captioning content. The Video on Demand section now allows you to choose a language and give a label to each audio program. The Cablecast Closed Captioning section now contains a similar configuration, where each audio track can be labelled with the appropriate language.
Network Stream Destinations
Network Stream Destinations enable you to publish server outputs to a third party. This allows for easy RTMP configuration and a method for publishing to social streaming platforms. Currently in Cablecast 7.8, you will be able to publish directly to YouTube, with more social platforms to be added in the future.
Control Rooms
Control Rooms aim to replace the Force Matrix by giving you greater customizability tailored for your station. These rooms can be configured to display only the set of devices relevant to your events. In addition, you can create Macros to better automate common broadcast operations with a single key press.
New Run Details Overlay
The Editing Records Side Pane in the Schedule has been replaced with a less cramped and more robust Run Details Overlay for you to control all settings related to a run. The Schedule Side Pane is now reserved for show searching, allowing new features more space in the new Run Details Overlay.
What Is Cablecast?
Cablecast is an audiovisual headend management system for television stations. It is capable of managing many aspects of your station’s life, including: program information, schedules, routing switchers, digital video servers, public web schedule output, reports, video on demand servers, live streaming servers, TV Guide X-List output and Carousel schedule display. It is the automation and back office system for your headend operations.
Through its web interface, Cablecast gives your staff the tools they need to program their entire audiovisual headend.
There are several hardware and software components that together comprise a working Cablecast system.
Software Components:
- Frontdoor : Frontdoor provides user login, security settings, user rights assignment and related functions. Frontdoor is a web application that you will log in to whenever you want to access Cablecast.
- Cablecast Web User Interface : The Cablecast Web User Interface is the heart of your Cablecast system. Depending on your configuration, the Cablecast Web Interface may be hosted by your video server, or on a separate server.
- Cablecast: Cablecast is the core software behind the functionality of your system. It houses the show records, show schedule, configurations for your various devices, helps serve livestreams / video on demand and controls video switchers.
- Cablecast CG: CablecastCG is what controls and renders your Bulletin Board content between programs. It can be configured with static content, images, dynamic content, crawls, background audio and much more.
Hardware Components:
- Cablecast Server : We call the server that is running the Cablecast Web User Interface the Cablecast Server. Depending on your configuration, the Cablecast Server might be the same physical computer as one or more of the following devices.
- VOD Server : The VOD server is responsible for transcoding video files so that your viewers can watch them on demand from your website. The server also stores all of the resulting transcoded files.
- Video Server : The video server is responsible for recording and playback of digital media files.
- Live Streaming Server : The live streaming server encodes your final channel output in an Internet-friendly format. The resulting stream can be displayed on your website so that your viewers can watch your channel online.
- Live Sources : Beyond the playback devices already described, you might have additional sources that are used for live events.
Quick Start
This chapter will walk you through a few basic operations of your Cablecast system. The purpose of this chapter isn't to give you an in-depth explanation of how everything in Cablecast works. Instead, our aim is to walk you through a few of the basics that you will use virtually every day you use Cablecast.
If you perform all of the following sections in order, you will have a basic idea of how to login to the software, add a digital file for playback, schedule that file, and commit the changes to automation. If everything works as expected, you will have a file playing back on-air in about 10 minutes.
In this quickstart, we'll be covering the basics, including:
- Logging in
- Uploading a video file
- Creating a show
- Scheduling your show
- Sending Autopilot
Logging In
For the sake of example, we'll pretend your server is at domain tv.yourtown.org.
To log in to the Cablecast software:
- From a web browser on your system, navigate to
http://tv.yourtown.org/- If the Frontdoor login screen doesn't automatically appear, navigate to
http://tv.yourtown.org/frontdoor/
- If the Frontdoor login screen doesn't automatically appear, navigate to
- Enter your username in the username field.
- Enter your password in the password field.
- Click "Log In"
Uploading a Video/Show
Cablecast is able to playback programming from a variety of sources. The most common type of source used is a video server that is capable of playing back files. This exercise will walk you through the steps needed to add a file to the video server and create a new Show record based on that file.
- Open your Cablecast UI in your web browser and ensure you're logged in.
- Click on "Assets" on the left navigation bar
- Find and click on
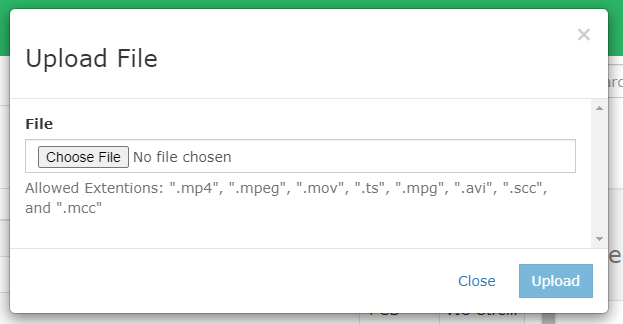
Upload(In the upper right corner of the page) - Choose a file to upload
- Optionally: Give the file an alternative filename to upload as
- Select the server the file should be uploaded to.
- Click
Upload.

You can monitor the progress of the upload by viewing the progress bar at the footer of your page. Once the upload is complete, you're able to move onto the next part, Creating a new show.
Creating a show
- From the Main Menu of the Cablecast Web User Interface, click on the Folder icon labeled "Assets" in the Side Menu.
- Cablecast is now showing all playback files that are "Unlinked", or are not attached to a Show.
- Click on the file you uploaded previously from the list of Assets or search for it by name above the list.
- The Asset Details screen opens on the right. Click
Actions.- Choose
New Showfrom the list of Actions.
- Choose
- The New Show screen opens.
- Here you can populate more information about the Show. For now, we'll keep everything default.
- Scroll to the bottom of the New Show screen and click
Save.
Scheduling a Show
Now that we have a Show we can add it to the Schedule so that we can play it back automatically.
- Click the Calendar icon labeled "Schedule" in the Side Menu.
- The Cablecast Schedule interface will appear.
- Locate the Show that we just added in the list of Shows on the right side.
- Click on the Show to select it.
- Locate an open time slot in the Schedule on the left side.
- Click on one of the open time slots in the Schedule on the left side to schedule the program.
Sending Autopilot
Now that we have a Schedule, it is time to commit these changes so that Cablecast can calculate timecodes and commands for Router equipment. We call this Sending Autopilot. To send Autopilot:
- Click the Paper Airplane icon labeled "Autopilot" in the Side Menu.
- Choose "Send Autopilot".
- Click "Send".
You will be taken to the Autopilot Send Report screen. The status of the send should transition from "Queued" to different states, finally landing on "Success". The Autopilot Report Screen includes information about any errors or warnings that occurred while Autopilot was being sent.
Congratulations, you have just sent Autopilot! You now have the ability to upload files, create shows, schedule playback, and send Autopilot.
Setting up Agenda Link
Agenda Link is a third party meeting management tool that helps you create and manage meeting agendas.
This is a quick start on getting the integration setup and running:
Initial Setup
- Navigate to Settings / System Settings and enter Integrations
- Follow the Integrations steps for setting up Agenda Link.
- Navigate to Settings / Location Settings and enter "Custom Fields"
- Create a new custom field for Agenda Link.
Linking Agenda Link items
- In a show record, using the new custom field, Link an Agenda Link item to the show record.
- In the Web Video item for the show record, Use the Agenda Link controls to your liking.
Main Menu
Dashboard
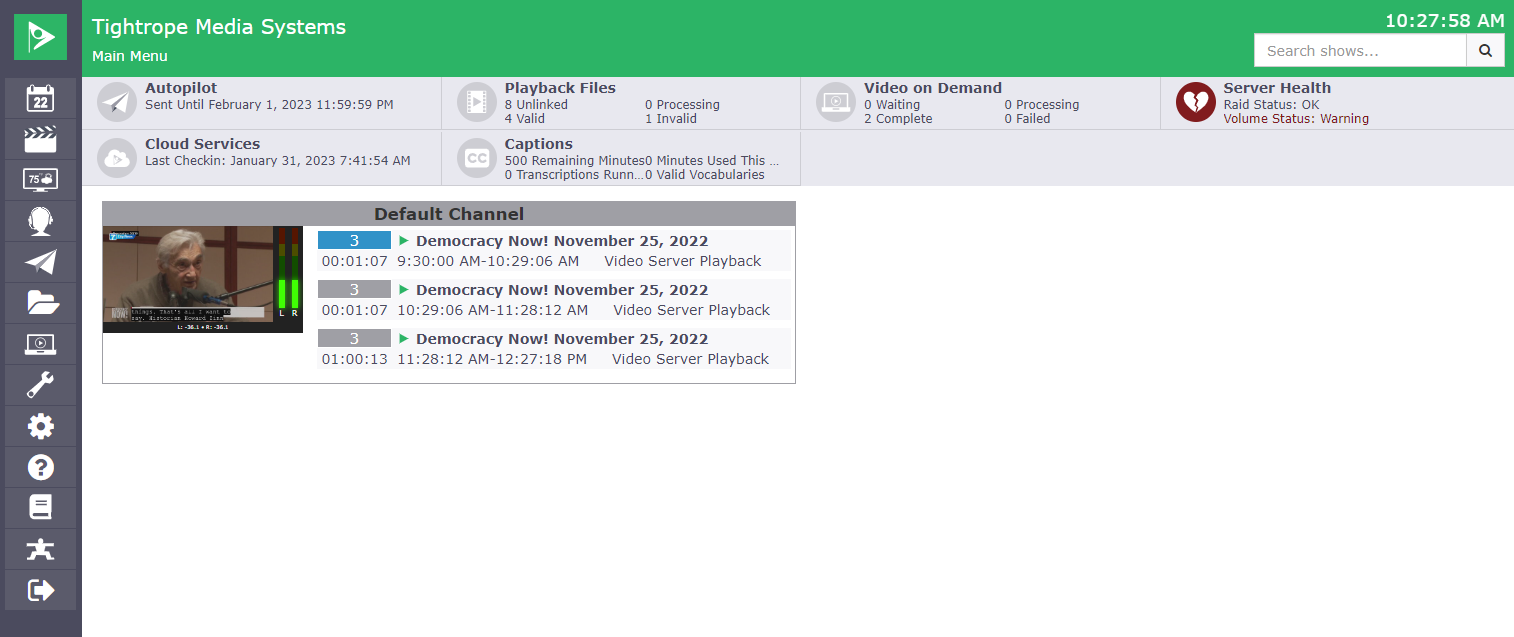
The Main Menu of Cablecast gives a comprehensive overview of the system which includes information on Autopilot, Playback Files, Video On Demand, System Health, Cloud Services, Captions, and what is currently on air and up next on your system’s channels.
The System Dashboard (seen above) displays various metrics about the Cablecast system.
- Autopilot: The Autopilot dashboard group displays when Autopilot was last sent. If the Schedule has been modified, or if the current send duration has elapsed, it will be highlighted red.
- Playback Files: The Digital Files dashboard group displays how many playback files are available to the system, and in what state they are in.
- Video on Demand: The Video On Demand dashboard group displays how many VODs are available to the system, and in what state they are in.
- Server Health : The Server Health dashboard group displays the condition of all RAID arrays, and disk volumes available to the system. If any RAIDs are in a warning state, or if any disk volumes lack sufficient free space, the heart will appear broken and the icon will be red.
- Cloud Services: If enabled the Cloud Services dashboard group displays the last time Cablecast checked in with Cablecast Cloud Services.
- Captions: If enabled the Captions dashboard group displays various close captioning statistics like minutes used and available.
The area below the System Dashboard will display information about each of the output channels configured in the system. For each channel, it will display the programs currently playing and upcoming. The confidence monitor gives a real-time preview of the video playing on the channel including audio levels and closed captions. If the output channel is configured with the video server as a Primary Device, the confidence monitor will display previews of any programming being played through the device. This includes live sources, CablecastCG, etc.
Main Menu Bar

The Menu Bar is present on every screen in Cablecast. It contains the Site Name, System Time, Breadcrumbs, and Quick Search.
- Site Name : The Site Name is a user configurable name for your Cablecast system. It can be changed in the Server Setup section of FrontDoor.
- Breadcrumbs : The Breadcrumbs in the menu bar allow you to see where you are in Cablecast’s navigation hierarchy. Clicking on Main Menu will take you to the Cablecast Main Menu from anywhere in the application. Clicking on intermediate links in the breadcrumbs will bring you to that screen in Cablecast.
- Server Time : The Cablecast server’s time is displayed in the Menu Bar. This time is corrected periodically to keep it as close to the Cablecast Server’s actual time as possible. It is always shown using the Cablecast Server’s time zone.
- Quick Search : The quick search box allows searching for Shows from anywhere in Cablecast. You can enter the ShowID to go directly to a Show Record if it exists.
Side Navigation Menu
The Side Menu in Cablecast allows access to any top level screen from any- where in Cablecast. Table 4.2 describes each item in the Side Menu.
- Schedule: Use to manage runs, crawls and record events.
- Shows: Use to manage Shows and searches.
- CablecastCG: Use to manage CablecastCG bulletins.
- Producers: Use to manage producers.
- Autopilot: Use to commit the schedule and send events to the hardware. You can also use this menu for real time control of the system via the Force Matrix.
- Assets: Use to view information on your system’s Assets including playback and VOD files. You can also rename files, create new Shows from orphaned files, and delete files from this screen.
- Internet Video: Use to manage Video On Demand and Live Streaming.
- Tools: Use to access Batch Functions, Workflows, Plugins, Reporting and Developer Tools.
- Settings: Use to access Location Settings, System Settings, and User Settings.
- About: Use to display the about screen. This screen will display the version of Cablecast currently installed.
- Manual: Use to display the electronic Cablecast manual in another browser window.
- Frontdoor: Use to navigate to the "FrontDoor" user interface.
- Log Out: Use to log out of Cablecast.
Schedule
The Schedule is where Shows, Crawls, and Record Events are scheduled. The Schedule is calendar based, meaning that any calendar day can be scheduled independently. There is no limit to how far out you can schedule.
To get started with scheduling shows, read more about the Show Schedule.
Schedule Toolbar
The Toolbar at the top of the Schedule allows for changing the current schedule day, switching modes, and performing bulk operations on selected items. Each item in the Toolbar is described in Table Schedule Toolbar.

Toolbar Items
| Item | Description |
|---|---|
| Channel | Use to switch between channels. The at the bottom of the drop down is where record events can be scheduled. |
| Mode | Use to switch between scheduled Shows or crawl events. The current mode is highlighted green. |
| Date | Use to choose date being worked on. The and change the date to previous day, today and next day respectively. |
| Undo & Redo | Use to undo and redo changes to the Schedule. Note that undo history is only maintained in the current web browser session. |
| Add & Delete | Use to insert empty runs, crawls or record events into the Schedule. The button is used to delete any selected runs, crawls or record events. |
| Copy & Paste | Use to copy any selected items into the clipboard. The button is used to open up the and duplicate the items in the clipboard. |
| Move | Use to open the which allows for moving any currently selected runs. |
| Unbump | Is used to move any currently selected runs back to to their original scheduled time, if they were previously bumped due to a schedule conflict. |
| Fill & Clear Gaps | is used to fill empty timeslots in the schedule with filler programs from a saved search. will clear any filler for the current day. |
| Autopilot | When indicator is green, there are no changes to the schedule that would affect the current Autopilot send. When the indicator is red, there are modifications to the schedule that require an Autopilot send. |
Show Schedule
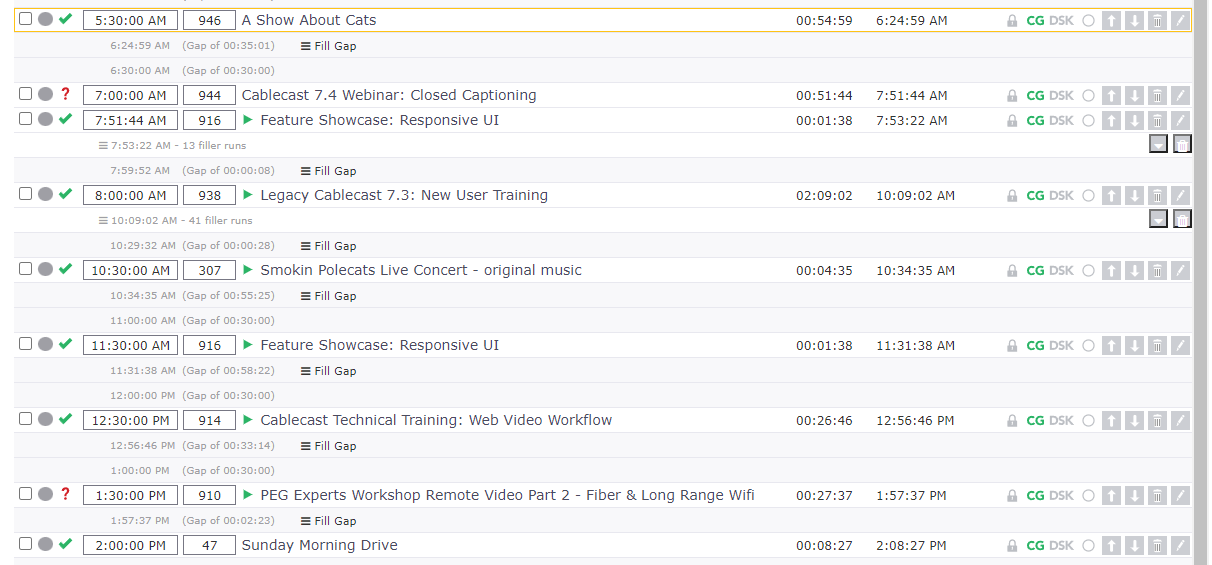
The schedule mode is used to schedule runs of Shows. In the section below, the parts of a run are described from left to right.
- Show Actions
- Run Types
- Timeslot
- Filler Block
- Right Side Pane
- Adding Runs
- Copy & Paste
- Moving Runs
- Editing Runs
- Filling Gaps
- Record Schedule

| Item | Description |
|---|---|
| Checkbox | Indicates if the run is selected. Selected runs can be moved, deleted, or copied as a single block using the Schedule Toolbar. |
| Run Status | Circle to the right of the selection checkbox is used to indicate if the run has been committed via Autopilot. Gray indicates the run is in the past, red indicates the run is uncommitted, green indicates the run is committed, and blue indicates the run is on air. |
| Run Type | Icon to the right of the indicates what type of device will be used for playback of the run. and their icons are described in table Described in Run Types |
| Start | The time the run is scheduled to start. The time can be changed by entering a new time directly in the form field. |
| ID | The ShowID of the scheduled show. The ID can be changed by entering a new ID or searching for a Show title in the form field. |
| Title | The title of the scheduled show. |
| TRT | The total run time of the scheduled show. |
| End | The time which the run will end. This field is calculated from the runtime. |
| Actions | Buttons which perform actions on the run. |
Scheduled Show - Actions

| Action | Description |
|---|---|
| Bump & Unbump | Use to move the run so it does not conflict with the previous run. The icon is only displayed if there is a conflict. The icon is only displayed if the run has been bumped, and the conflict is resolved. |
| Locked & Unlocked | Locked indicates that the run is currently locked. Locking a run will prevent Autopilot from bumping the run because of conflicts. Unlocked indicates that the run may be bumped, if needed. |
| CG & CG Exempt | Use to control whether runs will be presented on public facing schedules. indicates that the run will be publicly viewable. indicates that the run will be excluded from public schedules. |
| DSK & DSK Disabled | Displayed if DSK data exists for the run. indicates that there is no DSK data for the run. Clicking this icon will bring up the pane to allow editing of the DSK info to add down stream key data (crawl text and bug text) to a run. |
| Record & Recording Disabled | is displayed if there is a record event associated with the run. is displayed if there is no record event associated with the run. Clicking will create a record event and open the Run Details pane for editing. |
| Move Up & Move Down | Use to move a run. moves a run, so it begins when the previous run ends. moves a run, so it ends when the next run begins. |
| Delete | Use to delete the run from the Schedule. |
| Edit | Use to open the Run Details pane. |
| Network Broadcast Settings | Displayed if the run can utilize Network Stream Destinations. Brings up the Run Details Overlay for you to setup your Network Broadcast Events. |
Run Types
| Run Type | Icon | Description |
|---|---|---|
| Valid File | Indicates that this Show is a valid digital file. | |
| Invalid File | Indicates that this Show is an invalid digital file. | |
| Missing File | Indicates that this Show is set to use a digital file, but that the file does not exist. | |
| Tape | VHS Icon | Indicates that this Show will play back from tape. |
| DVD | Disc Icon | Indicates that this Show will play back from DVD. |
| Live | Indicates that this Show will play live. | |
| Network Stream | Indicates that this Show will play from a Network Stream. | |
| Manual | M | Indicates a Manual Event. |
Timeslot
Timeslots are used to schedule new runs as described in Clicking Timeslots Timeslots also contain the button allowing a single gap to be filled.
Filling gaps is covered in section Filling Gaps.
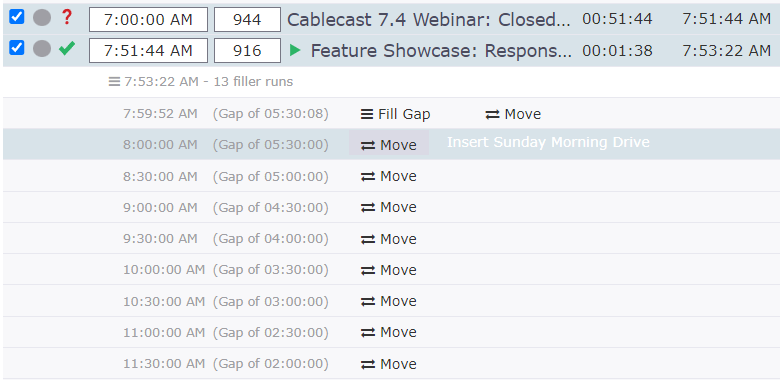
Filler Block
When a gap has been filled as covered in Filling Gaps, all the runs are summarized by default, decluttering the schedule. A filler block is shown in Filler Block section.
- Up & Down Arrow: Allows expanding and collapsing the runs in the filler block.
- Trash Can: Will delete all the filler runs.
Right Side Pane
To the right of the runs in the schedule is a pane used for searching Shows and contextual controls for pasting, moving and editing of runs. The side pane in its default search mode. Click Shows, Saved, or Advanced buttons to bring up the different search options described next.
- Shows: Type a search term into the box and click the magnifying glass to search.
- Saved: List previously constructed Saved Searches
- Advanced: Build a custom query to filter available Shows by numerous different properties of a Show.
Adding Runs
There are three ways to schedule a new run, as follows:
Select and Schedule
Selecting a Show from the search results in the right side pane and then clicking a time slot is the simplest way to schedule a show.

- Find the Show you wish to schedule using any of the search methods in the Right Side Pane.
- Click anywhere in the Show card. The card will be highlighted blue.
- Click anywhere in a time slot to schedule the show. While your mouse is over a time slot it will be highlighted blue if the Show can fit in the time slot, or red if scheduling the Show here would create a conflict.
Add Button
The button in the Schedule Toolbar can be used to add empty runs to the Schedule. These runs can then be edited manually to update the and fields. This is an efficient way to schedule, if you already have a list of start times and ShowIDs.
- Click the
+ Addbutton in the toolbar. The side pane will open on the right. - Enter the number of new runs desired in the form field.
- Click to create the empty runs. They will be placed at 12:00:00 AM
- Fill in the newly created fields.
- Start time & showID should be populated to your desired values
Clicking Timeslots
Any time slot in the Schedule can be clicked to create an empty run at that time. Then, the of a Show can be entered manually. This is useful if you already know the of a Show and know when the time should be.
- Click a time link in the time slot you wish to schedule the Show. An empty run will be placed at that time.
- Enter the of the Show you wish to schedule.
Deleting Runs
There are two ways to delete runs in the Schedule.
Deleting Individual Runs
You can delete any individual run in the Schedule by clicking the delete icon for the run. A full list of run actions can be viewed in the Schedule Actions Table.
Deleting Multiple Runs
You can delete multiple runs in the Schedule by clicking the selection checkbox for any run that should be deleted. Then, clicking the button, in the Schedule Toolbar will delete the selected runs.
Copy and Paste
The and functions of the Schedule allow for duplicating runs. Runs can be duplicated from one day to any other day in the Schedule.
Copying Runs
- Tick the checkbox on the runs you wish to copy to add the runs to the current selection.
- Click the button on the [Schedule Toolbar](#sec: UiReference: Schedule: Toolbar) or on your keyboard. :::
Pasting Runs
When runs are in the clipboard, they can be pasted either by opening the or by clicking the button in any timeslot.
Paste Runs Pane
The interface allows for multiple options of pasting.
- Original: Runs will be scheduled at the same time, but on the current schedule date. This option is useful for repeating blocks of programming at the same times but on different dates.
- To Time: Runs will be scheduled starting at a user defined time while keeping the time between programs in a block the same. This option is useful for repeating blocks of programming at different times and days.
- Advanced: Runs will be duplicated to multiple dates and times while keeping the spacing between programs in a block the same. This option is useful to repeat the same block of programming multiple times for a defined schedule. Read more about pasting in Advanced Paste.
Advanced Paste
Choosing from the Paste Runs pane allows you enter multiple dates and times to repeat a block of runs using the advanced paste builder. The fields in the advanced paste builder are:
- Load Blocks: This dropdown allows you to load pre-defined blocks of paste targets. See blocks for more information on creating blocks.
- Pick a Day: The date picker allows for creating a new paste day.
- Date: The Date at the top of a paste day displays what calendar date the copied runs will be pasted to.
- X: The in the upper right will remove an entire paste day from the advanced paste builder.
- Time: Each paste day contains a list of times at which runs will be duplicated.
- Remove: The link removes an individual time from a paste day.
- Cancel: Close the without pasting any runs.
- Reset: Remove all paste days and paste times.
- Paste: Perform the paste, duplicating any runs in the clipboard to each of the date time combinations defined in the paste builder.
Time Slot Paste Button
When runs are copied and in the clipboard, a Paste button will be available on all time slots. Clicking this button will paste the copied runs to that time.
Moving Runs
Existing runs can be moved in three different ways.
Moving Individual Runs
You can move any individual run in the schedule by clicking the or buttons in the section of a run. See the Actions Table for details about the and actions.
Moving Multiple Runs
You can move multiple runs in the Schedule by clicking the selection checkbox for any run that should be moved. Then, clicking the button in the Schedule Toolbar to open the pane. All selected runs will be moved, so the time in-between runs is maintained. The options for the pane are listed below.
| Option | Description |
|---|---|
| Move Up | Moves selected runs, so the first run in the selection begins when the previous run ends. If there is no previous run, the first run in the selection will be moved to 12:00:00 AM. |
| Move Down | Moves the selected runs, so the last item in the selection ends when the next run begins. If there is no next run, the last item in the selection will be moved so it ends at 12:00:00 AM on the next day. |
| Move To | Opens a prompt for a start time. The first run in the selection will be moved, so it starts at the specified time. |
| Move By | Opens a prompt for a timecode. The first run in the selection will be moved by the entered value. Negative values will move the run earlier in time. |
Time Slot Move Button
When runs are selected, a Move button will be available on all time slots. Clicking this button will move the selected runs to that time. This is equivalent to using the feature in the Schedule Toolbar.
Run Details Overlay

Hit the Edit icon on any run to bring up the Run Details Overlay. This overlay allows you to modify many different settings pertaining the scheduled run. Each tab covers a different type of setting. The tabs are as follows:
- Run Details: The basic settings of a run, like Show ID, Start time, and CG Exempt. Located under these settings is a list of all Control Rooms you have access to. Clicking one of the Open buttons will redirect you to the Control Room with the current schedule run selected as the event within the Control Room.
- DSK Settings: The DSK settings similar to the Show Record configuration.
- Record Settings: You can configure your run as a Record Run here, instead of opening up the Record Schedule.
- Caption Settings: Enable live closed captioning and live translations here with the associated dropdowns.
- Network Broadcast Settings: Create Network Broadcast Events to utilize your Network Stream Destinations. Ensure you hit Save and send Autopilot for your events to be synced with social platforms.
Hit Save to persist your changes.
Filling Gaps

Using ether Fill Gaps button on the toolbar or the Fill Gap button on the schedule will open a dialog allowing you to define the criteria used to fill the gap. The different fields are defined below:
| Function | Description |
|---|---|
| Dates | Allows defining a and date range in which to fill gaps. These fields are only shown when using the button in the Schedule Toolbar. |
| Fill Gap With Shows From | Allows selecting a Saved Search from which to pull content from when filling the gap. |
| Fill Mode | Determines if programs are allowed to repeat within the same gap. |
| Show Advanced Settings | Clicking this link will reveal advanced settings described below. |
When is clicked it will reveal several additional options for controlling how gaps are filled:
| Function | Description |
|---|---|
| Open Gap With Search | If populated, a single random show will be used from the search at the beginning of each gap. |
| Close Gap With Search | If populated, a single random show will be used from the search at the end of each gap. |
| Insert Before Fill With Search | If populated, a single random show will be used from the search before each inserted filler. |
| Insert After Fill With Search | If populated, a single random show will be used from the search after each inserted filler. |
| Maximum Bump | Values greater than zero allow filler to be scheduled even if it would cause the next program to bump. Useful for completely filling a gap even if a search doesn't contain results that perfectly fit. |
Record Schedule
The Schedule can be switched to viewing record events by choosing from the dropdown in the Schedule Toolbar. The fields of a record event are described from left to right below.
- Checkbox: Indicates if the record event is selected. Selected record events can be deleted, or copied as a single block using the Schedule Toolbar.
- Start: The time that the record event will begin to display.
- Name: A user-defined name for the record event. This is useful to be able to distinguish several record events on the same day.
- Length: The duration in hours:minutes:seconds that the record device will be recording for.
- End: The time that the record event will stop. Calculated by adding the to the properties.
- Device: The name of the device that will be recording.
- Actions: The delete button, can be used to delete an individual record event. The edit button, will open the side pane.
Creating Records

Creating a new record event is easy.
- Navigate to the desired date for the new record event.
- Click Create New Record Event in the right side pane.
- Fill out form. The fields of the form are described below.
- Click to save the new record event.
Create Record Event Side Pane
The fields of the Record Event Side Pane are described below
- Name: The user defined name of the record event.
- Start: The time which the record event will start.
- Length: The duration, in hours:minutes:seconds the record device will record for.
- Source - Device: The device that will be recorded.
- Destination - Device: The device that will perform the record.
- Destination - Stream: The Network Stream that should be used as a source for the recording.
- Destination - File Key: The name of the file that will be created if recording to a video server device.
- Destination - Cue: Duration in hours:minutes:seconds that the record device will record prior to the actual start time of the record.
- Caption Settings - Enable Live Captions: Enables live closed captioning for this record run. This brings up more form fields for you to fill out the Source Language, Provider, and optional Vocabulary.
- Caption Settings - Enable Live Translations: Enabled live closed captioning translations for this record run. This will bring up an additional for field for you to select the Translation_Language .
Editing Records
To edit an existing record event, click the edit button. This will open the form described in Record Events Side Pane. You can also edit a record run from the Record Settings tab of the Run Details Overlay.
From here, make the desired changes and click Save.
Deleting Records
Deleting record events is the same as deleting runs described in Deleting Runs.
- Single Record Event: To delete a single record event, click the delete button, in the section of the record event you wish to delete.
- Multiple Record Events: To delete multiple record events, click the checkbox of each record event you wish to delete adding it to the current selection. Then, click in the .
Crawl Schedule
The Schedule can be switched to viewing crawls by clicking the button in the Schedule Toolbar. The fields of a crawl event are described from left to right below.
| Field | Description |
|---|---|
| Checkbox | Indicates if the crawl event is selected. Selected crawl events can be deleted or copied as a single block using the Schedule Toolbar. |
| Start | The time that the crawl event will begin to display. |
| Text | The message that will be displayed by the crawl event. |
| Length | The duration in hours:minutes:seconds that the crawl event will be displayed. |
| End | The time that the crawl event will stop being displayed. Calculated by adding the to the properties. |
| Actions | The delete button, can be used to delete an individual crawl. The edit button will open the side pane. |
Creating Crawls
Creating a new crawl is easy.
- Navigate to the desired date for the new crawl event.
- Click in the or in the right side pane to bring up the pane
- Fill out and fields.
- Click to save the new crawl event.
Editing Crawls
To edit an existing crawl, click the edit button, in the section of the crawl event you wish to edit. This will open the same form described in Creating New Crawls. Make the desired changes and click to finish the edit.
Deleting Crawls
Deleting crawl events is the same as deleting runs described in [Deleting Runs](#sec: UiReference: Schedule: ShowsSchedule: DeletingRuns).
- Single Crawl Event: To delete a single crawl event, click the delete button, in the section of the crawl event you wish to delete.
- Multiple Crawl Events: To delete multiple crawl events, click the checkbox of each crawl event you wish to delete adding it to the current selection. Then, click in the .
Shows
A Show is the metadata that represents a single, self-contained item of programming. Examples could include a specific football game, a single city council meeting or an episode of a comedy series.
A show is one of the core mechanics to Cablecast. Most functionality within Cablecast revolves around show records. VOD Programs refer to a show record, scheduled shows refer to show records, generated reports use metrics from shows, etc.
There are some base mechanics to shows within Cablecast:
- Viewing & Editing Shows
- Creating a New Show
- Searching Shows
- Creating / Managing Saved Searches
- Viewing Cleared Shows
Shows Screen
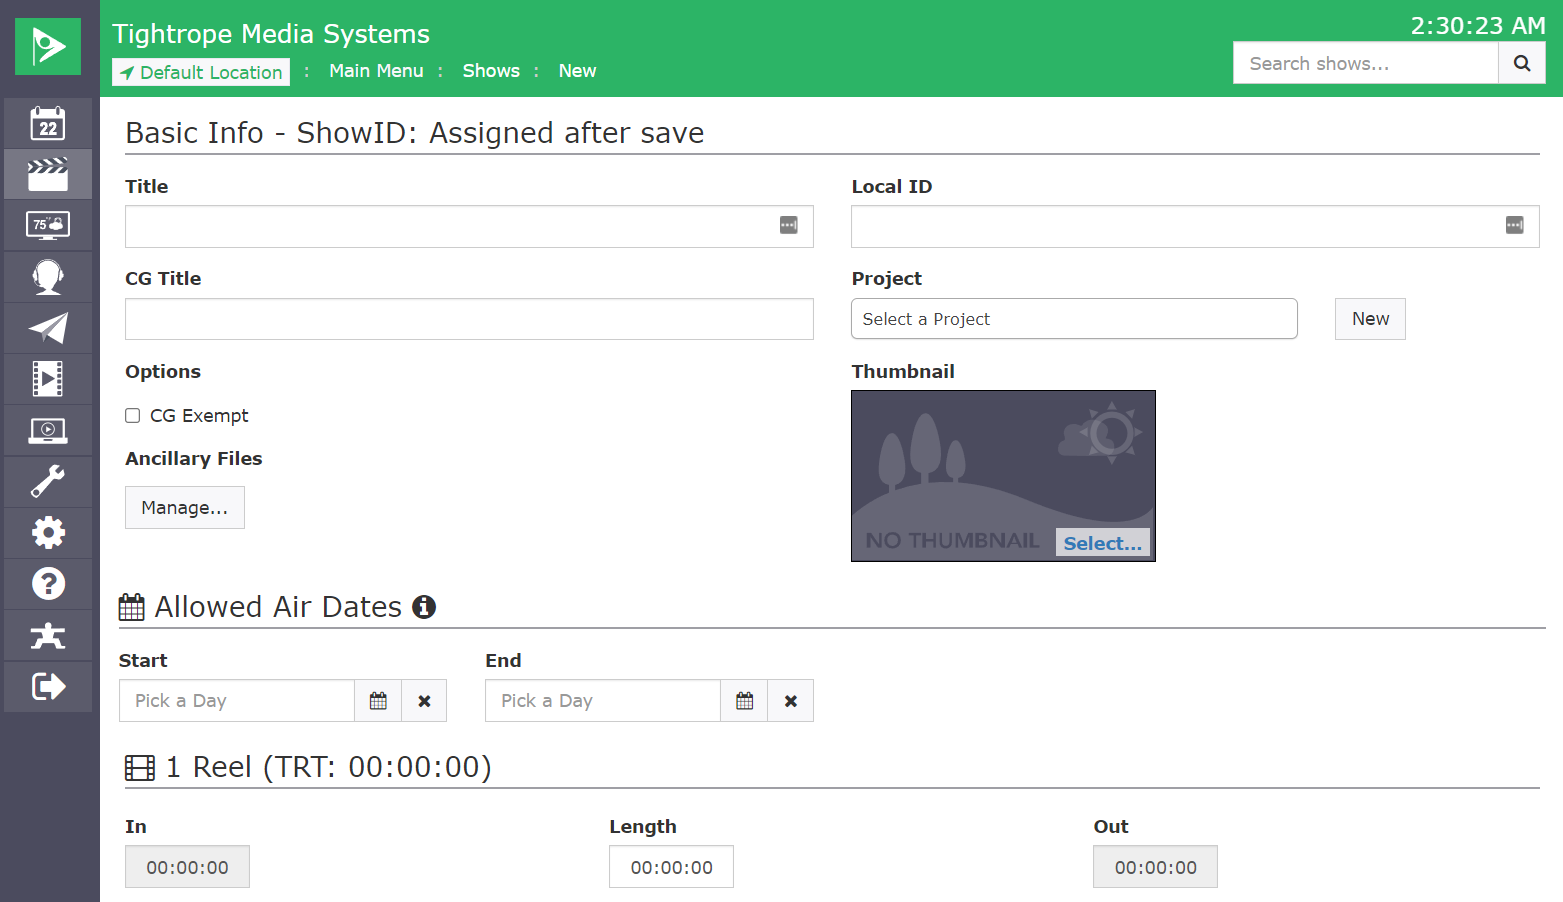
The show record contains six different tabs to organize all of the editable show fields.
- ShowID: This number is assigned by Cablecast automatically and is the system-wide unique identifier for each Show. Cablecast allows you to enter a ShowID to instantly recall a Show in almost every screen.
Edit Show Info
The following Info fields are included in every Show:
- Title: The user-defined name of the program. Using a concise, descriptive title will make it easier for you to find a given Show later when using Cablecast's search system.
- CG Title: The public-facing name of the program. The is used for any publicly viewable description of the program, such as on your channels Character Generator, website, and TV Guide output.
- Thumbnail: The thumbnail of a Show is used on your website to give viewers a visual representation of the Show. Cablecast will automatically generate a thumbnail for digital files on supported video servers, and you can always upload your own thumbnail.
- Alt Text: Alt text provides a brief description of the thumbnail for accessibility purposes. It is used by screen readers to help visually impaired users understand the content of the image, and it also helps improve SEO by offering search engines more context about the image.
- CG Exempt: Checking this box tells Cablecast that this program should not be shown on your stations character generator, or other public-facing outputs. For example, you might not want to include each and every PSA on your website's schedule display.
- Allowed Air Dates: The start and end date the show will be available to air.
REELS
Each Show in Cablecast includes a single Reel by default. You can add and delete additional reels, but each Show must have at least one.
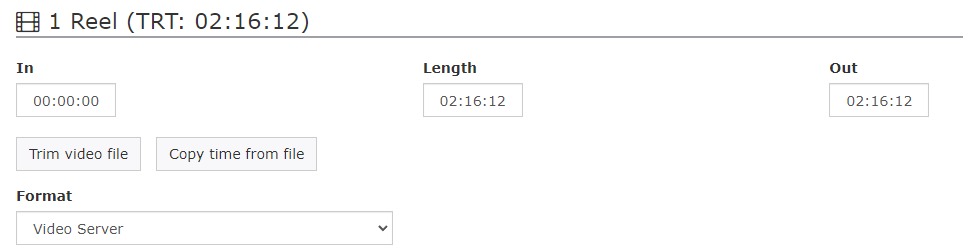
The reel represents a segment of a Show, such as each half of a football game. When it comes time to schedule your channel, you will simply schedule the Show and Cablecast will take care of playing all of the needed reels in order automatically.
To create a new reel:
- Click
Add Reel. - Select the Format and fill out any necessary fields.
- Click
Create Reel.
To edit a reel:
- Click the edit icon on the specific reel.
- Edit the Format and/or any necessary fields.
- Click
Update Reel.
To edit the timing of a reel:
- Click the scissors icon on the specific reel.
- For digital files, a trimming modal will appear.
-
Reel Timeline: Adjust the reel's duration by dragging either bar to shorten or extend it.
-
Reel Marker: Drag and drop to the place you would like to create a new reel, or mark in/out the timestamps. To create a new reel, click the plus icon on the bottom of the marker.
-
Mark In: Once the reel marker is in the appropriate position, click
Mark Into fill in theTime Ininput for that reel. -
Mark Out: Once the reel marker is in the appropriate position, click
Mark Outto fill in theTime Outinput for that reel. -
Reset Reel to File TRT: Click this button set the reel
Time Into 00:00:00 and the reelTime Outto the length of the digital file.
- For all other formats, a trimming modal with
Time In,Length, andTime Outwill appear. - Once the necessary edits have been made, click
Save.
To delete a reel:
- Click the trash can icon on the specific reel.
Reel Terminology Reference:
- Format: The type of content that this reel represents. Cablecast includes some default formats, but you will likely need to create more of your own.
- Digital Files: (For Digital File formats only) Lists the files that Cablecast has associated with this reel. Clicking
Select Filewill bring up a dialog with more detailed file information. - Network Stream: The Network Stream that should be used to play back this live content. See [Network Streams](#sec: Settings: Location: IOTab: NetworkStreams) for more information.
- Length: The total length of the selected reel. Will automatically be updated by change in
Time InorTime Out. It can also be manually edited, which will automatically update theTime Outfield. - Time In: The point in the source material at which the reel starts. This field is expressed in hours, minutes, seconds.
- Time Out: The point in the source material at which the reel ends. This field is expressed in hours, minutes, seconds.
- TRT: The total running time of the Show, expressed in hours, minutes and seconds. This is the sum of the lengths of all of the individual reels.
- Thumbnail: The system-generated thumbnail for the associated digital file or a format-based icon, if there is no thumbnail image.
BIBLIOGRAPHIC INFO
The Bibliographic Info section allows you to keep track of additional details about the Show. The following fields are available:
- Local ID: A user-defined identifier for the show. This field is not automatically generated by Cablecast. Typically this field is used when data is migrated into Cablecast from a different automation system. This allows you to find Cablecast Shows based on the old system's identifiers if needed.
- Event Date: The date on which the Show was recorded. Example: the date of the football game.
- Project: Defines a grouping of Shows such as episodes of the same series. You can create as many projects as you would like, but each Show can only belong to one project at a time.
- Category: You can associate a user-defined category with all of your Shows to facilitate easier searches. Cablecast includes several default categories. You can edit and delete them as you see fit as well as create new ones.
- Producer: The person or organization that created this program. You can add as many Producers to Cablecast as you need.
- Comments: Any additional notes about this program.
- Custom Fields: Cablecast includes custom fields that you can name and use to store any other data you need.
INTERNET VIDEO
TRMS Video On Demand
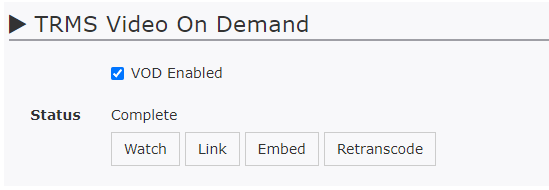
The "VOD" section contains the Video On Demand feature, described in detail via its respective section plus the addition settings modal.
In the settings modal, you can configure:
- Secondary Audio Mode:Sets the default behavior for VODs with more than one audio source. Individual VOD MAP configurations will override this configuration. Setting this configuration to Default will have VODs defer to System Settings.
- Primary Audio Language: The primary audio source's language.
- Primary Audio Label: The primary audio source's display label.
- Secondary Audio Language: The secondary audio source's language.
- Secondary Audio Label:The secondary audio source's display label.
Live Streaming
- Live Streaming Exempt: If this box is ticked, Cablecast will not broadcast this program via live streaming. Instead, users will see a page informing them that this Show can't be viewed online.
TEXT TRACKS

Closed Captions
- Auto Generate Captions: Will use a configured captioning appliance (e.g. Enco enCaption) or Cablecast Cloud Services to generate a captions file for this show. Enabling this field will display a settings button which will open a new modal:
- Provider: Select which caption provider to have caption this content
- Vocabulary: Select a custom vocabulary for this caption transcription job
- Primary Audio Language: Select the language of speech to be transcribed
- Add Additional Languages: With the Cablecast Cloud Services provider, you can add any additional languages spoken in this content to have the captioning service automatically detect and transcribe these different languages alongside the language set in the Language dropdown.
Note: The Languages selector will only list languages that the user has enabled. This configuration is available in the Languages setting.
Once the Show record is saved, the Captioning job will be queued.
Beneath the Translations sections, the Text Tracks will appear. This is the same feature that appears on the text tracks page.
Translations
- Auto Translate: Will translate existing closed caption text to another language. Enabling this feature will display a settings button which will open a new modal:
- Source: Specifies the language of the source caption file to translate.
- Language(s): This dropdown lets you select a language to translate to. You can add multiple languages to be translated. Languages already added will be listed and can be removed by clicking the X button.
Note: The Languages selector will only list languages that the user has enabled. This configuration is available in the Languages setting.
Once the Show record is saved, the Translation job will be queued.
Beneath the Translations sections, the Text Tracks will appear. This is the same feature that appears on the text tracks page.
DSK Settings
The DSK Settings section allows you to define default values to be used for DSK info when this Show is scheduled. For example, you can define crawl text here, and it will be used automatically whenever this Show is subsequently scheduled.
- Bug Text: User-defined text that will be shown on-screen such as for live programs.
- Crawl Text: User-defined text that will be slowly moved across the top or bottom of the screen while this Show is on air.
- Crawl Length: Sets how long the will be shown after the start of the Show. This field is expressed in hours, minutes and seconds.
Assets

All related assets to the show record are displayed here. This includes:
- Playback files
- Thumbnail Images
- Closed Captions
- Video On Demand Files
This is the same feature that appears in the "Assets" UI.
Runs Information
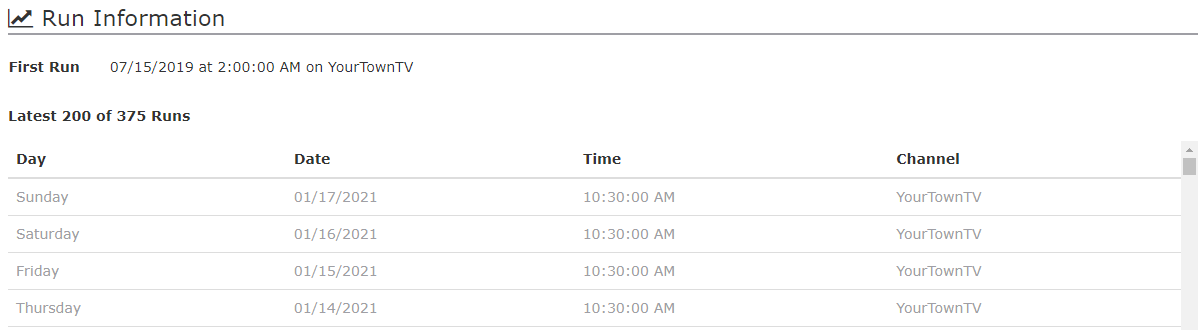
- First Run: The first scheduled run of this program will be shown by its date & time, followed by the channel.
- Latest Runs: This list shows all or some of the scheduled air times of this Show.
New Show
Use to create an empty Show that you can then edit. See Show Fields for information about the fields on the Show screen.
Methods of creating Shows
There are a few different ways that you can create a show within Cablecast, and all depends on the situation. For example, if you already have a file on your server, you'll likely want to create a show file off the "Digital Files" screen. If you are creating a show for a live event, or otherwise something that doesn't have a digital file yet, you'd want to create it manually.
Refer to the Digital File Management chapter for more information about Digital Files.
Uploading via the Web UI
The easiest and most consistent method no matter where you're located is uploading files via the Cablecast Web UI. This can be accomplished via the following steps:
- Navigate to Digital Files
- Click
Uploadlocated to the left of the "Search all digital files" search box. - Select the video file on your system.
- Optional: Give the file a new filename
- Select the server this file should be stored on.
- Click
Upload - Once the file is finished uploading (as visualized by the progress bar on the bottom of the page), switch to the "Unlinked" tab.
- Find your file, and click on it.
- On the details pane on the right, click
New Show. - Fill out the Show Fields and click
Save
"Unlinked" Digital Files
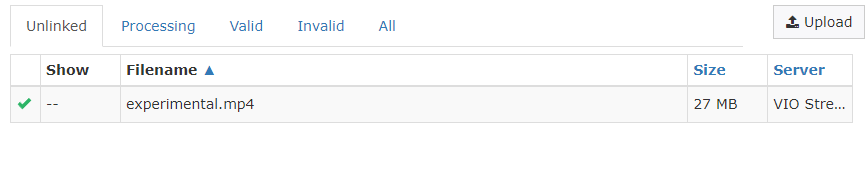
Video files added to the servers E:/ content drive can be found within the Digital Files "Unlinked" tab. These are files that have no show record assignment. To create a show off one of these files:
- Navigate to Digital Files
- Switch to the "Unlinked" tab
- Find your file, and click on it.
- On the details pane on the right, click
New Show. - Fill out the Show Fields and click
Save
"New Show"

If you don't have the video file yet, or need to create a show file based on a different "format", you can create a show record without linking it directly to a digital file asset. To do this:
- Navigate to "Shows" on the side navigation menu
- Click
New Show - Populate the Show Fields such as the "Title" and other necessary fields.
- Under the reel section, click the scissors icon and enter a "Length" in a HH:MM:SS format. Example: For a show that is 1 hour and 35 minutes, enter 01:35:00. Click
Save. - Change the format to your desired format by clicking the edit icon.
- Example: If scheduling a HLS Network stream, Select "Network Stream" and then select your preconfigured Network Stream, or click "New" to create a new stream Click
Save.
- Example: If scheduling a HLS Network stream, Select "Network Stream" and then select your preconfigured Network Stream, or click "New" to create a new stream Click
- Click
Create.
Show Search
The screen allows you to search for Shows based on a variety of search terms. The right side of the screen shows the that are currently applied to search.
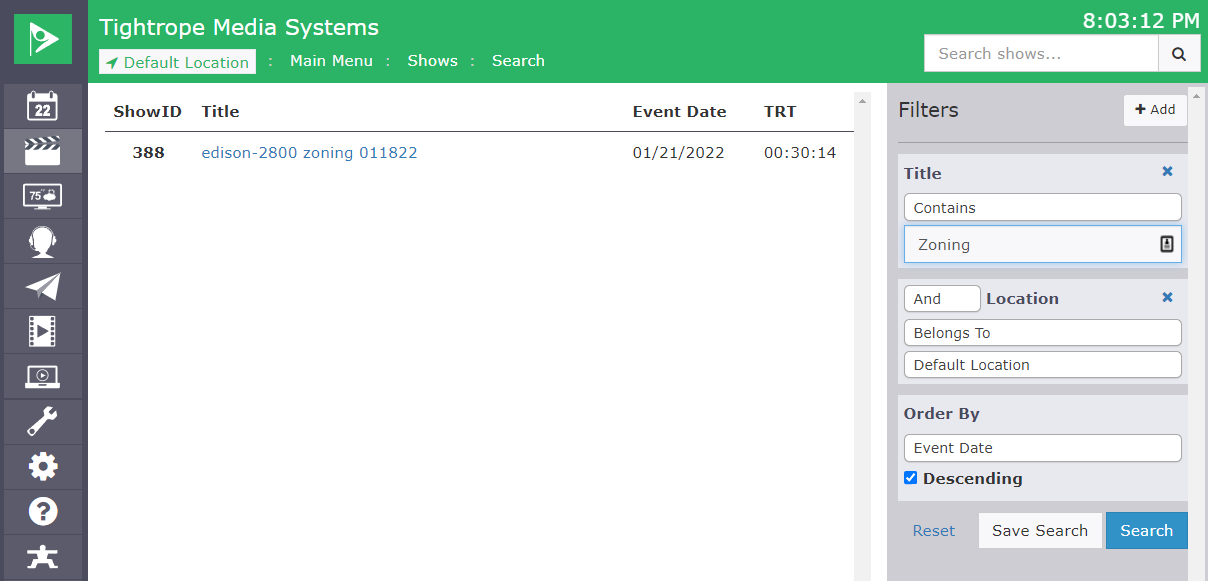
In the example seen above, we are searching for Shows that contain the term "Zoning" in their Title field. The left side of the screen displays the list of Shows that match the current filters.
Filters
 The filters area allows you to build complex searches quickly and
easily. When you first enter the Show Search screen, the filters will default to Title contains "".
The filters area allows you to build complex searches quickly and
easily. When you first enter the Show Search screen, the filters will default to Title contains "".
If we execute this search as-is, it will find all of the Shows in the system, since we are giving it no specific search criteria. This search consists of one search groups:
- Title contains ""
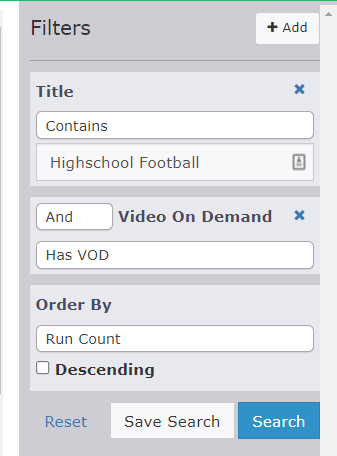
In the example seen to the right, these search filters will return shows that contain the "Highschool Football" in the title, and has a VOD enabled. The results will order by "Run Count".
Adding / Removing Filters
You can add and stack multiple filters to get more granular with your searches. This can be accomplished by clicking + Add in the top right of the "Filters" section. Filters can be removed by clicking the x icon in the top right of each filter.
Filters that can be added:
- Custom Fields
- Category
- CG Title
- Channel
- Comments
- Digital File
- Disposition
- Disposition Date
- Event Date
- Local ID
- Media Creation Date
- Modified
- Producer
- Project
- Run Count
- Schedule Date End
- Schedule Date Start
- ShowID
- Title
- TRT (Total Run Time)
- Video On Demand
Groups
Each search group will filter the results to include only the Shows that match the group. To make powerful searches, you will combine many different groups.
The group consists of the following options:
-
Field Name: The name of the field that is being used by a specific group will be shown in bold on the top line. In the previous example, we are filtering by the field. If you would like to change the field that a group is using, you will need to remove the existing group and add a new one using the desired field.
-
Remove Button: The in the top right of each group will allow you to remove a group from the search.
-
And / Or: The second and subsequent groups in a search will allow you to specify how this group is to be combined with the previous groups. If you select the Show must satisfy both the previous groups and the current group. If you select the Show must satisfy one or both of the groups.
-
Contains / Does Not Contain: For text fields such as Title, you can set if the search should include items that contain or do not contain the specified text.
-
Belongs To / Does Not Belong To: For fields that are selected from a list of possible values such as Producer, Category and Project, you can select if the search should include items that belong to or do not belong to the specified value.
-
On / Before / After: Available for date-based fields such as Event Date, Disposition Date and Modified. For example, if you wish to search for Shows that have been recently modified, you might select After and enter . You may also enter a specific date instead of a relative expression.
-
Is / Is Not: Available for the Digital File field. This filter will match Shows based on the status of their digital files.
Equals / Greater Than / Less Than: Available for numeric fields such as Run Count.
Order By
Below the search groups you can control the order in which the results are displayed.
-
Field: Selects the field that should be used to sort the results.
-
Descending: Reverses the sort order.
Buttons
-
Bulk Action: See Bulk Actions for more information.
-
+ Add: Press to add an additional group to the search.
-
Save Search: Press to store this search as a Saved Search so that you can easily recall it later.
-
Reset: Press to discard your changes and restore the search to its original state.
-
Search: Press to execute the search using the current filters and order by settings. After executing the search, you can further refine the filters and search again.
Results
The search results area shows the following information:
-
Result count: Displays the total number of Shows that match the specified filters.
-
ShowID: The unique ShowID of the Show.
-
Title: The title of the Show.
-
Producer: The name of the producer, if set.
-
Event Date: The event date of the Show.
-
TRT: The Total Run Time of the Show.
-
Runs: The total number of times that the Show has ran.
Bulk Actions
If you need to make changes to multiple Shows, even large numbers of Shows, you can use the Bulk Actions feature. This feature allows you to select multiple Shows and then apply a change to all of them at once.
Selecting Shows

To use Bulk Actions, you must select the Shows you want to change in the Show Search screen. You can do this by clicking the checkbox next to each Show you want to select. You can also clear your selection or select all Shows on the current page by clicking the checkbox in the header row.
In the example above, the user has selected six Shows to apply a Bulk Action to.
Configuring Bulk Actions
Once you have selected the Shows you want to change, click the "Bulk Actions" button at the top right of the screen. This will open the Bulk Actions configuration screen.

Bulk Actions Options
- Bulk Cleanup Shows: This option will allow deleting the assets, VOD's, or Metadata associated with the selected Shows. This will not delete the Shows themselves.
- Bulk Update Metadata: This option will allow you to update the metadata for the selected Shows. You can change the Title, Category, Producer, and other metadata fields for all selected Shows at once.
Bulk Update Metadata
If you select the "Bulk Update Metadata" option, you will see a screen like the one below.

To configure which metadata fields you want to update, click the "New field to update" button and select the field you want to change from the dropdown. You can then enter the new value for that field. You can add as many fields as you want to update.
Additional fields can be added by clicking the "New field to update" button again. Fields can be removed by clicking the circular red "X" button in the top right of the box for that field.

When you are finished configuring the metadata fields you want to update, click the "Update" button to apply the changes to all selected Shows.
Depending on the number of Shows you have selected and the changes you are making, this process may take some time to complete. You will see a progress bar to show you the status of the Bulk Action.
Saved Searches
Saved Searches allow you to save and recall a search later. For example, you could create a search that looks for public service announcements or for episodes of a specific program.
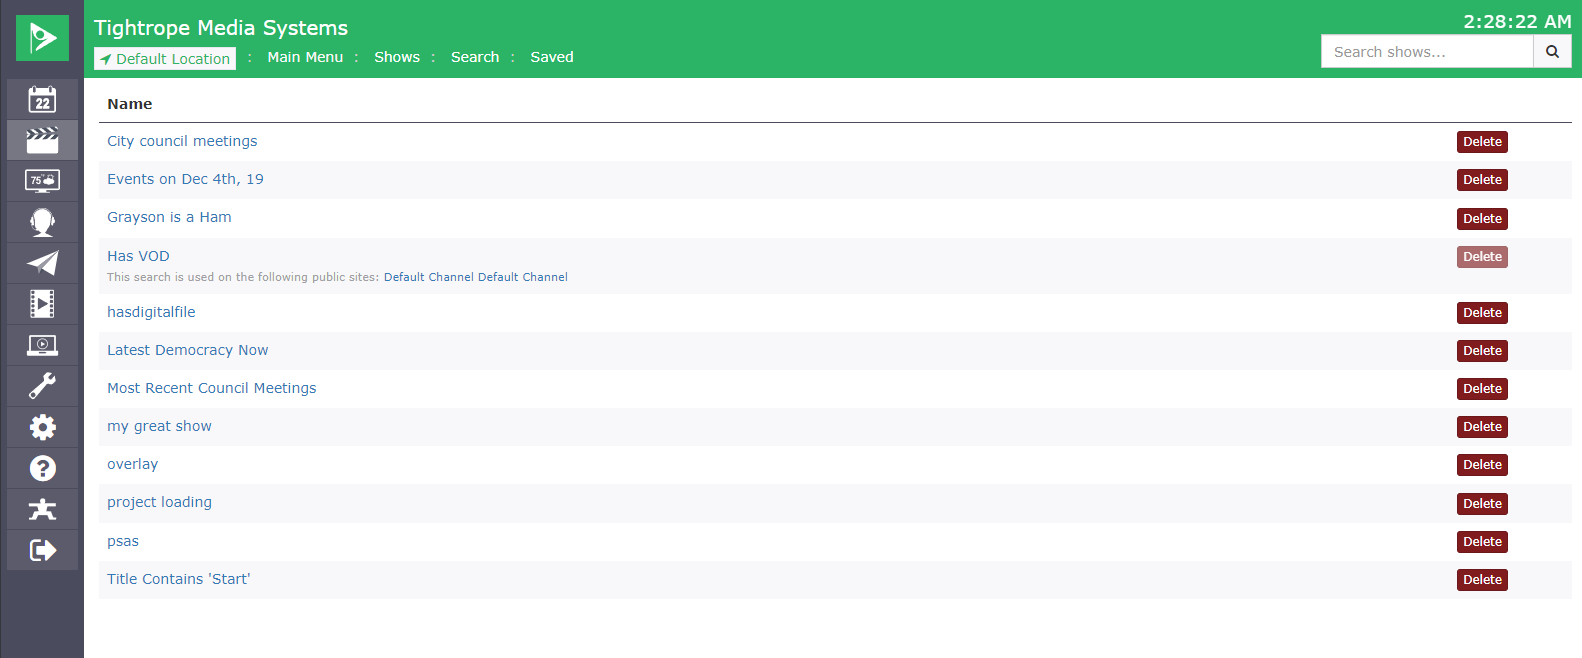
If you use date-based filters in your saved search, those dates will be evaluated when you execute the search later. In this way, you can easily make a saved search that finds Shows that have been recorded (based on their Event Date) within the last 30 days.
From the main Saved Searches screen, you can click the searches name in order to load it, or you can click to delete it from the system.
Saved Searches are used to populate portions of the Cablecast Public Site. You will be unable to delete any Saved Searches that are used in Public Site Galleries. A link to edit the public site will be listed below the Saved Search name. See Public Site Settings for information Public Sites.
Cleared Shows
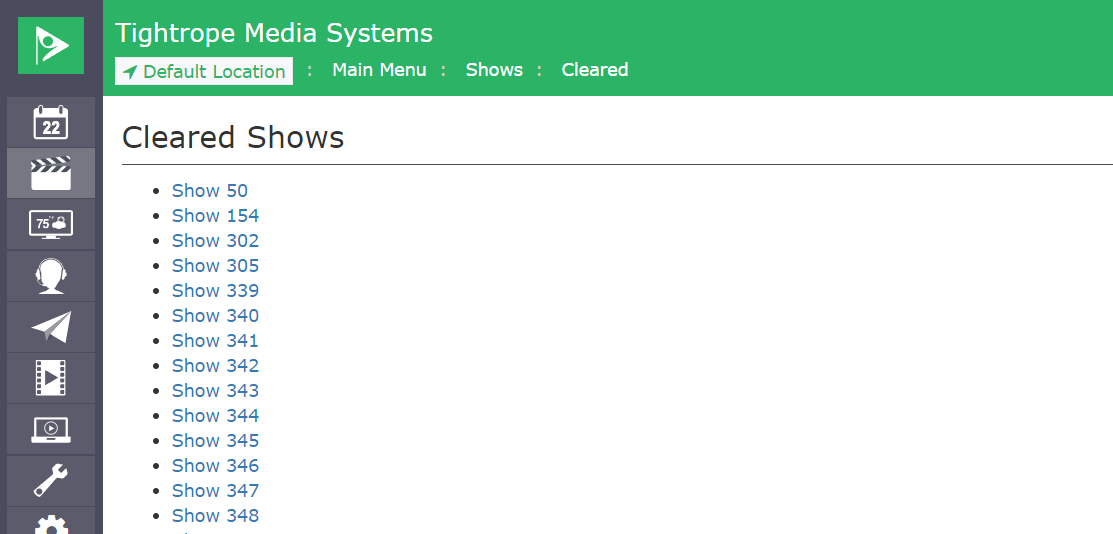
The Cleared Shows screen allows you to see a list of Shows that have been cleared by clicking the Delete button on the Show screen. These Shows can be re-used if needed.
Producers
A Producer represents a person or organization responsible for creating a Show.
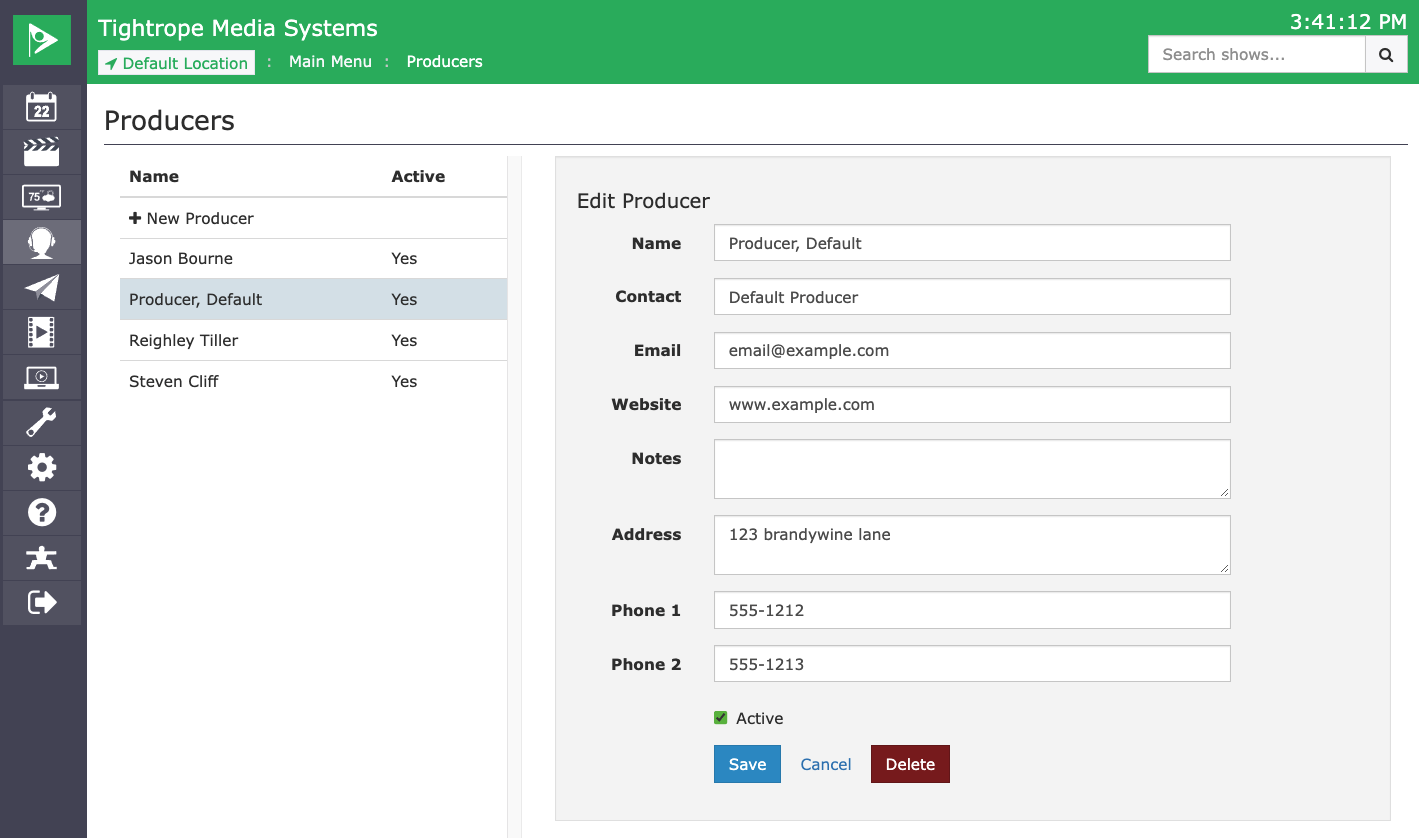
Producer Fields
The following fields make up a Producer.
| Field | Description |
|---|---|
| Name | The name of the producer or organization. |
| Contact | The name of the contact of the producer. This is useful if the producer is an organization. |
| Email address of the producer. | |
| Website | Website URL of the producer. |
| Notes | Notes about the producer. |
| Address | Mailing address of the producer. |
| Phone 1 | Primary phone number of the producer. |
| Phone 2 | Secondary phone number of the producer. |
| Active | Indicates if the producer is active or not. Shows produced by inactive producers will cause an Autopilot error if scheduled. |
Creating Producers
Creating a new producer is easy.
- At the Producers list, click
+ New Producer. - Fill out the form. The fields are described in Producer Fields.
- Click
Save.
Editing Producers
To edit an existing Producer:
- At the Producers list, click the individual you want to edit.
- Modify the fields in the the form. The fields are described in Producer Fields.
- Click
Save.
Deleting Producers
To delete an existing Producer:
- At the Producers list, click the individual you want to remove.
- Click
Delete.
Your choice to delete the producer will be confirmed. This operation cannot be undone. Click to confirm your choice and delete the producer.
Autopilot
The Autopilot menu in Cablecast is used to control the automation of your station.
Sending Autopilot
Sending Autopilot will take data from your Schedule and generate all of the events needed to automate your station.
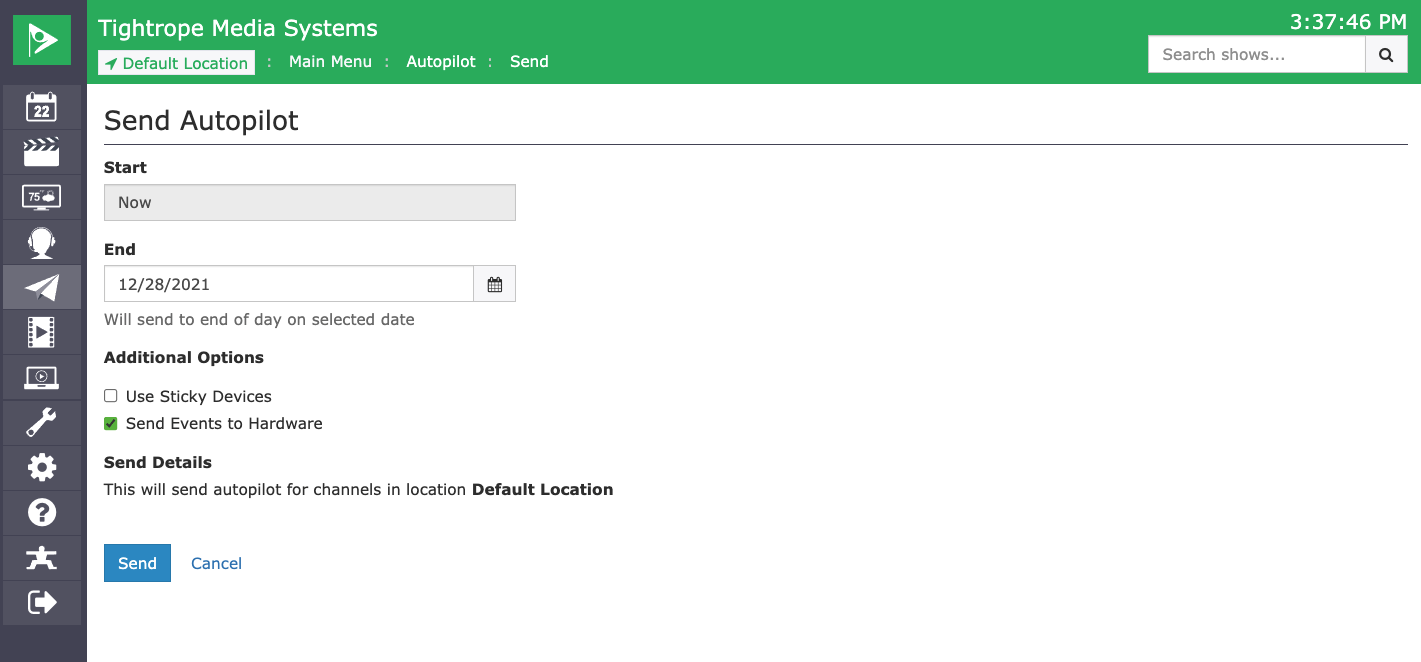
This screen has several options:
| Item | Description |
|---|---|
| 'End' Date | Sets the date and time at which Cablecast will stop generating events (Up until 11:59 PM of the selected day) |
| Use Sticky Devices | Sticky Devices will attempt to keep physical media assigned to the same devices. If you are using devices that require manual loading such as VTRs and DVD players, you should check this box. This setting has no effect on video servers. |
| Send Events To Hardware | This box should be checked for day-to-day use. If this box is not checked, Cablecast won't actually send the generated events to the devices. This is useful as a troubleshooting tool. |
| Send | Execute and start processing of the Autopilot send. |
| Cancel | Leave the screen without committing any changes. |
To Send Autopilot:
- Set the date: Cablecast will only generate events from the current time until 11:59 PM on the date that you specify here.
- Change optional checkboxes defaults (if desired)
- Click Send
You will then be taken to the report page for the autopilot in a "Queued" status. Shortly after, you should see the result of the send (can vary depending on the size of your schedule in the range you specified), along with the Autopilot send status.
Tip: If your Autopilot sends are taking a long time to process, consider reducing the size of your sends by reducing the end date, and sending autopilot more frequently. You may also want to consider checking out the Automatic Autopilot sends feature.
Send Reports
Report List
When navigating to Autopilot / Autopilot reports, you'll be presented with a list of previously sent Autopilots. This list shows the previous 30 sends of which you can see some quick information regarding each send:
- The report ID number
- Status of the send
- Date range of the computed send
- Who sent autopilot
Clicking on the Report number will bring you into the summary of that report. If a send has failed or is showing warnings, you can see the breakdown in the report itself for some insight of what may have happened to cause that status.
Report View
Upon sending autopilot, or viewing a historical send, you'll be presented with a individual report view. This will give you insight into everything related to that Autopilot send, either if you sent it just now, or had sent it a month ago.
Across the top of the report, you'll see tabs to navigate around the report: Info, Messages and Events. Click on these tabs to navigate aroaund the report sections.
Info
Info gives you some basic information about the send.
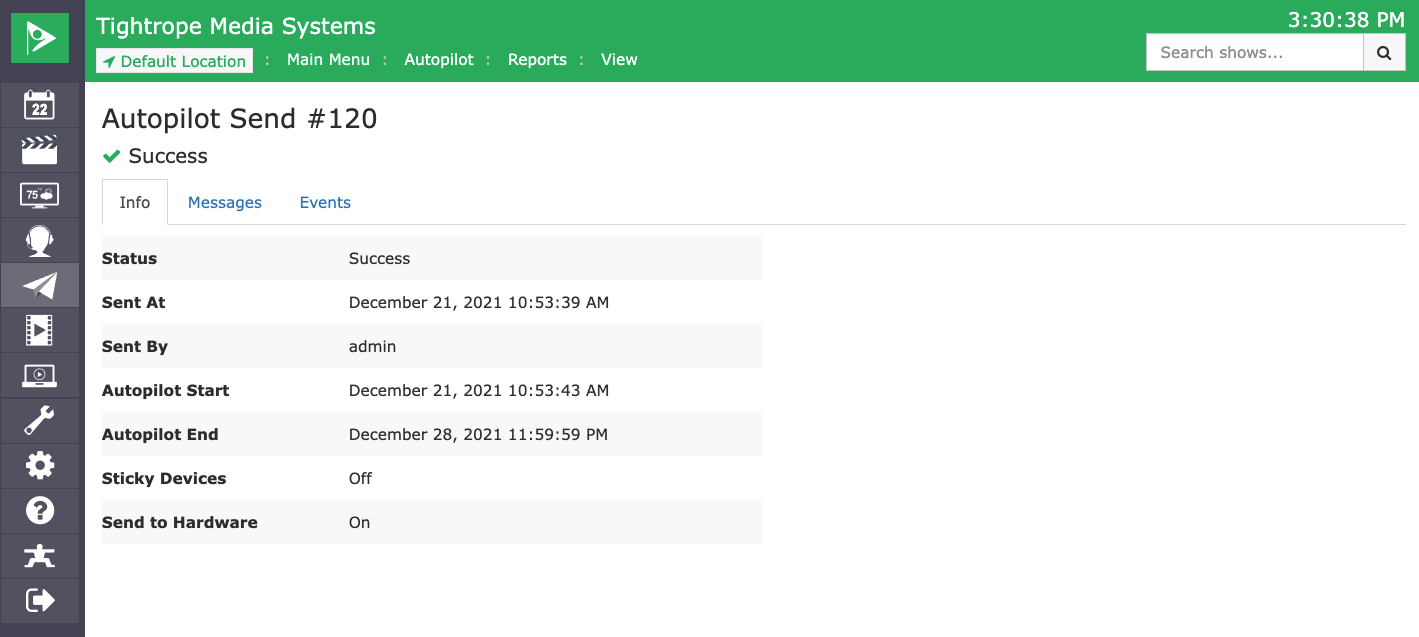
This information includes:
| Item | Description |
|---|---|
| Status | The overall status of the send (More details below). |
| Sent At | At which time the send was sent by the user for computing. |
| Sent By | The username of the individual that made the send. |
| Autopilot Start | The range of the schedule that the autopilot started computing for. |
| Autopilot End | The range of the schedule that the autopilot has computed up until. |
| Sticky Devices | If sticky devices was defined as enabled / disabled. |
| Send to hardware | If send to hardware was defined as enabled / disabled. |
Statuses
The different statuses of a send are as follows:
| Status | Description |
|---|---|
| Queued | The report has been sent, and is in the process of running. This will stick around longer with larger Autopilot sends. |
| Success with Warnings | The send finished & is valid, but with some warnings about playout / events. Server playout shouldn’t be impacted too heavily by these warnings. |
| Success with Errors | The send finished & is valid, but with some problems that will impact the playout of your schedule. It's generally a good idea to review the messages, resolve the conflicts and resend Autopilot. |
| Success | The Autopilot sent without any warnings or errors. You’re in good shape! |
| Failed | There was an issue large enough that preventing the Autopilot from sending altogether. Review the messages to determine the cause, resolve the issue, and resend Autopilot. |
Messages
The messages tab will show you more information behind various different items within your report. Generally the messages provide you information about your run that may be relevant to your interests, or prompt you about items that may need to be resolved.
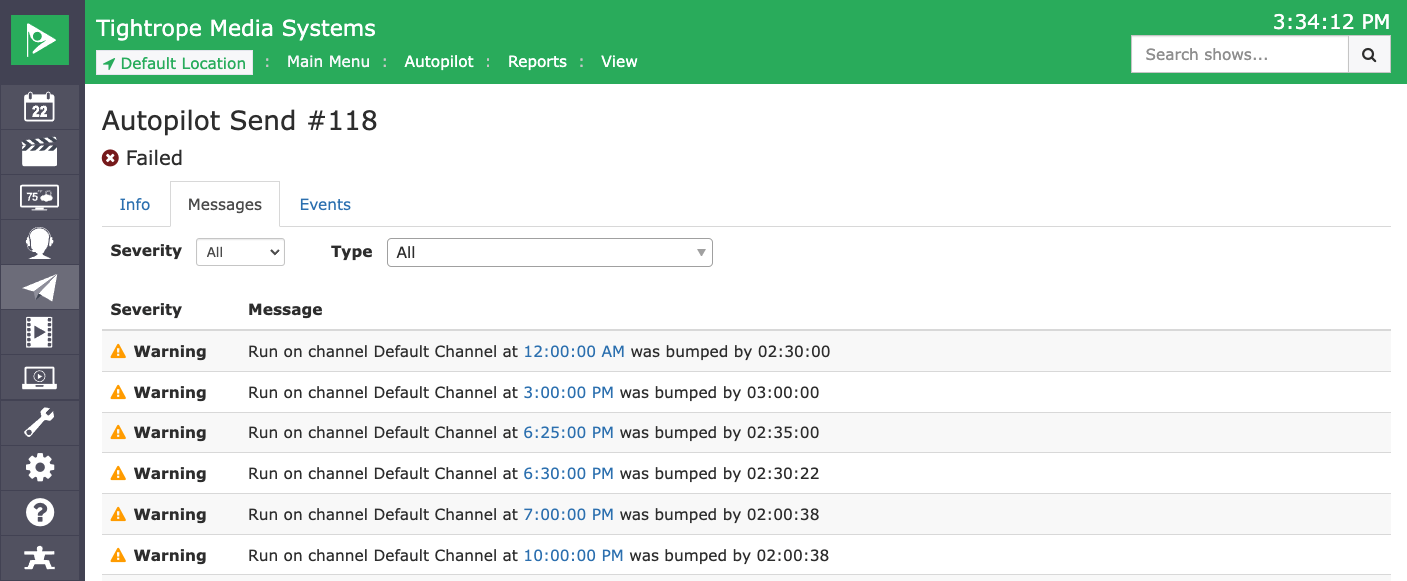
If your Autopilot report is busy with a lot of messages, you can filter down the messages to get to information you find most useful to you. The following filters are available for your use. The two filter criteria is as follows:
| Filter | Description |
|---|---|
| Severity | Sort messages depending on the Severity of the message. If the send failed, this defaults to show you only the failures. |
| Type | There are a lot of different message types in Cablecast, including things like Raid Issues, Disk space problems, Run bumps, Missing Files, etc. You can use (and search in) this dropdown to show only specific messages. |
Some Autopilot messages will even provide you with some contextual links to help you get to where you need to be to resolve the problem.
Example: A run bump will give you a timecode to jump to that location in the schedule. A show without a valid file will link you to that show record. Etc.
Events
The event table screen allows you to see the events that were generated as part of send in the report you are viewing. This screen is useful as a troubleshooting tool.
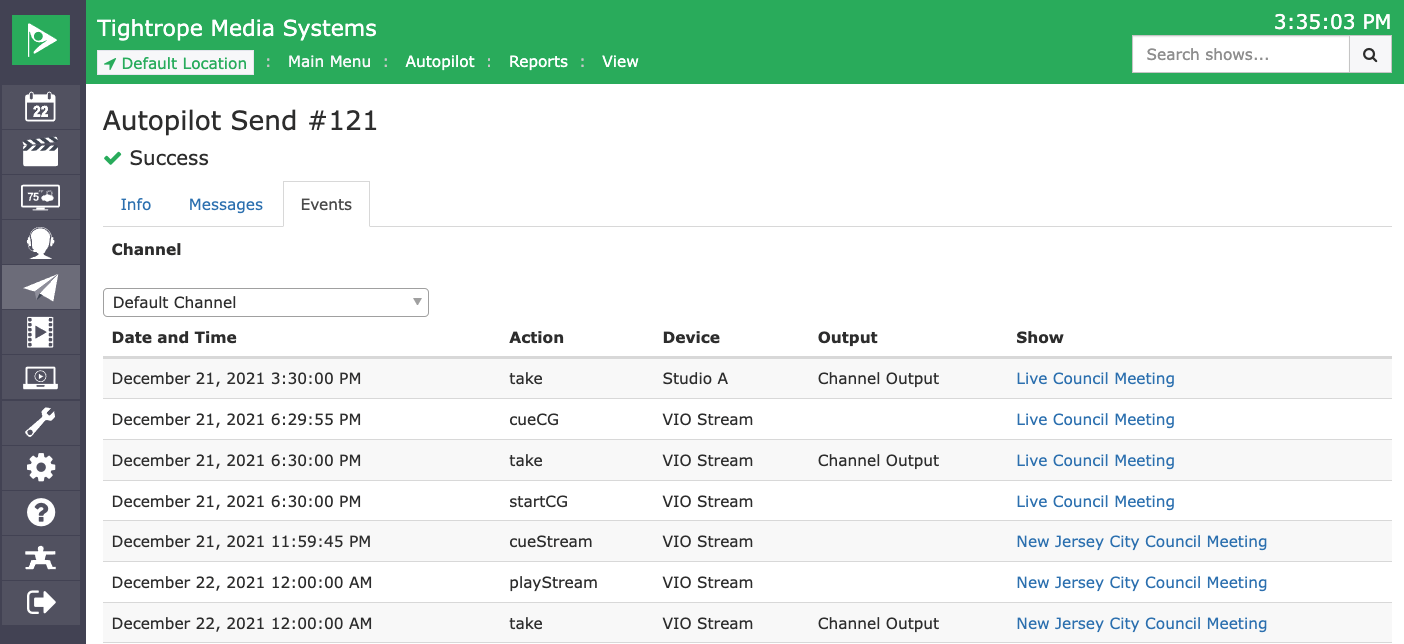
At the top of this screen, you can change the filter to show only specific events for a specific channel on your system.
This screen shows the following information:
| Item | Description |
|---|---|
| Date and Time | The time at which this event is to be executed. |
| Action | The name of the action that will be performed for this event. |
| Channel | Which channel the event is taking place on. |
| Device | Shows the name of the device that will be used for this event. |
| Output | For take Events, this column displays the name of the router output that will be used. |
| Show | The Show that generated this event. |
Force Matrix
The Force Matrix screen allows you to manually control your routing switcher as well as your playback and record devices. You can also use this screen to determine what is currently happening in real-time.
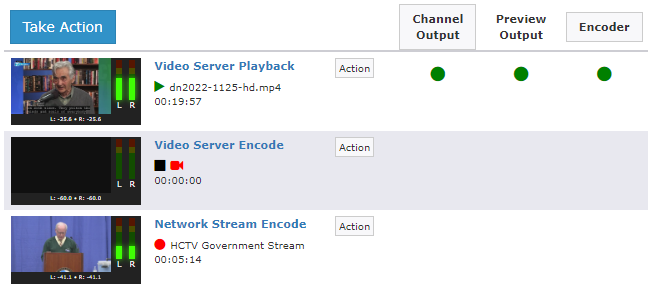
Each row in the Force Matrix screen represents a single device in your system & Each row contains the following controls:
| Control | Description |
|---|---|
| Confidence Monitor Thumbnail | If an output device on the playback server, you can see a live preview thumbnail of the output source. |
| Device Name and Status | The first column shows the user-defined name of each device as well as the status of the device. |
| Action Button | Clicking this button will open the Force Matrix action modal with the selected device pre-populated. |
| Crosspoint Buttons | One column of buttons will be shown for each router output that you have defined. A green button indicates the currently active crosspoint. Clicking a gray button will open the Force Matrix action modal with a switch pre-populated with the selected crosspoint. |
Clicking on a devices name (blue text) will show you some information in the Device Status Window.
Device Status Window
When clicking on the device name, you will see the some more information about that device, including:
- Confidence Monitor Preview
- "Patched To" destination
- Device Info
- Name
- Device Type
- Router Input
- Control Module Details
- Name
- Control Module Name
- Server Details
- Name
- Host Address
- Remote Access ID
Confidence Monitor
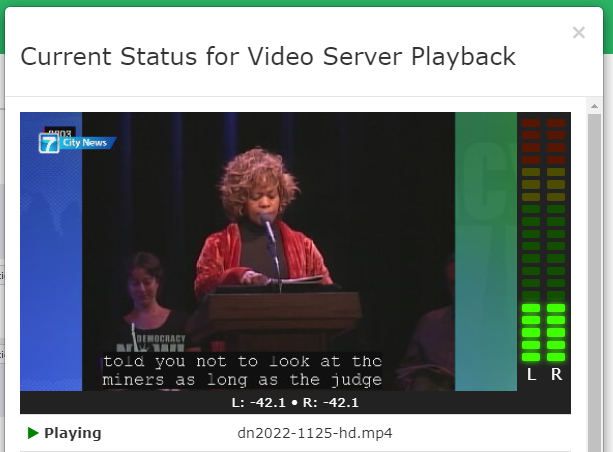
The Confidence monitor on Cablecast gives you a real-time preview of the output or input devices on the video server. Audio levels of the signal will be displayed on the bar graphs to the right of the image and the actual values will be displayed below. If available, the monitor will also show a live preview of the captions on the output.
Please note that the preview updates every 2 seconds and should only be used as basic preview of the source out of the server, and not to be used to guarantee the output to your channels / livestreams.
Action Window
There are 2 ways to open the action modal.
- Clicking
Take Actionin the upper left. - Clicking a device's
Actionbutton.
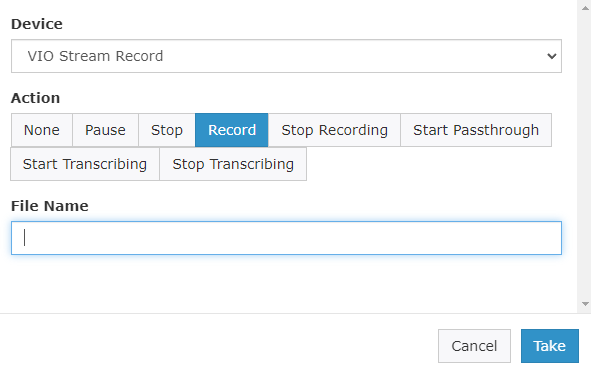
The action window can be used to send a command to a device, have the router perform a switch, or both. Once the window is open fill out the form and click Take to perform the action. The field(s) of the window are described below.
| Fields | Description |
|---|---|
| Device | The device the command will be sent to. |
| Action | The command to send to the device if device supports actions. |
| File Name | The filename of the media to be played. |
| Output | Selects an Output for Start Passthrough action. |
| IP Stream Name | The network stream to be played. Select New to create a new Network Stream. |
| Source Language | For Transcribing action, selects the sources language being live captioned. |
| Translate Language | For Transcribing action, selects the language to live translate to. |
| Switch To | The destination Output for a switch command. Leave blank to perform an action only. |
Actions
The following actions can be taken, depending on the device:
| Actions | Devices | Description |
|---|---|---|
| Play | Output | Play a specific file out on the selected device, as specified by its File Key. |
| Play Stream | Output | The network stream to play or record, if controlling a compatible video server. Optionally, a new network stream can be created. |
| Stop | Output | Stop the source playout on the selected device. |
| Start RTMP Output | Output | Start sending the selected device's output to a Network Stream Destination. |
| Stop RTMP Output | Output | Stop one or all active Network Stream Destination outputs. |
| Play CG | Output (W/ CG) | If the device is equipped with CablecastCG, Play the CG Channel on that device. |
| Record | Encoder | Record the current source going through the encoder, with the specified filekey as filename. |
| Stop Recording | Encoder | Stop the recording event currently set on the encoder. |
| Start Passthrough | Encoder | Start passthrough from this encoder to the specified output device. |
| Start Transcribing | Encoder | Start a live captioning transcription or translation on the encoder device. |
| Stop Transcribing | Encoder | Stop the live captioning transcription or translation on the encoder device. |
Override and Resume
Each router output that is defined as a channel will offer the option to Override and Resume automation.
Clicking the channel's name will place the specified channel into Automation Override mode. While in this mode, the channel's router output will skip any scheduled Take events.
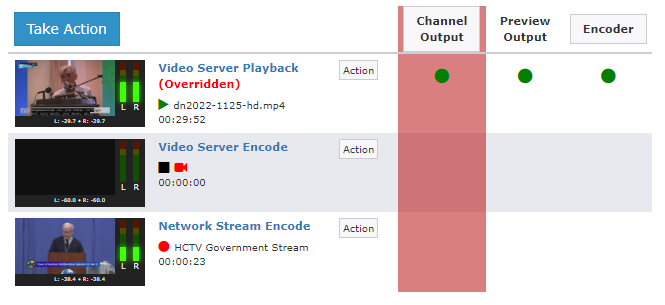
While the channel is overridden, the playback schedule will continue to operate normally but the routing switcher won't switch to new sources. In this way, when the live event is finished, you can seamlessly switch back to the originally scheduled programming already in progress.
Clicking the channel's name again for a channel that is currently in Automation Override mode will show the following screen:
| Item | Description |
|---|---|
| Execute Last Switch | Tick this box if you would like the routing switcher to automatically switch to the programming that was originally scheduled to be on-air now. |
| Enable Crawl | Tick this box to enable the crawl defined in the field. |
| Crawl Text | Set the text that should be displayed if is ticked. |
| Crawl Duration | Set the length of time for which you would like to run the crawl defined in . The default is (two minutes). |
Simple Mode
On large systems with lots of devices and outputs, the amount of cross-points can be cumbersome to work with. Use simple mode to display the devices and outputs side by side. All of the same status information and control options are available. To activate simple mode, click on the toggle (three lines button) in the lower right of the page.
Control Rooms
Control Rooms mimic the Force Matrix but scope down your devices to the Control Room or Schedule Event level for easier operation.
See Location Settings for information on how to create and configure a Control Room.

Change Event
The topmost dropdown allows you to scope the Control Room to the devices used by a Schedule Event. Select an event from the dropdown to pull in any additional devices. The status bar will now display the event's scheduled start time with a Time Until Live counter.
Actions
The Actions dropdown displays the list of Macros available in the Control Room. Select one to fire the action.
Change Control Rooms
The dropdown next to the Control Room's name shows you a list of Control Rooms you can access. Select one from this dropdown to swap into that Control Room.
Network Broadcast Events
Selecting a Network Broadcast Event from the Event dropdown will give you an additional action button to manually Start or Stop device output and Start or Stop social streaming if an issue arises. These are for manual intervention only. An Autopilot send will allow Cablecast to perform the necessary Start and Stop commands automatically with the Network Stream Destination.
Assets
An Asset represents a file within a file store that can be associated with differnt types of content. Content that can be represented as an asset includes things like:
- Video Files
- Video On Demand Content
- Agenda Files
- Thumbnails
Cablecast will index digital files in order to ensure they are compatible and play without errors. New and existing File Stores can be managed within File Stores of the System Settings screen.
Navigating Assets UI
Across the "Assets" screen, you'll see some options for navigating around your different assets across your system.
| Item | Description |
|---|---|
| File Store Dropdown | Lets you view files within a specific File Store. Defaults to showing "All" content across all file stores. |
| Page Selector | If the store you're viewing has a lot of content, it'll paginate the content across multiple pages. This element is used to change pages. |
| Search | If you're looking for specific content, you can use this search to seek specific files. |
Searching for Assets
Right above the details panel, you'll see a search box showing "Search all assets...". When text is entered into this search box and "Search" is clicked (or Enter is pressed), a search will be conducted on the currently selected file store. To clear search criteria, you can click "Clear" to the right of the "Search" button.
Assets List View
On the left of the screen, You'll see the list view of assets, pertaining to your filtering / searching criteria. If nothing is in the search box and you have "All" selected for File Store, all assets on your Cablecast system will be visible here. Clicking on an asset will show more information on the "Detail Panel" to the right.
When new files are added to a pre-configured File Store, you'll see those assets appear here in this list.
The following information is shown for an asset:
- Name: First and foremost will be the name/path of the asset.
- Stores: The file stores this file exists on. This can be a mix of local stores, network stores or cloud based stores. The color of the store gives some information about the file status on that associated store:
- Green: The asset is available for use.
- Orange: The asset is missing from the store.
- Grey: Deleted from the store.
- File Size: The size of the file on the store(s)
- Status (Playback files only): A badge with the playback status of the playback-file will be shown. Different statuses are Valid, Processing, invalid, and unlinked.
Assets Detail Panel
On the right side of the screen, you'll be presented with the detail panel for the selected asset. This will show information about the asset, as well as present you with different actions to interact with the selected asset. At the top of this detail panel will show you the name of the asset, along with some other elements:
| Item | Description |
|---|---|
| Actions | Clicking this drop-down will present you with several different actions involving this selected asset. Such as copying, moving, deleting, reindexing, to name a few. |
| Details Tab | The details tab will show you additional meta information about the selected file. Such as filename, length, file-size, etc |
| Related Tab | The related tab will show you additional information about the various other records on the system this asset belongs to, such as show records, video on demand, and more. |
| Log Tab | The log tab gives more information about historical system and/or user involvement with this asset. |
Actions
At the top of the details panel will be a "Actions" drop down, which presents you with various actions you can take.
| Action | Description |
|---|---|
| Copy | Clicking will give you options for copying the asset between configured File Stores. |
| Move | Clicking will give you options for moving the asset between configured File Stores |
| Delete | Clicking will permanently delete the digital file from the video server. |
| Reindex | When a file is reindexed the video server will re-run its indexing and compatibility checks. This should be done if a file is believed to be incorrectly marked as invalid. This may happen because the file was indexed before it was fully copied to the video server. |
| New Show | Clicking will create a new Show Record with the being set to the name of the file that is ready to schedule. |
| Manage Captions | Manage parameters pertaining to automatic captions of this file. |
Details Tab
The details tab will show you additional metadata about the selected asset (if available). This information includes:
| Metadata | Description | Example |
|---|---|---|
| File Name | The actual file name of the file on the system. | meeting.mp4 |
| Path | The absoute path of the file on the system. | E:\meeting.mp4 |
| Length | The length of the file in HH:MM:SS format. | 00:35:50 |
| File Size | The size of the file on the disk. | 430 MB |
| Codec | Which codec the file is. | h.264 |
| Frame Rate | The framerate of the video file. | 29.95 |
| Frame Size | The frame size of the video file. | 1920x1080 |
| Aspect Ratio | The aspect ratio of the video file. | 16:9 |
| Bit Rate | Bit rate refers to the number of bits used per second to represent a continuous medium such as audio or video after source coding (data compression) | 5.41 Mb/s |
| Sample Rate | The sampling rate refers to the number of samples of audio recorded every second for the file. | 48 kHz |
| Closed Captions | If closed captioning was detected for this file, either embedded or a side-car file. | |
| Created | The date the file was created. | Wednesday, January 26, 2022 1:28:41 AM |
| Modified | The date the file was last modified. | Wednesday, January 26, 2022 1:28:41 AM |
| Media Info Export | Clicking "Open" will show raw and additional metadata about the file. Useful for debugging and troubleshooting issues. | |
| File Stores | Which File Stores this asset belongs to. |
Related Tab
The related tab will show you different other records that this asset belongs to. Such as a show record, or a video on demand.
Log Tab
The log tab will show you different logs involving this file. Such as its discovery date/time, when actions were taken against it, and other logged information involving the asset.
Internet Video
The Internet Video screen brings together all of the tools and features for delivering content online, whether through live broadcasts, on-demand libraries, or managed distribution. Each option is covered in detail in its dedicated section:
- Internet Channels
- Livestreaming
- Video On Demand
- Chapter Live Events
- Reflect Plus Content
- Reflect CDN
- Manage Member Access
- Pay to Download
These features allow you to publish live or recorded programming, organize event-based content, expand reach through Reflect services, and control viewer access for a secure, tailored online video experience.
Internet Channels
This screen allows you to configure the Cablecast Public Site. The Public Site is a ready-made website for your station that includes schedule information, VOD playback and the ability to view live streams.
List of Internet Channels
When you open Internet Channels, you’ll see all channels configured on your system.
Each channel offers the following actions:
- View Site — Preview and browse the Internet Channel.
- Edit — Update channel settings and criteria.
- Delete — Remove the Internet Channel (shows/videos are not deleted). This action cannot be undone.
Use New Site at the top of the page to create a channel and open its edit screen.
Configuration / Settings
Header
- Site Name — Appears in the browser tab and search results.
- Header Logo — Recommended size: 400 × 75 px.
- Social Media Logo — Square logo used for sharing and in the channel index (falls back to the header logo if not provided).
Channel
Associate a linear (physical) channel with this Internet Channel.
Site Content
Limit items and search results to specific collections—ideal for including, for example, meetings and sports while excluding other materials. Site Content is powered by Saved Searches. You can define multiple items to cover a wider range.
- Content Downloads — Allow users to download video files from your Internet Channel.
Create a Site Content item
- Click New.
- Select a Saved Search.
- Set Number of Shows (use
0for unlimited). - Click OK.
Edit a Site Content item
- Locate the item.
- Click Edit.
Delete a Site Content item
- Locate the item.
- Click Remove.
VOD Playback
Configure viewer controls for on-demand videos.
- Skip Buttons Enabled — Allow viewers to skip forward during playback.
- Skip Button Duration — Choose the skip interval (e.g., 30 seconds).
- Playback Rates Enabled — Allow viewers to change playback speed.
Member Restrictions
Define whether browsing the site or viewing live streams requires a membership.
- Require Membership — Restrict access to the entire site to logged-in members.
- Live Stream Requires Membership — Restrict access to live streams to logged-in members.
Monetization
Configure optional revenue features for your Internet Channel.
- Pay to Download — Enable to show a Download button next to Shows that have a Price configured.
- Donations — Enable to show a Donate Now button in the Internet Channel header.
Colors
- Banner Color — Color of the top banner.
- Background Color — Page background color.
- Gradient Color — Top-of-page gradient that fades to white.
- Primary Button Color — Used for search buttons.
- Secondary Button Color — Used for watch buttons.
- Body Button Color — Applied to interactive elements (tab buttons, display toggles, chapter indicators).
Galleries
Create a gallery
- Click New.
- Complete the gallery fields as they should appear on the public site.
Edit a gallery
- Click Edit.
- Update the fields and save.
Delete a gallery
- Click Remove.
Gallery Fields
- Title — Displayed gallery title.
- Description — Shown on the gallery page.
- Display on Home Page — Show/hide the gallery on the home page.
- Content Type — Show (list of shows) or Gallery (nested galleries).
- Display Type — Grid or Table default layout.
- Saved Search — Source for shows (see Saved Searches).
- Max Number of Shows — Limit the number shown on the home page.
- Thumbnail — Image shown on the gallery page.
Home Page
- Slideshow Search — Saved search used to populate the slideshow.
- Galleries — Use site galleries to organize shows on the home page. If none are created, a default “Recent Shows” gallery is displayed.
Overlay fields when creating or editing a gallery:
- Title — Gallery title on the public site.
- Saved Search — Source for gallery shows (see Saved Searches).
- Maximum Number of Shows in Gallery — Home-page limit for the gallery.
Show Fields
Control which show properties appear on the show details page. Reorder fields with the drag handle. Use Add to create a field, and Edit/Delete to modify or remove it.
- Label — The field’s display label.
- Field — Show property to display. Choose Custom Field to use a custom value.
- Custom Field — Select which custom field to show (when applicable).
- Display — How the value is presented.
Contact Info
- Email — Viewer contact email (leave blank to hide).
- Phone — Viewer contact phone (leave blank to hide).
- Blog URL — Station blog URL (leave blank to hide).
- Facebook Page — Station Facebook page (leave blank to hide).
- Twitter Handle — Station Twitter handle (leave blank to hide).
Footer
- Channel Index — Show this channel in the site’s channel list.
- Footer Title — Footer section heading text.
- Site Description — Footer content (HTML or text).
Metrics
Embed your Google Analytics ID to collect visitor statistics (format typically begins with UA-).
Custom CSS
Add custom CSS to further style the Public Site. Changes apply to this Internet Channel only.
Livestreaming
A represents a single channel that can be viewed in real time using the internet. The screen within can be used for viewing the Live Stream, obtaining embed codes, and starting / stopping the stream. For configuring Live Streams see Live Streaming section in the Location Settings chapter.
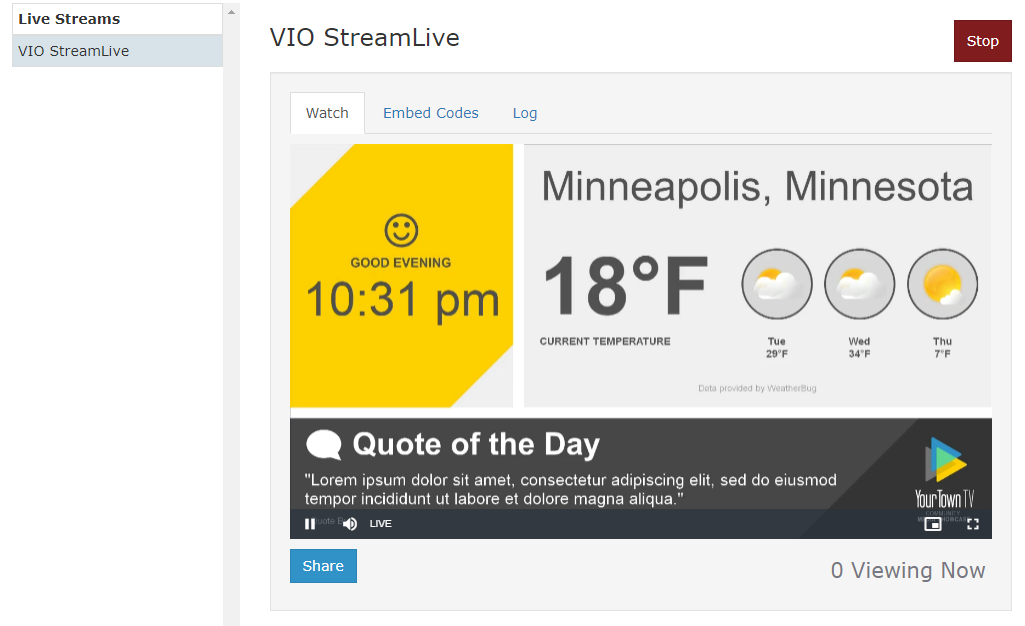
Clicking on the name of a stream in the list on the left side of the screen will display that stream's details on the right side of the screen. The stream details has three tabs available, each of which is described below.
| Item | Description |
|---|---|
| Watch | Will load the Live Stream Player. Click the Play button in the video player to watch the stream. |
| Embed | Displays the embed code that can be copied and pasted to embed the Live Stream Player in another website. |
| Log | Displays logs about when the stream has been started and stopped, and by what user. |
Starting and Stopping
A button is located in the top right of a Live Streams detail screen that can be used to / the stream depending on its current state. The button will be red and read when the Live Stream is currently streaming. The button will be blue and read when the Live Stream is currently stopped. Clicking / will change the state of the stream.
Video On Demand
A represents a single Show that can be viewed at any time using the internet. The screen within can be used for viewing VODs, obtaining embed codes, monitoring progress, and queuing for re-transcoding. For configuring Video On Demand see Video On Demand section in the Location Settings chapter.
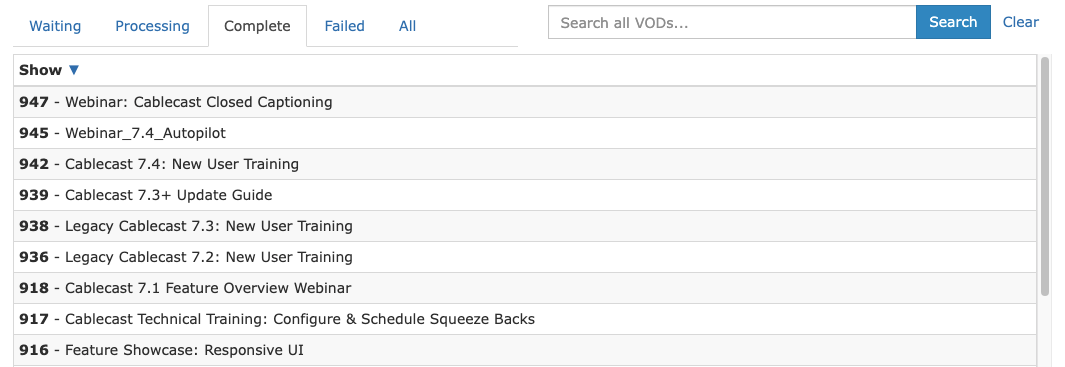
Filtering Tabs
Cablecast organizes VODs into one of the following five categories.
- Waiting: VODs that cannot be transcoded because there are missing files, or the Show Reels are not properly timed. User action is required for these VODs to be transcoded.
- Processing: VODs that are currently in some stage of the VOD process. These VODs will eventually enter the tab once finished.
- Complete: Finished VODs that are available for viewing.
- Failed: VODs that have failed a stage of the VOD process.
- All: All VOD files regardless of status / category.
The tabs at the top of the VODs screen allow filtering the VODs by any of the above categories. In addition the tab allows displaying all VODs available on the system.
Search
The input allows for searching for specific words from the Show of the associated VOD. When performing a VODs search the will switch to a list of results. Clicking on any of the other tabs will filter the search results to just VODs in that state. Click to reset the search filter.
Details
Clicking on any VOD will display the details for that VOD. What is displayed in the details section will depend on the state of the VOD. The information displayed is described below for different VOD states.
- Waiting: The VOD details screen will display a tab showing the status of each Reel that is preventing the VOD from being transcoded.
- Processing: The VOD details screen will display the progress of the current transcode step.
- Completed: The VOD details screen will allow watching, assigning chapters, obtaining embed codes, and viewing the VOD logs.
- Failed: The VOD details screen will show the VOD logs.
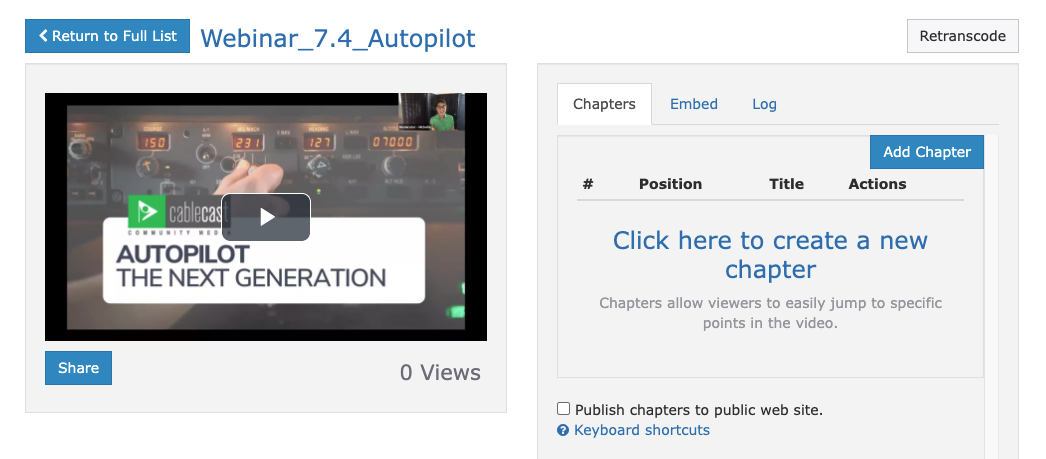
On the left side of the VOD Details screen, you'll see a player preview of the VOD, with the ability to play the VOD content. Beneath the player is some additional content:
- Share Button: Clicking this will show the "Share Dialog" that allows quick sharing to social media channels.
- View Counter: This counter will show the total number of Video On Demand views.
- A view is determined by the webplayer and if the video was played.
- Views only via the web player embed will increment the view counter.
- Example: A video embededed on the public site, external website or social media will increment the view counter. Views via OTT applications will not increment the view counter.
A completed VOD has several tabs which are described below.
- Reel Status: Shows the status of the digital file reels if there is an issue.
- If there are no problems with the digital file reels, this tab will not appear.
- Agenda:
- Chapters: Displays the embedded chapter interface. You can , , and get a to each created chapter. Click the button to add a new chapter to the VOD. From the window that appears, you can add a for the chapter, with chapter details, and the of the start of the chapter.
- Embed Code: Displays the embed codes that can be copied and pasted into other websites to embed the VOD.
- Log: Displays the VOD logs that show all the state transactions during VOD processing.
Retranscode & Retry
Depending on the state of the VOD, a button might be displayed in the upper left section of the VOD details area. These buttons are described below.
- Retranscode: Displayed on VODs. Clicking queues the VOD for re-transcoding. This is especially useful if the original source material of the VOD has changed.
- Retry: Displayed on VODs. Clicking queues the VOD for re-transcoding.
VOD Live Chaptering
The VOD Live Chaptering interface aids chaptering of live events through agenda preparation and real-time chapter editing features.
Agenda
The agenda feature enables quick creation of chapters and a convenient way to mark chapter times during a live event.
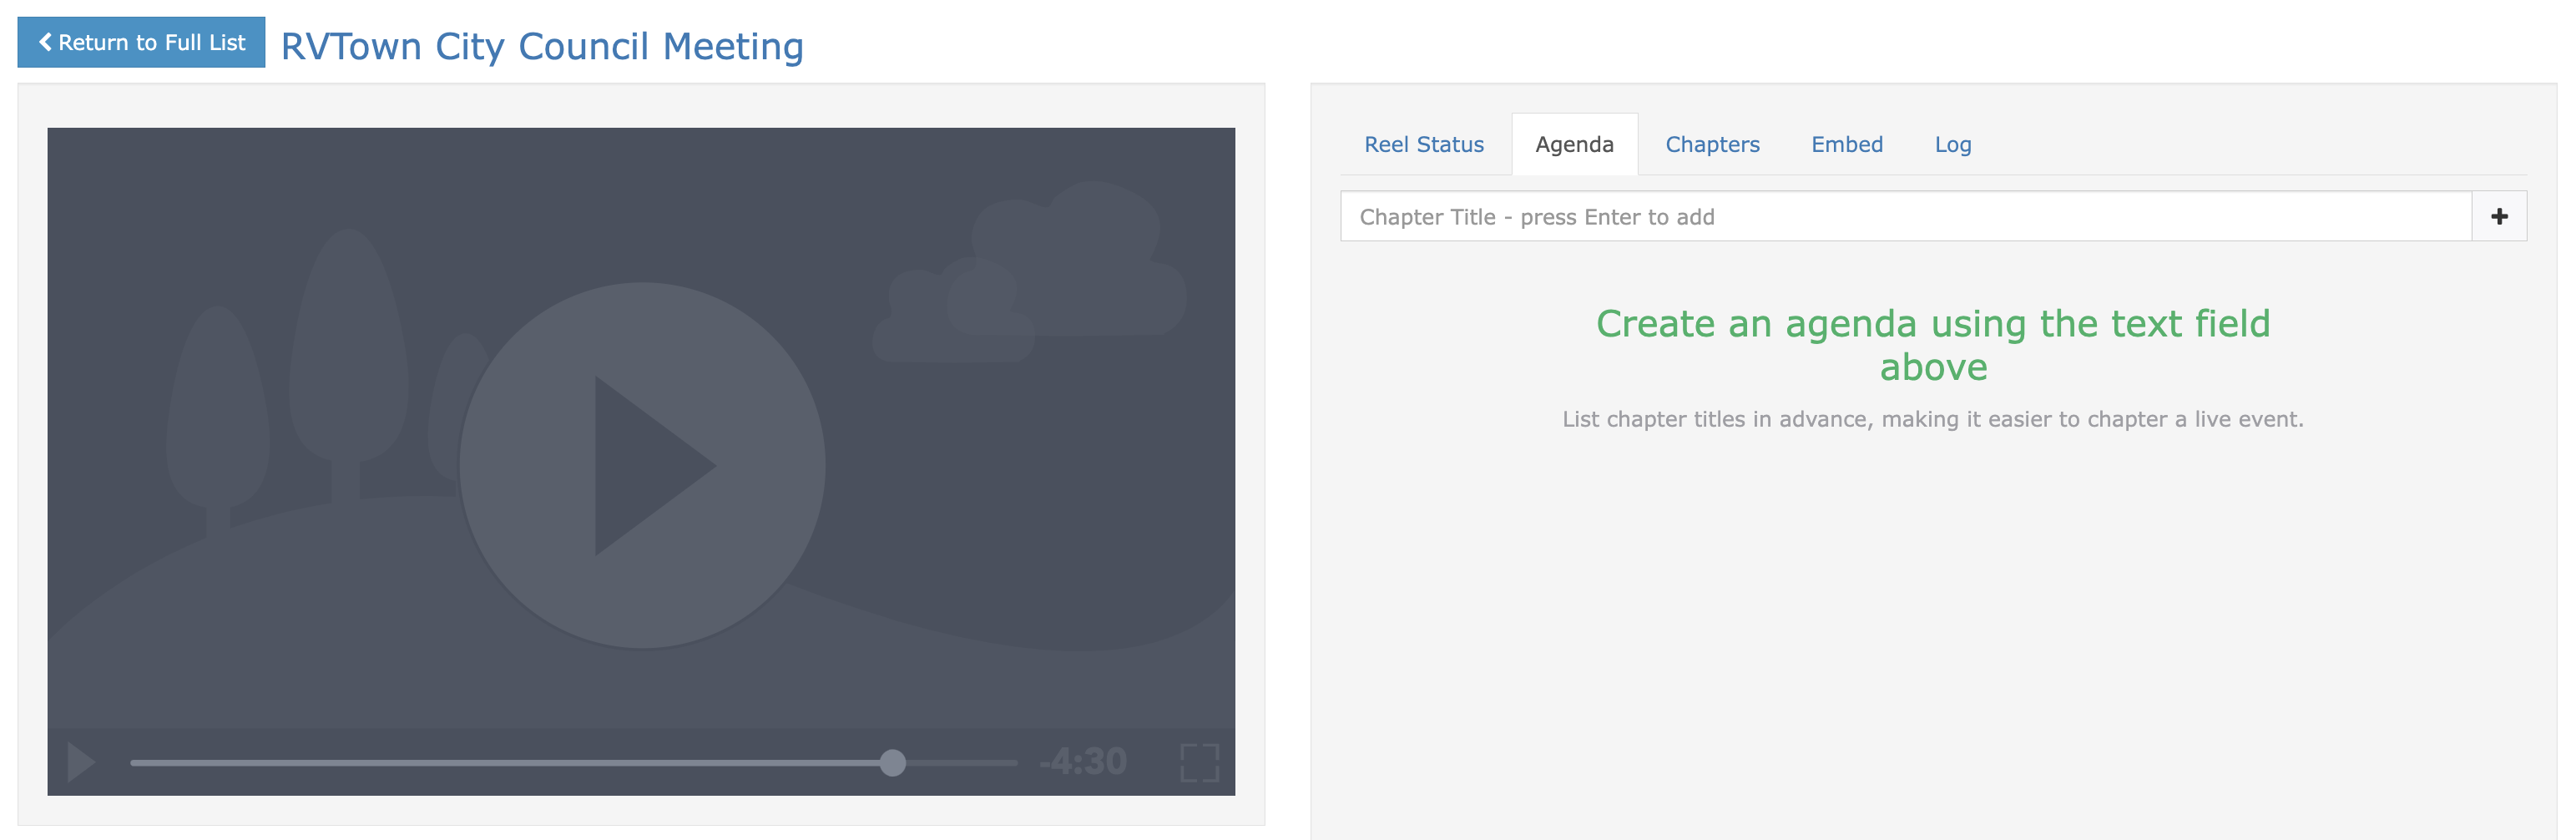
- Chapter With Livestream: Displays the livestream. If the VOD has a scheduled show time, the chaptering clock will sync with the show's start time. Otherwise, the chaptering clock will start immediately.
- Chapter In Person: Opens the live chaptering interface without starting the livestream. If the VOD has a scheduled show time, the chaptering clock will sync with the show's start time. Otherwise, the chaptering clock will start immediately.
- End Chaptering: Ends the chaptering session and stops the clock.
- New Chapter Field: Via the input field, users can quickly create new chapters without using the mouse. Chapters on the agenda list do not have a time until marked during the live event.
- Mark: Disabled unless the clock is running. Click to set the chapter's position to the current clock time.
- Annotate: Write operator notes for later review.
- Annotations are only visible internally, and are not externally visible.
Agenda Link Integration
Agenda Link integration (if enabled) can be managed here for linking content to Agenda Link items.
This feature requires it to be configured in Integrations via System Settings.

Once configured and linked via the show record, You'll see some options available:
- Pull Chapters
- Push Chapters
- Publish chapters to public web site.
Pushing & Pulling Agenda Link Chapters
Clicking on Pull Chapters or Push Chapters will prompt with a confirmation window at the top of the screen upon success (or failure) of the action:
- Pull Chapters: Will pull the meeting items from Agenda Link and attach them as Cablecast Chapters to the VOD
- Push Chapters: Will overwrite the Agenda Link meeting items with the VOD's Cablecast Chapters
Chapter Drafts
Drafts allow chapters to be reviewed and edited before being published to the public site. Any VODs with unpublished chapters will be visible in a list on the index screen.
Chapter Live Events
You dont need to write down timecodes or do all the work in post-production. You can create chapters in realtime during a live meeting,sports game or any other programming content that you'd like to add chapters to.
Main Screen
When you first visit the chaptering page, you'll be presetned with a list of content that is availble for chaptering.
- Name of the Show
- Run Date/Time of Show
- Channel of the show to be chaptered
- Chaptering Button
Chaptering Content
The "agenda" feature enables quick creation of chapters and a convenient way to mark chapter times during a live event. To learn about chaptering content, refer to the Chaptering Section of the manual.
Reflect Plus Content
Cablecast Reflect Plus is offered as an optional service with pricing based on tiered storage capacities. The original Cablecast Reflect service continues to be available for media organizations who want the scalable delivery advantages of the Reflect CDN but prefer the economics of on-premises storage.
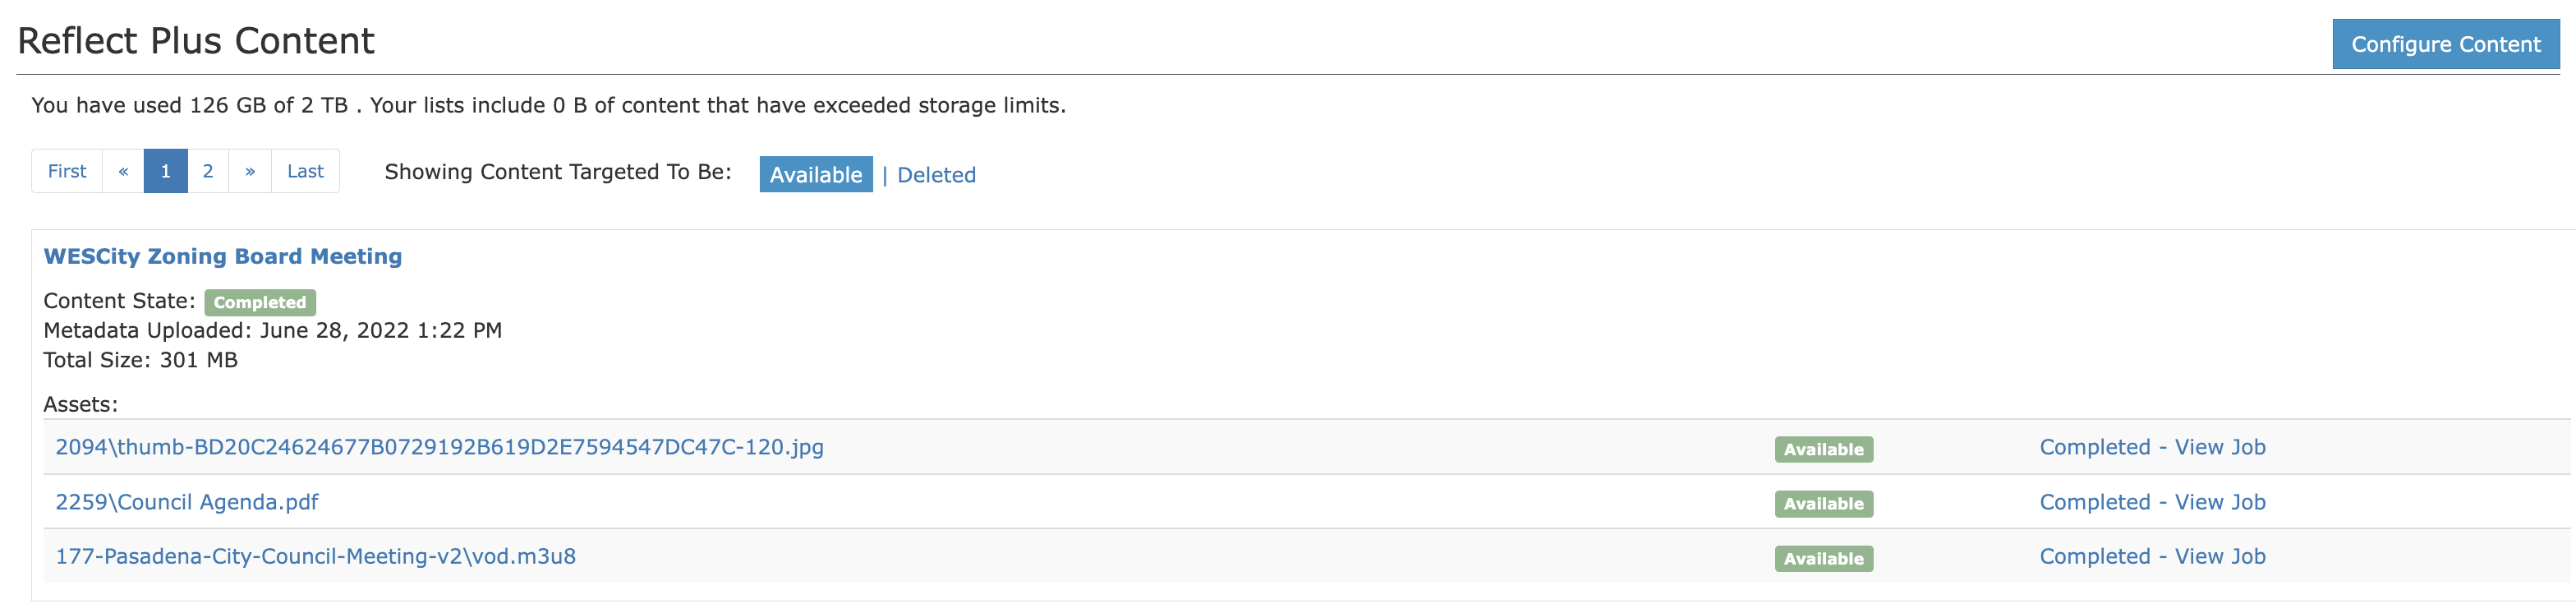
Reviewing Reflect Plus Content
When navigating to the Reflect Plus Content page of "Internet Video", you'll be presented with a list of items that are configured to use the Reflect Plus system.
At the top of the list of content, you can change which page of content you are viewing with the pagination controls. You can also toggle between the filtering of content with Available and Deleted.
Each item of content here presents you with the following information:
- Show Title
- Metadata Upload Date
- Total filesize
- Assets included with show:
- Asset Filename (and location)
- Reflect Plus Asset Status
- Server Job Status
You can click on the "Show Title" to see information about that show. You can click on the filepath of an asset to view more information about that asset and other locations it exists. You can also click on the "Server Job" status link to see more information about the job handling the Reflect Plus content move.
Configuring Content for Reflect Plus
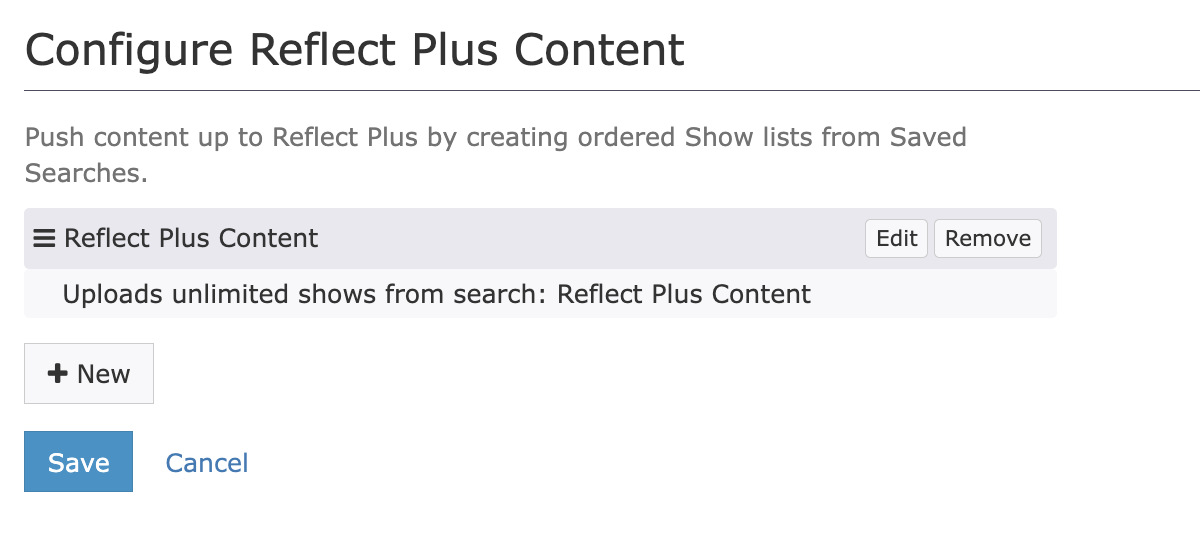
On the top right of the page, click on Configure Content. From here, you can configure new content, or existing content for use with Reflect Plus.
To Add Content:
- Click
New - Select a Saved Search to use
- Define Max Shows to honor this rule set (Use zero for no limit)
- Click
Okto save.
To Modify Content:
- Find the content rule you want to modify, and click
Edit - Change your criteria
- Click
Okto save and commit your changes.
To Delete Content:
- Find the content rule you want to remove, and click
Remove.
This will not remove content from your local server. This will only remove the content from the Reflect Plus cloud storage.
Reflect CDN
What is Cablecast "Reflect" CDN?
Cablecast Reflect is tightly integrated with the Cablecast SX, Flex and VIO video servers as well as the Cablecast VOD and Cablecast Live Cablecast servers. For organizations with bandwidth restrictions or those who anticipate a high volume of streaming viewership, Cablecast Reflect caches Cablecast Live & VOD content in the cloud to meet bandwidth demands and provide smooth adaptive bit-rate playback on all devices.
Cablecast Live and Cablecast VOD support both standard definition and high definition content.
A Cablecast VOD and / or Live Streaming Encoder is required to use Cablecast Reflect. Cablecast Reflect does not replace on-site hardware.
Configuring Reflect CDN
If you're subscribing to the Cablecast Reflect CDN service, you can toggle the state of this server on / off here.
- Reflect CDN Enabled (Enabled / Disabled)
- Reflect Base URL (If Enabled)
For help configuring this feature, you may reach out to cablecast support.
Manage Member Access
The Manage Member Access screen provides controls for restricting or granting access to your online video content. It is divided into two tabs, each with distinct settings and tools.
General Settings
The General Settings tab controls how membership access is applied across your Internet Channel content. This is where you enable membership restrictions, define which content requires access, and configure payment integration.
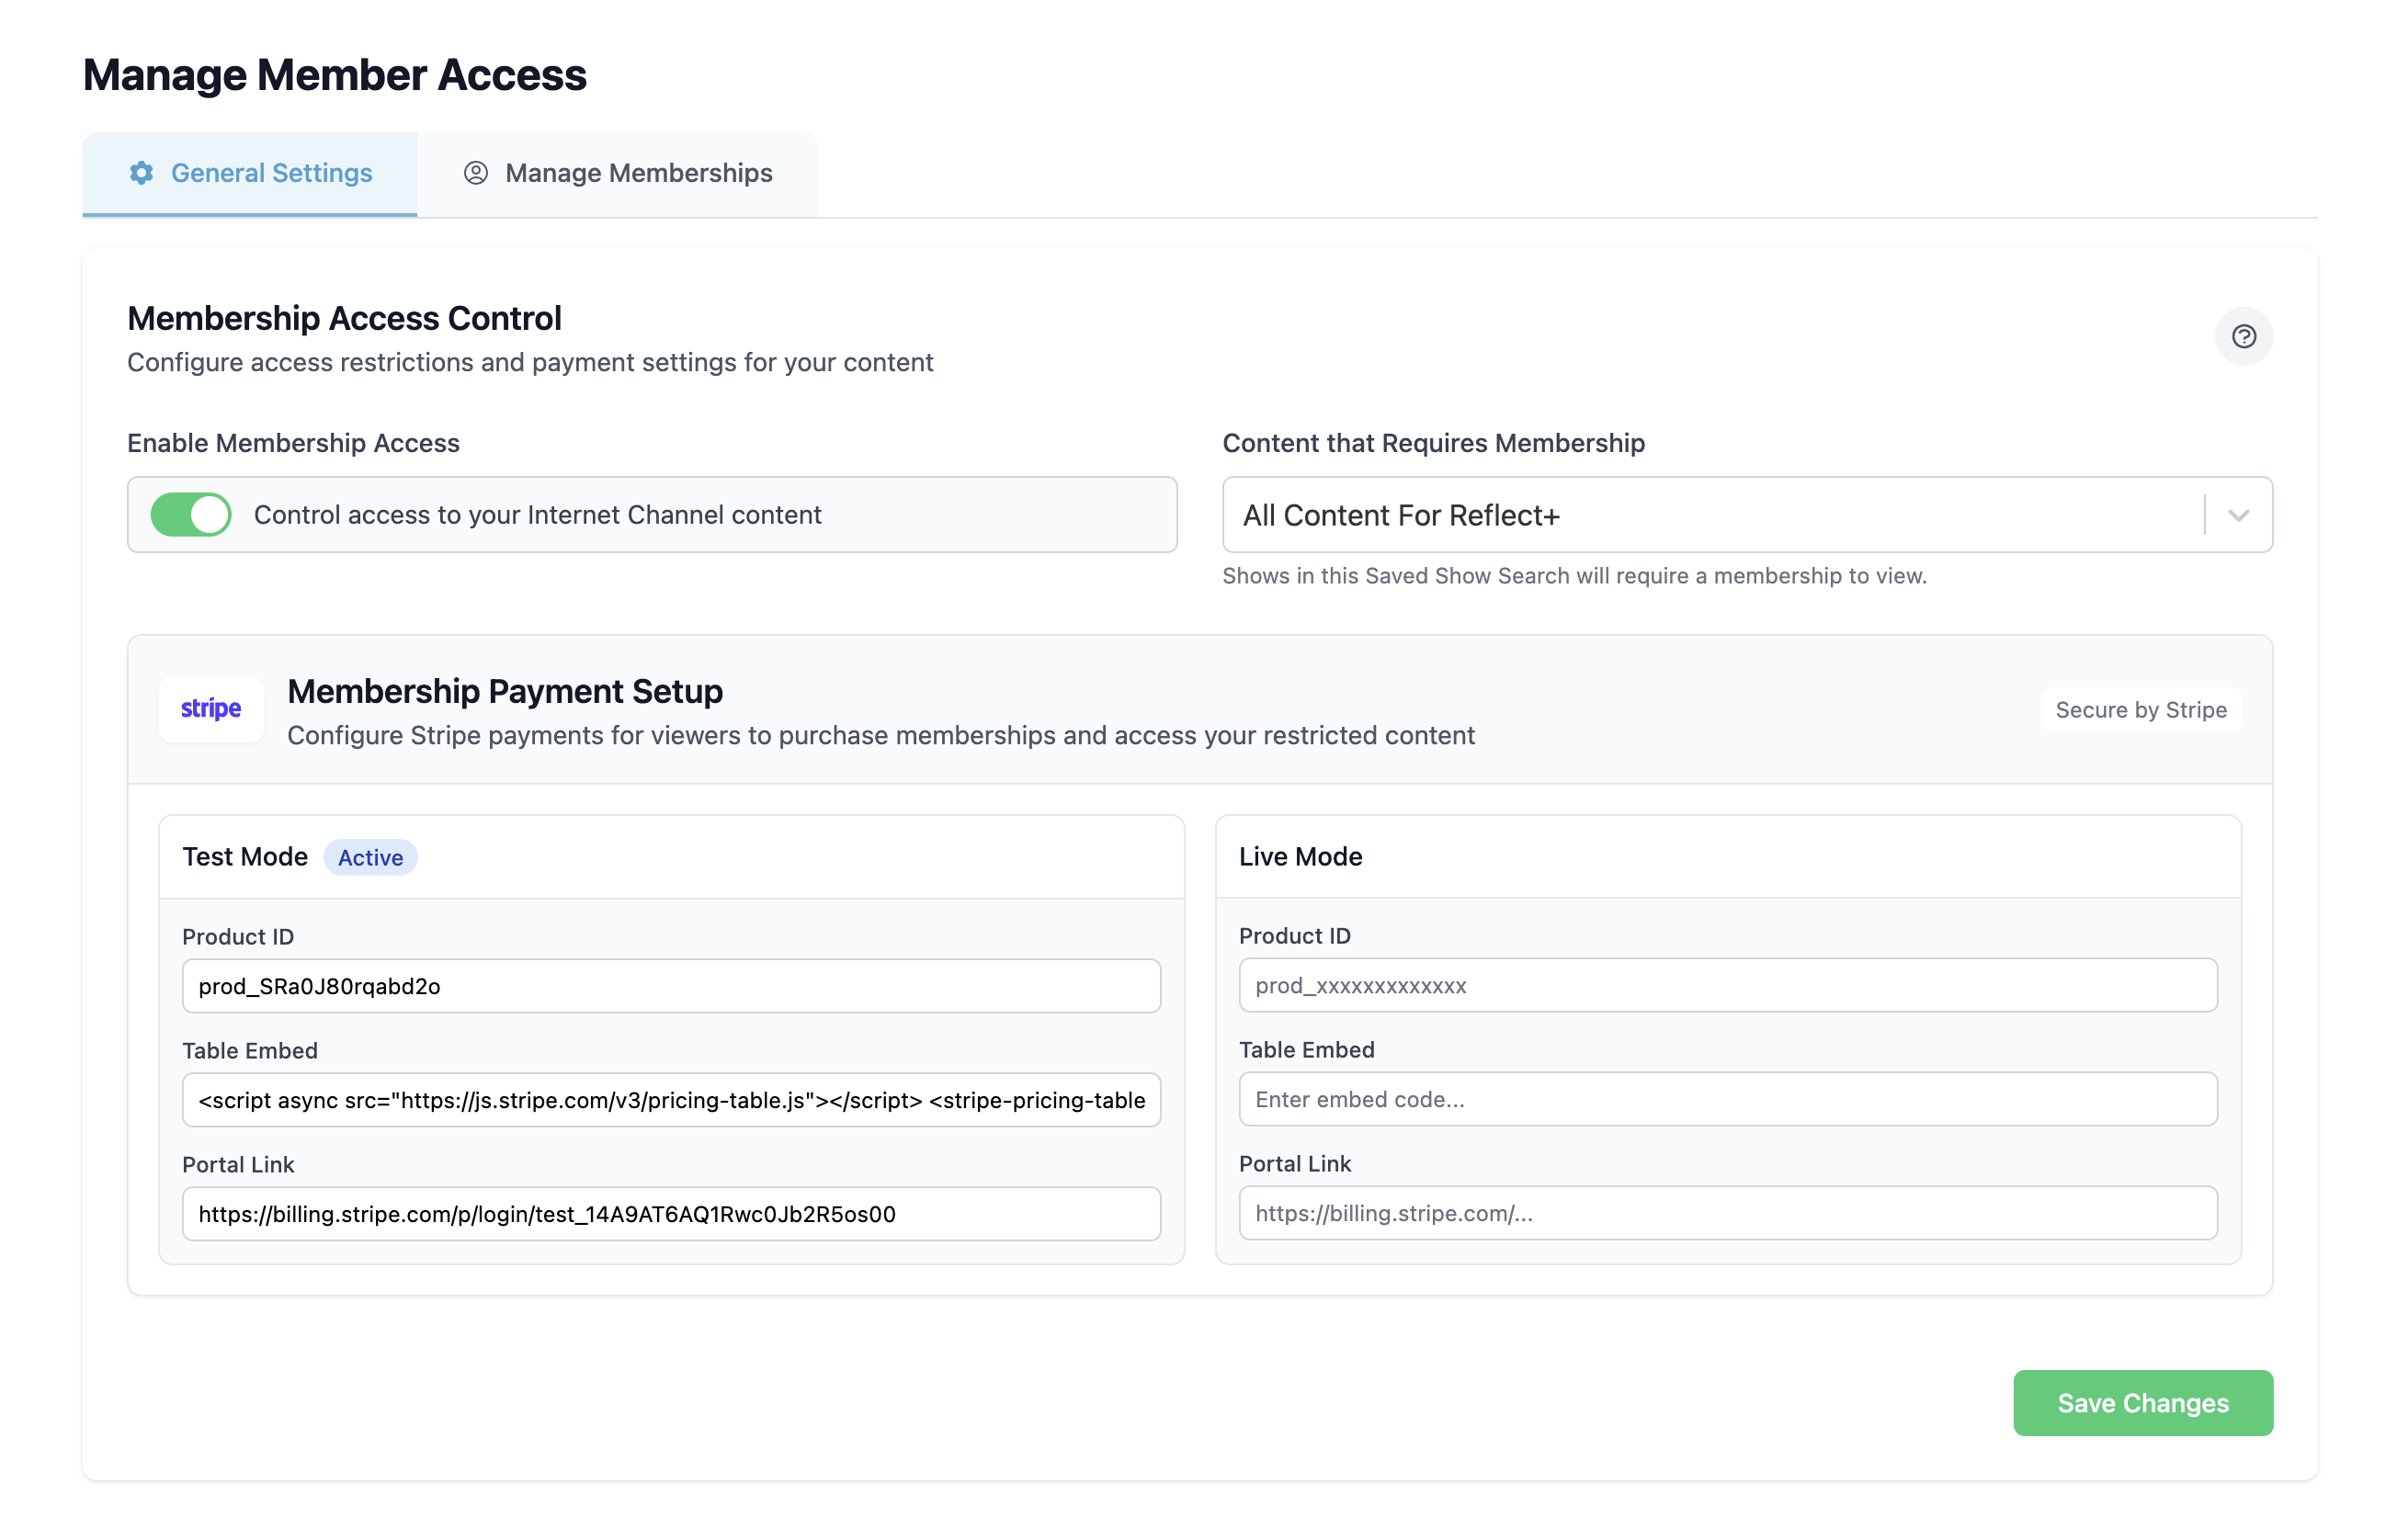
Enable Membership Access
- Toggle — Turn membership access on or off.
When enabled, viewers must have a valid membership to watch restricted content.
Content That Requires Membership
- Dropdown — Select a saved show search to determine which programs or content collections require membership to view.
Any show included in the chosen search will be gated behind membership access.
Membership Payment Setup (Stripe)
Memberships are managed and processed through Stripe integration. This section contains two configuration cards:
Test Mode
Used for setup and validation before going live.
- Product ID — The identifier for the membership product in Stripe.
- Table Embed — A snippet for embedding a membership purchase table.
- Portal Link — A direct link to the Stripe customer portal for managing memberships.
Live Mode
Contains the same fields as Test Mode but connects to the live Stripe environment:
- Product ID
- Table Embed
- Portal Link
Once everything is configured, switch from Test Mode to Live Mode to start accepting real memberships.
Save
After making any changes, click Save to apply your settings.
Manage Memberships
The Manage Memberships tab provides tools for creating, editing, and organizing the members who can access restricted content. This screen displays a searchable, paginated table of your current members and supports both individual and bulk management.

Members Table
The members table lists all existing members with the following columns:
- Name — The member’s full name.
- Email — The member’s email address (supports wildcard entries).
- Membership — Indicates whether the member was manually added or is an active Stripe member.
- Actions — Options to edit or delete the member.
Additional controls include:
- Show Dropdown — Adjust how many members are displayed per page.
- Search — Locate members quickly by name or email.
- Bulk Delete — Select multiple members to delete them at once.
Create Member
Click Create Member to manually add a new member.
- Enter the member’s name and email address.
- Wildcard emails are supported (e.g.,
*@cablecast.tvgrants access to anyone with an email ending in@cablecast.tv). - Save the entry to add the member to the table.
Edit Member
Use the Edit action in the table to update a member’s details.
- Modify the name or email as needed.
- Save changes to apply updates immediately.
Delete Member
Members can be removed individually with the Delete action in the table, or in bulk using the Bulk Delete option.
- Bulk Delete will remove all selected members at once.
- Stripe-managed members cannot be deleted manually.
Upload CSV
For bulk membership management, click Upload CSV.
- The CSV must include headers matching the provided template (order does not matter).
- Add Members — Appends new members from the CSV to the existing list.
- Replace Members — Removes all manually added members before adding new ones from the CSV.
- A template can be downloaded to ensure correct formatting.
Stripe Members
Members created through Stripe appear in this tab automatically when a user completes payment for a subscription.
- These entries display as Active in the Membership column.
- Stripe members cannot be edited or deleted from this screen.
Pay To Download
Configure Show Prices and Show Price Searches for use with Pay to Download on your Internet Channel. This screen has two tabs with separate settings and tools.
Show Prices
Use Show Prices to connect Stripe prices (test and live) to human-friendly labels that you’ll later attach to saved show searches.
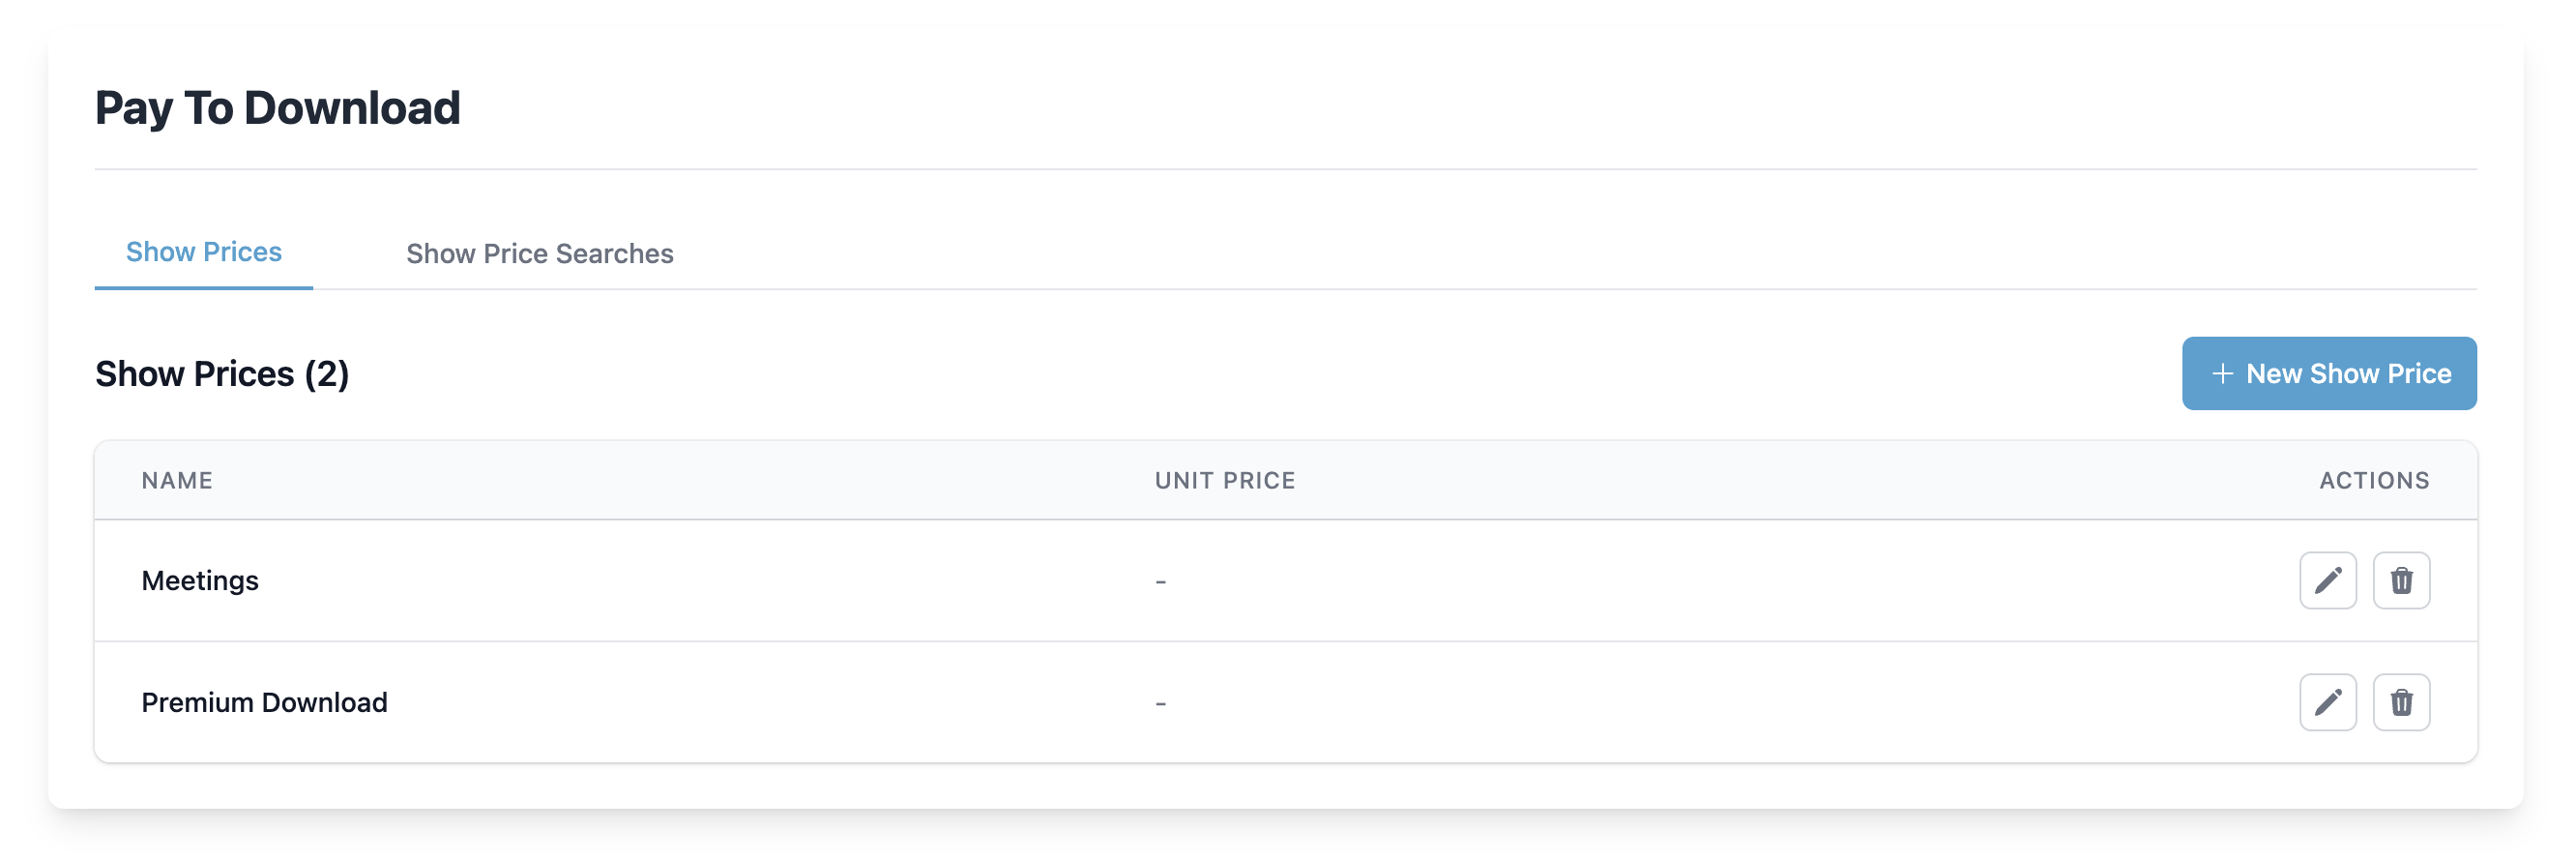
Show Prices Table
The table lists all configured prices.
- Name — A label used throughout Cablecast (e.g., “Premium Download”, “Meetings”).
- Unit Price — Displays the current amount when it can be read from Stripe.
- Actions — Edit or delete the price.
Additional controls:
- New Show Price — Create a new price entry.
Create Show Price
Click New Show Price.
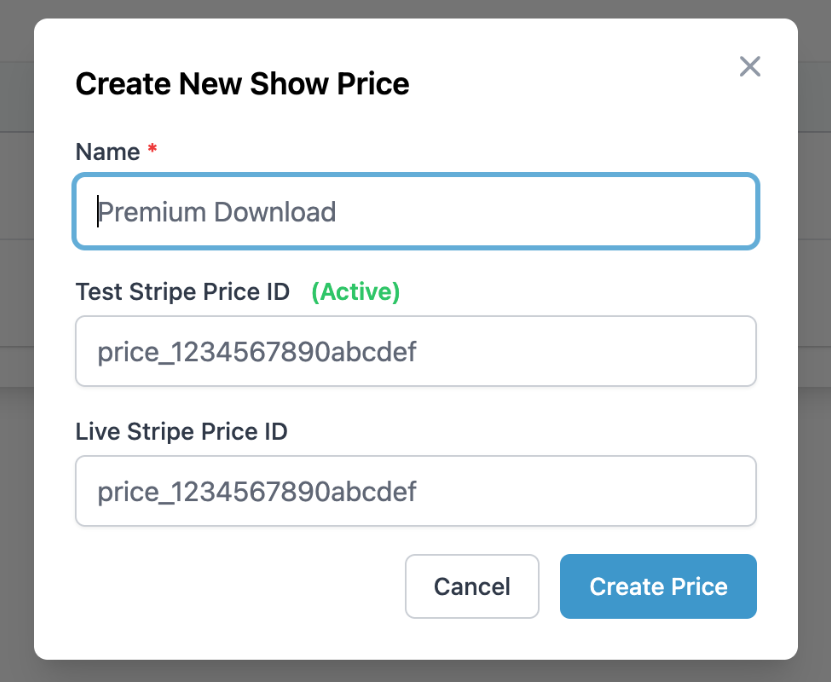
Fill in:
- Name — Friendly name for this price (shown to staff in Cablecast).
- Test Stripe Price ID — The Stripe price_… identifier in your Test environment.
- Live Stripe Price ID — The Stripe price_… identifier in your Live environment.
Tip: You create Price objects in Stripe. Paste the IDs here to link them to Cablecast. Use Test while validating, then add Live when you’re ready to charge real cards.
Click Create Price to save.
Edit or Delete a Price
- Edit — Update the name or either Stripe Price ID.
- Delete — Removes the price.
Show Price Searches
Show Price Searches tie a saved show search (the content being offered for download) to a Show Price (what it costs).
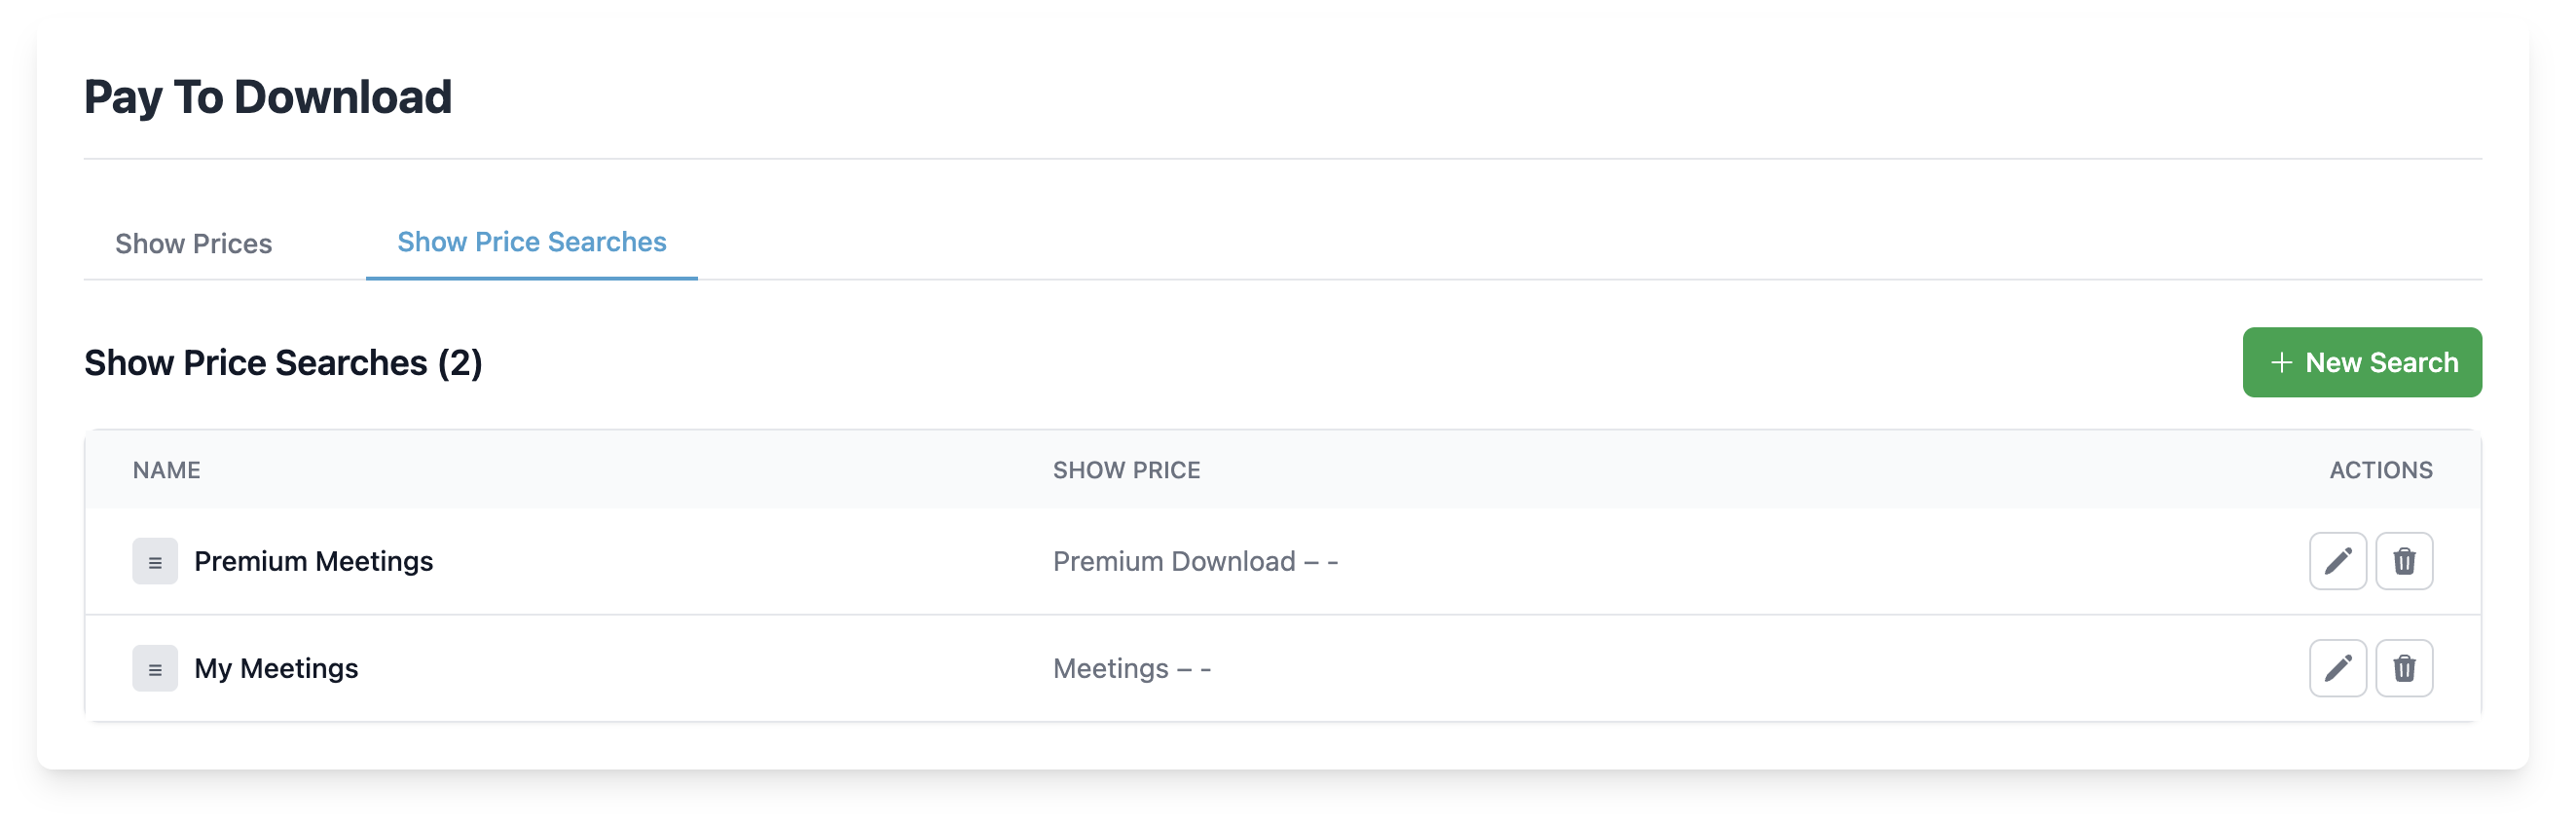
Show Price Searches Table
Each row represents one purchasable collection.
- Name — Internal label for the mapping (e.g., “Premium Meetings”).
- Show Price — The Show Price that will be charged for items found by the saved search.
- Actions — Edit or delete the mapping.
- Reorder Handle — Drag to change display order.
Controls:
- New Search — Create a new mapping.
Create Show Price Search
Click New Search.

Fill in:
- Name — Descriptive name for this mapping.
- Saved Search — Choose an existing saved show search that returns the shows you want to sell for download.
- Show Price — Select the Show Price (configured above) that applies to those shows.
Click Create Search to save.
Edit or Delete a Search
- Edit — Change the name, saved search, or associated price.
- Delete — Removes the mapping; shows will no longer be offered at that price.
How It Works Together
- Create Show Prices — Link your Stripe price_… IDs (Test and Live) to readable names.
- Create Show Price Searches — For each purchasable collection, choose a saved search and assign a Show Price.
- Publish — When your Stripe Live IDs are in place and your website is configured for Pay to Download, viewers will be prompted to purchase before downloading content that matches those searches.
Notes & Best Practices
- Test vs Live — Verify everything end-to-end using your Test Price ID. Add the Live Price ID when you’re ready to accept real payments.
- Saved Searches — Keep searches specific to avoid accidentally pricing unintended shows.
- Deletion Safety — Remove or update dependent Show Price Searches before deleting a Show Price that’s in use.
Text Tracks
Cablecast has the concept of Text Tracks which is a model to store all data associated with captions. Additional info like translations, languages, versions, will all be saved within a Text Track.
The Text Tracks menu button will take you to the screen where all Text Tracks are managed. This screen will display all existing Text Tracks as well as the status of any transcription or translation jobs. You can also create new translations, download captions and transcripts, and edit captions with the browser based Caption Editor.
- Managing Text Tracks
- Using the Cablecast Caption Editor
Text Tracks Management
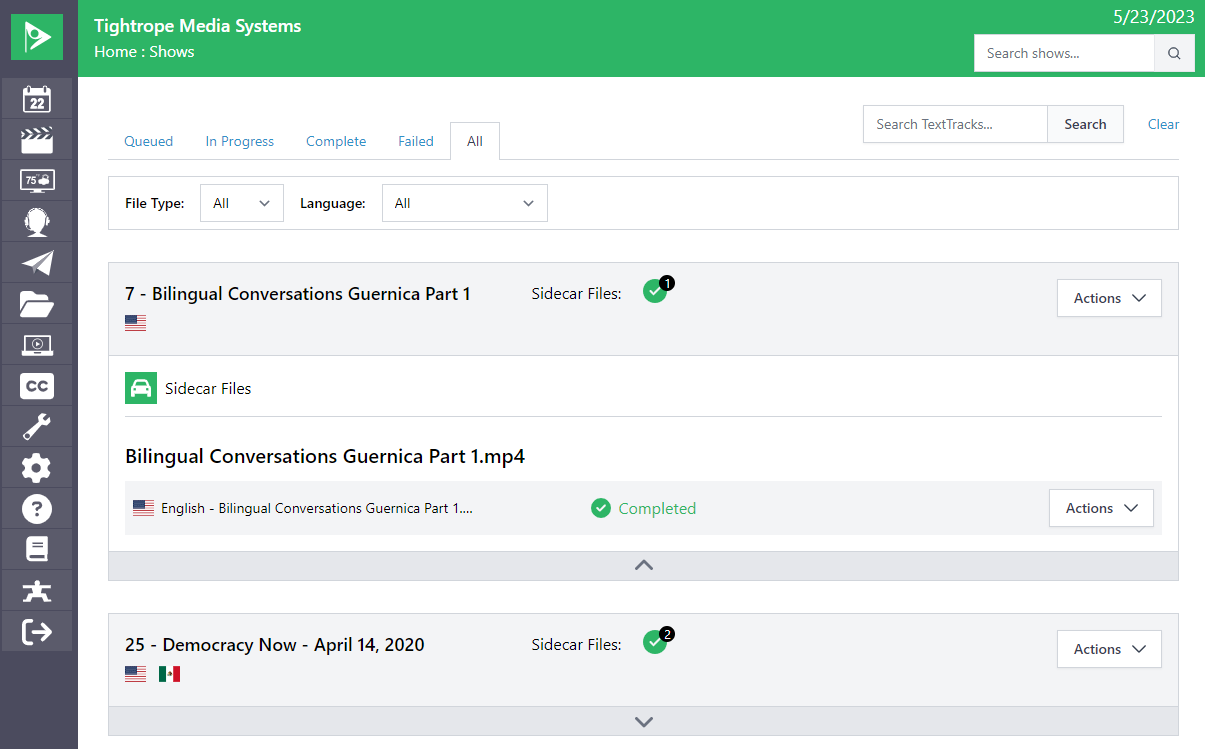
The Text Tracks screen provides an area where text track information can be viewed, filtered, and modified. By default, the Text Tracks screen will load all shows that have any text track assets (sidecar caption or VOD WebVTT files) associated with them.
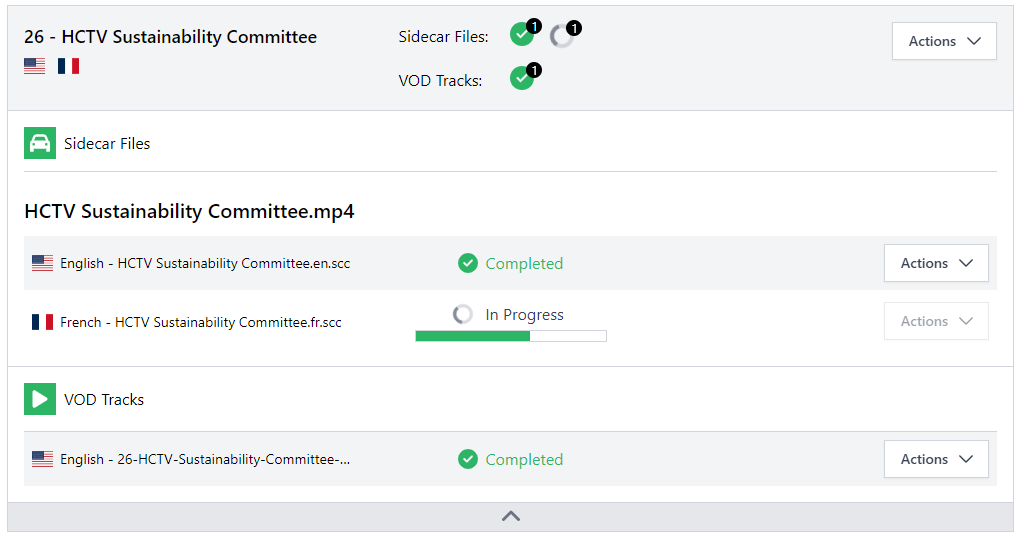
Text Track Card
The screen displays "cards" for each Show. The show title is displayed at the top of the card along with flag icons representing all of the languages of the text tracks. The Action button at the top allows the creation of translations of the primary caption file. It will display a window to pick the new translation language and submit that translation job for processing.
Below that are two sections that show all existing and in-progress transcriptions and translations. In-progress jobs will show the current state or a failure message.
-
Sidecar Files lists all of the completed or in-progress SCC or MCC files associated with the show. These files are the files that are used to include closed caption information during video server playout. They are also used to create the associated VTT files. If there are translations of any primary text track, they will be displayed as a separate sidecar file and indicate the language.
-
VOD Tracks lists all of the completed or in-progress VTT files for the show. These are the files that are used to display captions on the show's VOD playback. The VTT files are created by Cablecast from the original sidecar file. Similar to the sidecar list, each file in the listed translations will be displayed with an icon to indicate the language.
Each sidecar or VTT file listed will have an Action dropdown list next to it in the list. The Actions include:
- Download Asset will download the file to your local computer. This is useful if you want to transfer it to another system or edit it outside of Cablecast.
- Download Transcript will download a text file of the caption information. Cablecast will take the data in the caption file and convert it a plain text file. This plain text file could be used outside of Cablecast to assist in preparation of meeting minutes for or for searching for words or phrases spoken in the program.
- Edit will load the Cablecast Caption Editor. It will allow a wide range of adjustments to the caption information including adding, removing, and changing the text. Placement location on the screen and timing can also be changed. Click for more details on the use of the Cablecast Caption Editor.
- Resubmit Job: If either a transcription (caption) or translation job has failed you can use this action to resubmit the job for processing again.
- View Job History: A history of any caption or translation jobs that are in-progress or completed with the some or all of the following fields:
- Start: The timestamp of the job start
- Status: The result of the captioning job (Completed, In progress, Failed, etc.)
- Language: The language translated
- Description: A short summary pertaining to the status
- Updated: The last update time of the job
- Retry Button will retry the given caption job
Filtering Tabs

The display initially lists all shows that have any text track assets or jobs associated with them. Similar to the Video On Demand screen, the display has tabs at the top that can be used filter the list of shows that have Text Tracks that are in a specific state. This can be useful to narrow the list down to shows that need your attention (e.g. failed).
Cablecast organizes Shows with Text Tracks into one of the following five categories. The show will be included in the tab if any of the Text Tracks status falls into the category.
- Queued: The transcription or translation is queued and waiting to be processed. It can be in this state if other jobs are being processed.
- In Progress: The job is currently being processed and will transition to Complete or Failed.
- Complete: The transcription or translation has completed successfully and a file has been created.
- Failed: The job could not be completed successfully. The error message should indicate why it failed. Once the issue has been resolved the job can be resubmitted for processing again using the Action dropdown.
- All: All shows with any associated Text Tracks or jobs will be listed, regardless of the status.
Filtering By Type or Language
Below the Tabs is an area where further filtering may be done.
- File Type lets you select which specific Text Track file type to display. The options are All, SCC, **MCC*, and **VTT**.
- Language will let you select Text Tracks that match a specific language. The dropdown list will include any languages that are currently assigned to Text Tracks.
Search
At the top corner of the Text Track screen there is an area where you can enter a search term. This will filter the list of shows to those whose Title contains that search term. You can also search for a Show ID directly. Clicking the Clear button will reset the search to display all shows.
Cablecast Caption Editor
Any completed sidecar file in the Text Tracks screen may be edited by the user. Use the Action dropdown and select Edit next to the appropriate sidecar file.
The Cablecast Caption Editor can be used to make minor or significant changes to the existing captions. Various caption attributes can be adjusted including
- Adding, Removing, and Editing text
- Caption location on the screen
- Timing of the display of the captions

Media Player Panel
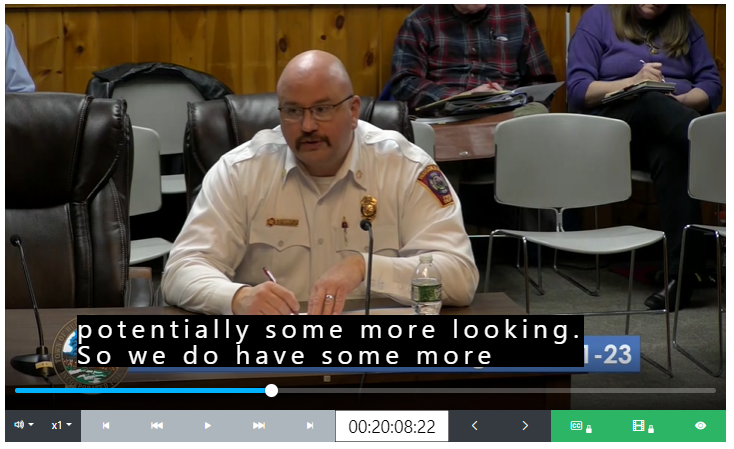
The Media Player panel allows the user to move around within the playback video file associated with the caption data. The panel includes typical navigation tools you would find in a video player:
- Volume Adjustment
- Playback Speed - Select from .25 to 8 times real time playback
- Play Controls - Jump to start/end, move ahead or back by one frame, play/pause
- Timecode Window - Will display the current time position in the file. A time can be entered in this field to jump to that position.
- Caption Events - Jumps ahead or back one caption event
Search and Replace Panel
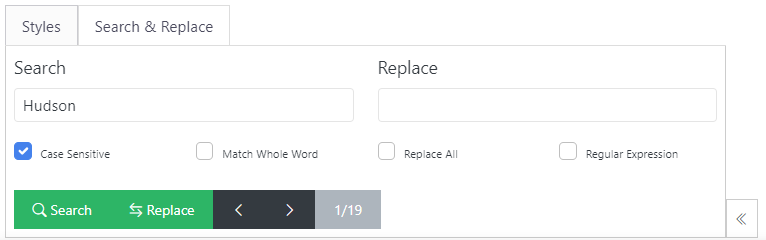
The Search and Replace panel can be used to search the Events of the selected Event Group for a specific word (or regex expression), and replace it with a new word or character set.
Enter a Search term and click the search button to begin searching the currently selected Event Group. The number of results will show next to the bottom controls along with arrows to navigate between them. Use the arrow buttons to quickly jump between results. The selected Event will automatically scroll into view and the search term will be highlighted.
There are additional Search Options available to help improve search results:
- Case Sensitive - Makes the search case sensitive and removes results that do not match the term exactly. Default search is case insensitive.
- Match Whole Word - Match the entire word based on word bounds. For example searching the word to with match whole word enabled will return results for the word to but not too or tomorrow.
- Replace All - When replace all is enabled, the replace button will affect all search results.
- Regular Expression - Enabling Regular Expressions allows for the use of regular expressions when searching. Tools such as Regex101 can be helpful in testing Regex searches. Note: Only ECMASCRIPT (JAVASCRIPT) regex expressions are supported.
Event List Panel
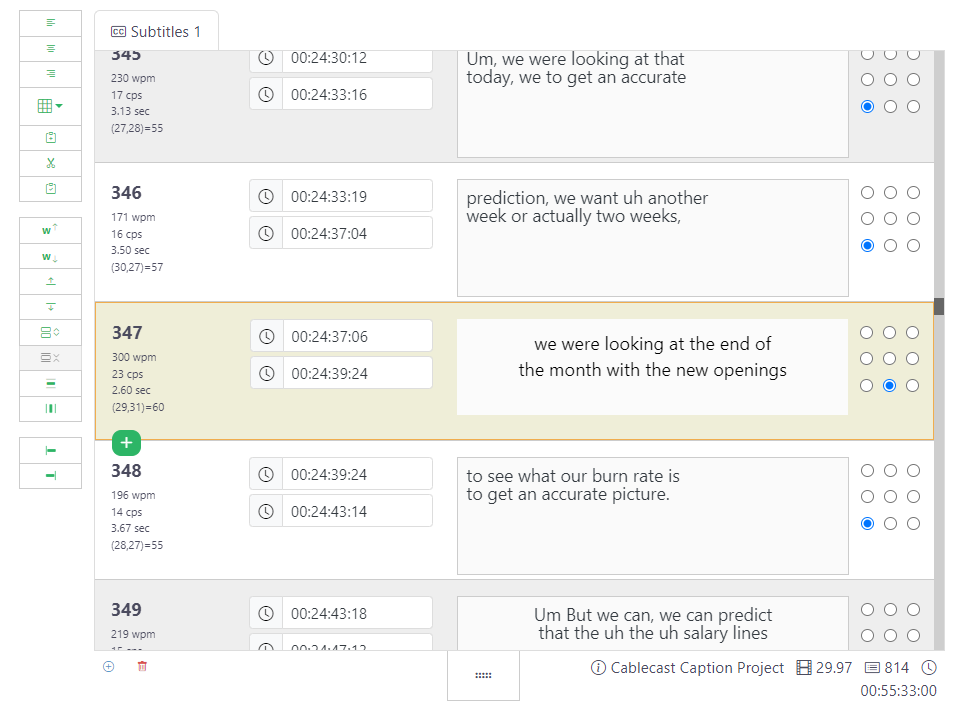
The Event List will show all Events for the show. Each Event is represented by a row in the Event List.
At the very bottom of the Event List are additional controls used to create Events and delete Events. On the bottom right of the Event List is the Project information which will show the Project Frame Rate, number of Events in the selected Event Group, and the media duration.
The Event Editor Controls are located in a ribbon to the left of the Event List:
- Align Left - Set the alignment for all selected Events to the left.
- Align Center - Set the alignment for all selected Events to the center.
- Align Right - Set the alignment for all selected Events to the right.
- Position - Update the position of all selected Events using a nine box grid.
- Copy - Copy the selected Events or highlighted text to clipboard.
- Cut - Cut the selected Events or highlighted text to clipboard.
- Paste - Paste Events, or text.
- Shift Word Up - Shift single word up to the previous Event.
- Shift Word Down - Shift single word down to the next Event.
- Shift Line Up - Shift single line up to the previous Event.
- Shift Line Down - Shift single line down to the next Event.
- Split Event - Split Event based on the cursor location.
- Merge Event - Merge all selected Events.
- Expand Text - Expand the text of all selected Events.
- Compress Text - Compress the text of all selected Events.
- Snap To Start - Update the Start time of all selected Events to match the End time of the previous Event.
- Snap To End - Update the End time of the all selected Events to match the Start time of the next Event.
Event Timeline

The Interactive Timeline is an alternative view of all Events from the Selected Event Group. Events are rendered as Timeline Events based on their Start and End time.
💡 Events without Start or End times will not be displayed on the Timeline.
Timeline Events
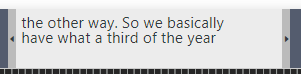
Timeline Events will show the Event Text, along with handles used to update the Start and End time. Users can simply click-and-drag either handle to update the time of an Event. Users can also click-and-drag an Event anywhere on the timeline in order to update both the Start and End times at once.
Multiple Events can be moved at once by selecting more than one Event and dragging it on the timeline.
Event Handles
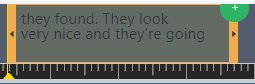
Selected Events will show a green plus (+) icon in the top right corner, used to create a new Event on the timeline. Events created using the timeline will automatically generate based on the timecodes of the selected Event. This means that the new Event will inherit timing based on the previous Event.
Horizontal Zoom
Horizontal Zoom controls are located to the right of the Timeline. Horizontal Zoom is limited to the default values 10, 15, 30, 45, and 60 seconds. The lower the number, the greater the Zoom multiplier. For example, 10 seconds will show 10 seconds of Events within the width of the display.
Save Work

Once editing has been completed, click the Save Work button in the upper right corner of the screen. This will update the appropriate caption file in Cablecast.
Tools
The Tools menu consists of five areas: Auto Schedule, Batch Functions, Reporting, Plugins and Developer Tools.
Auto Schedule
The Auto Scheduler, introduced in Cablecast 6.6, allows operators to define a series of rules that will create and update schedule events automatically. For example, one could define a rule that plays the latest city council meeting every Monday, Wednesday, and Friday at 2pm. The Auto Scheduler is built using saved searches, therefore as the search results change, so will schedule events. In the previous example once an an operator creates a new City Council show, the Auto Scheduler will automatically update future episodes.
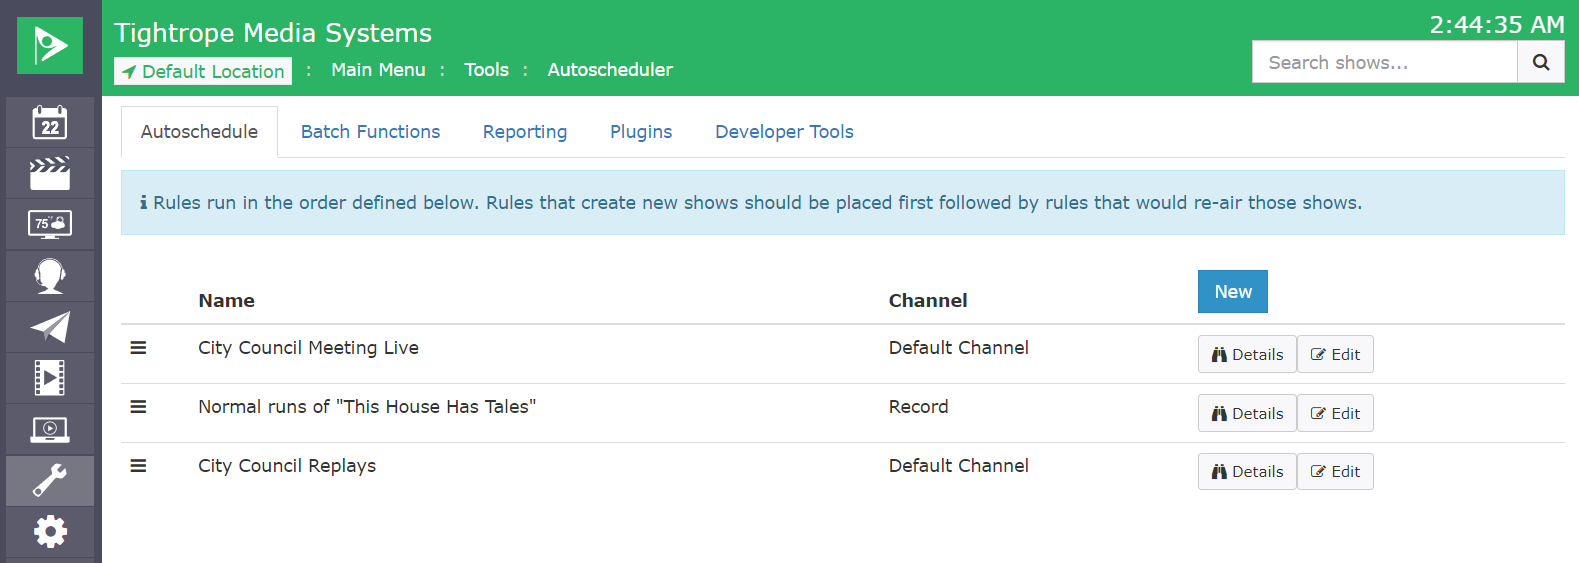
For a complete overview of how to use the Auto Scheduler please refer to the Feature Overview on the Cablecast Knowledge Base: Feature Overview: Auto Scheduler
The tab allows you to see all the rules defined on the system. Click the icon to the left of the rule's name to drag and reorder rules. From the index screen you can perform the following actions:
| Action | Description |
|---|---|
| New | Click to create a new Auto Schedule rule. This will bring up the Auto Schedule Rule Edit Form as described in Autoschedule: EditForm |
| Details | Click to see an Auto Schedule rule's report of individual runs or to delete a rule. This section is described in Autoschedule: Details |
| Edit | Click to edit a rule after it has been created. |
Auto Schedule Edit Form
An Auto Schedule rule consists primarily of that define when a schedule item or record event should start and that should be used to fill the timeslot.
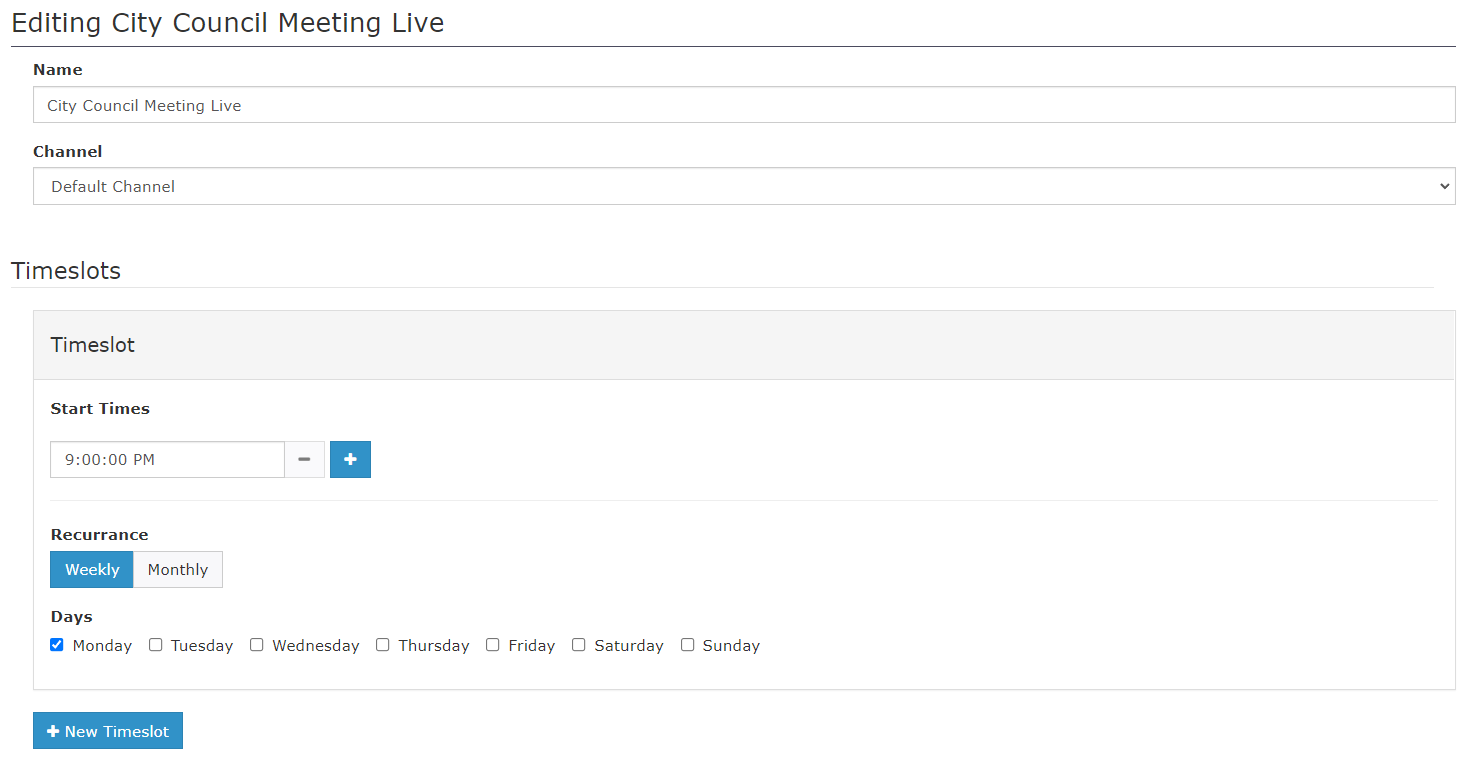
For a complete overview of how to use the Auto Scheduler please refer to the Feature Overview on the Cablecast Knowledge Base: Feature Overview: Autoscheduler
Auto Schedule Details Screen
From the screen you can see a list of recent and future schedule events created by the Auto Scheduler. From this screen an Auto Schedule rule can also be deleted by clicking "Delete" at the bottom.
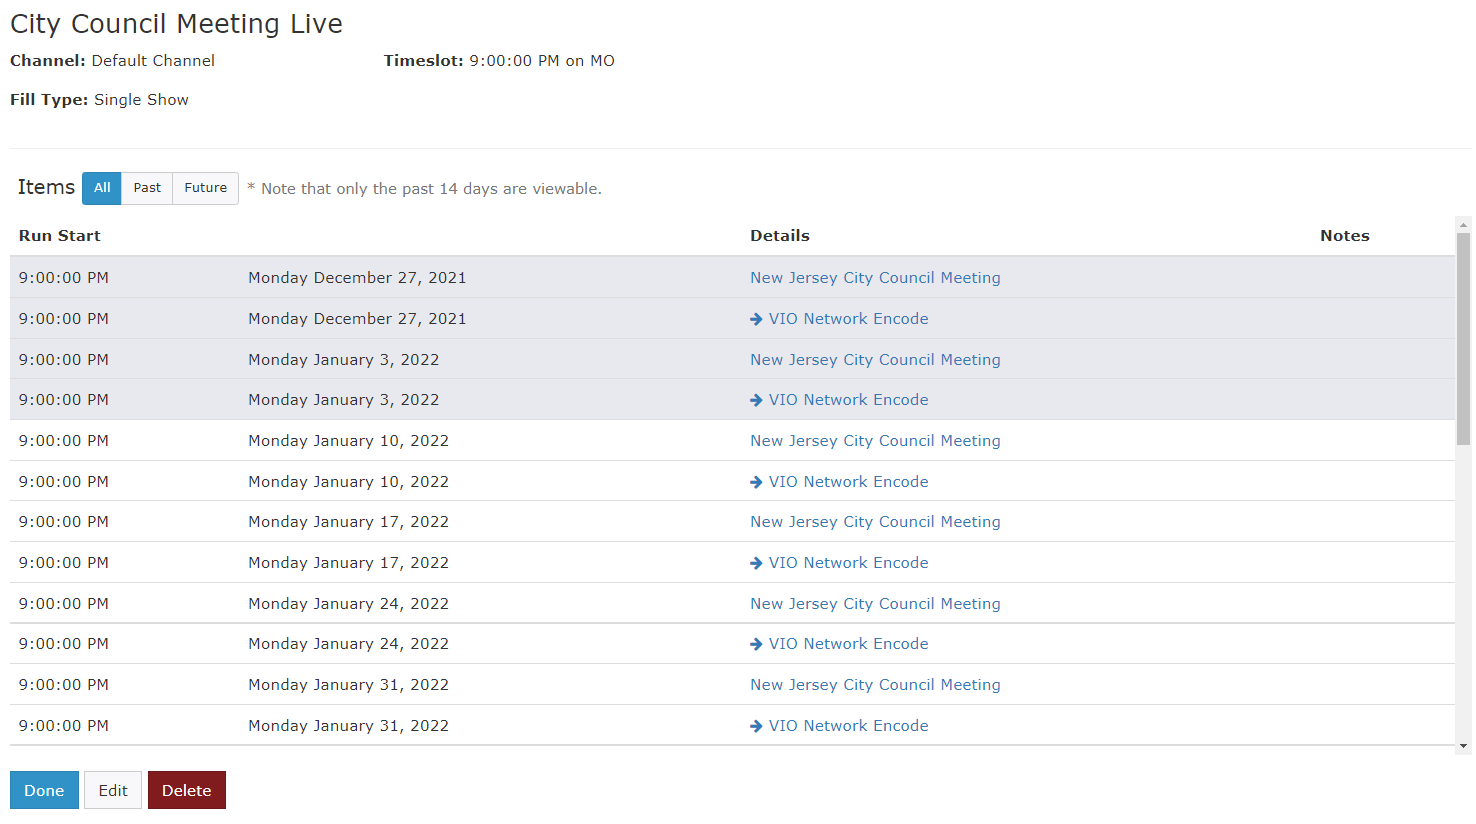
You can see some details about the Auto Schedule item such as the Channel, Fill Type and Timeslot. Items created by this Auto Schedule rule can be seen below, and filtered using the following options:
- All: All items, past and future
- Past: Showing only rule items having occurred in the past (relative to now)
- Future: Showing only rule items that are yet to run
Workflows
This screen allows you to configure the Cablecast Workflows. Workflows provide a rules based mechanism for automatically managing assets on a Cablecast system. Assets can be moved, copied, or deleted. Currently Cablecast supports 5 different Workflows:
| Workflow | Description |
|---|---|
| Archive | Archive playback assets based on a Show Search |
| Restore | Restore playback assets needed for schedule runs |
| Backup | Backup playback assets to a secondary File Store based on a Show Search |
| Delete | Delete playback assets based on a Saved Search |
| Mirror | Synchronize the contents of an entire File Store to another File Store |
Main Workflows Screen
The main Workflows screen lists all current Workflows in a table format.
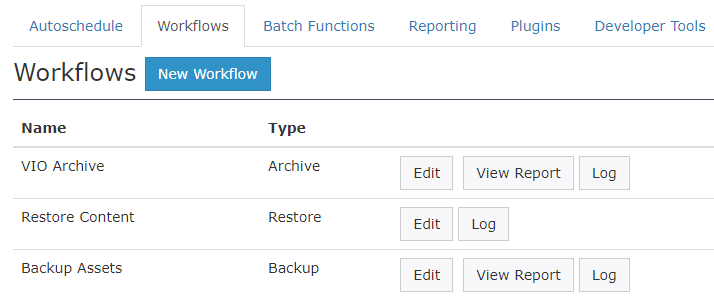 The
The New Workflow button is used to create a new Workflow.
For each exisiting Workflow in the table there are buttons available to
- Edit
- View Report (except Restore Workflow)
- Log
Workflows Report Screen
This screen will display the status of the selected Workflow. It can be used to determine whether the Workflow is in progress or completed and if there were any failed transfers. The View All button will display a detailed asset report for each category.

Workflows Log Screen
This screen displays a list of log entries related to the selected Workflow. It can be used to view when specific assets were moved, copied, or deleted as well as the File Stores involved. Clicking on an Asset, Source Files Store, or Destination File Store in the log will open the associated screen.
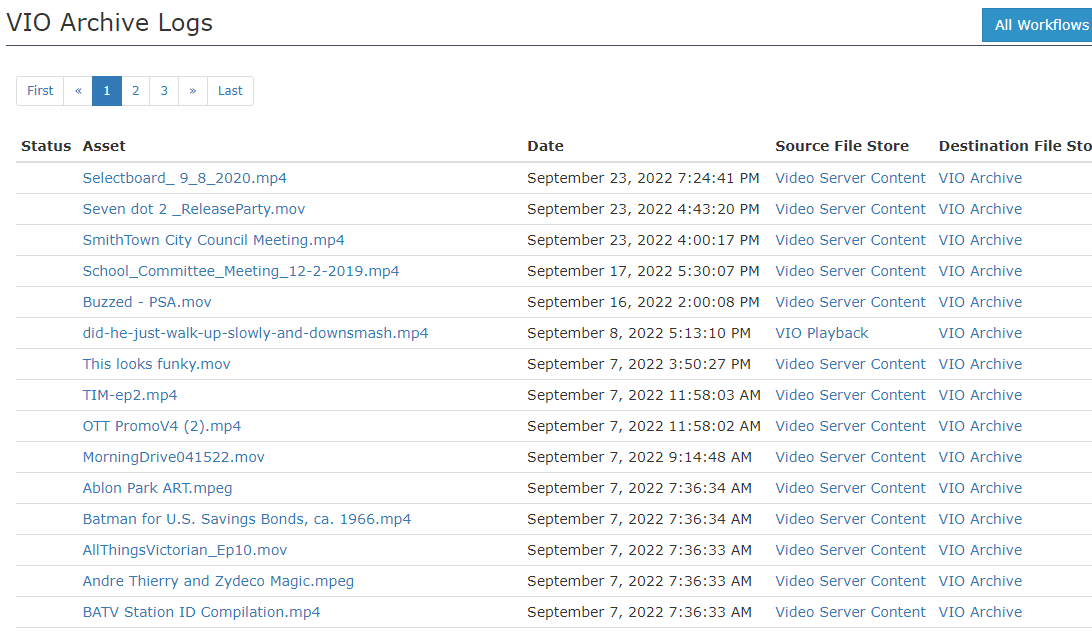
Archive Workflow
An Archive Workflow will move playback assets from a primary File Store to an archive File Store. The Show Search associated with the Workflow will determine which assets are moved. The Inactive Days in Schedule setting determines how many days in the past a show must be not scheduled before it will be archived. This workflow can be used to free up disk space on the primary playback video servers by removing inactive assets.
Creating/Editing/Deleting Archive Workflows
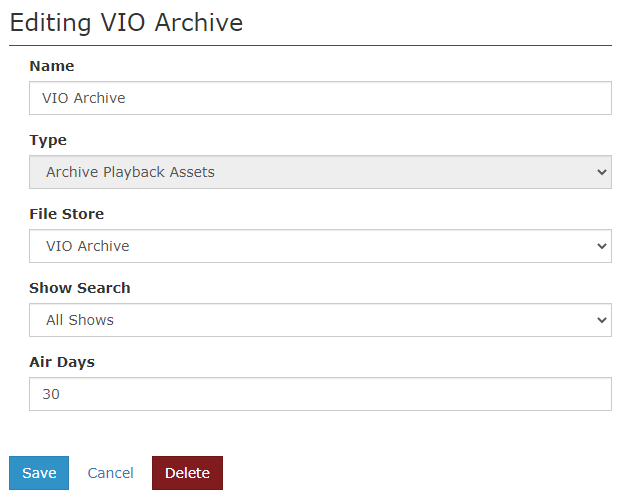
To Edit or Create a new Archive Workflow
- Enter a name for your workflow
- Select "Archive Playback Assets" type for New archives.
- Select the destination File Store.
- Select the existing show search for the shows to be affected by this workflow.
- Select the inactive days until the archive workflow triggers.
- Click
Saveto save the workflow.
To Delete an Archive Workflow, click the Delete button.
Restore Workflow
A Restore Workflow will move playback assets from an archive File Store to a primary playback File Store. This workflow will search the Schedule, looking 7 days ahead, for any assets that are not on the associated primary playback server. The workflow will copy the asset if it is available on any archive File Store. The Restore Workflow can be used in conjunction with the Archive Workflow to effectively move assets on and off the primary video playback servers as needed.
Creating/Editing/Deleting Restore Workflow
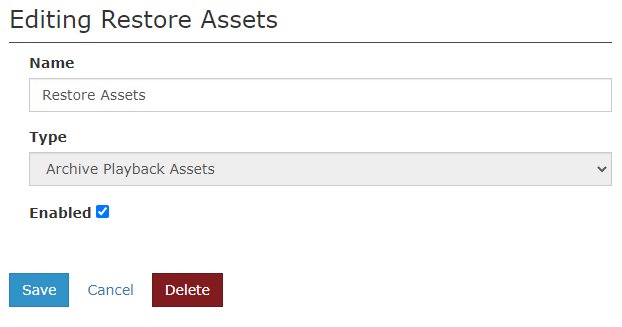
To Edit or Create a new Restore Workflow
- Enter a name for your workflow
- Select
Restore Playback Assetstype - Toggled the
Enabledstate. - Click
Saveto save the new workflow.
To Delete the Restore Workflow, click the Delete button.
Note: Only one Restore Workflow can be created. The Restore Workflow can be Enabled and Disabled.
Backup Workflow
A Backup Workflow will copy playback assets from a primary File Store to a backup File Store. The Show Search associated with the Workflow will determine which assets are copied. This workflow can be used to create copies of important assets. The copies can be stored on local, network, or cloud File Stores offering secure and redundant options.
Creating/Editing/Deleting Backup Workflows
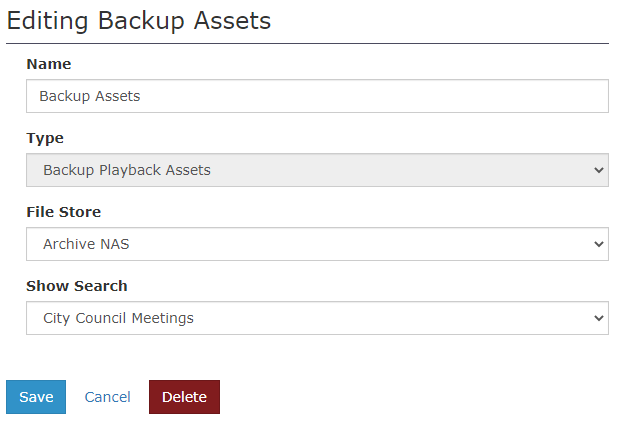
To Edit or Create a new Backup Workflow
- Enter a name for your workflow
- Select "Backup Playback Assets" type for New archives.
- Select the destination File Store.
- Select the existing show search for the shows to be affected by this workflow.
- Click
Saveto save the workflow.
To Delete a Backup Workflow, click the Delete button.
Delete Workflow
A Delete Workflow will remove playback assets File Stores. The Show Search associated with the Workflow will determine which assets are deleted. The Inactive Days in Schedule setting determines how many days in the past a show must be not scheduled before it will be removed. This workflow can be used to free up disk space on the primary playback video servers by removing assets that will not played asfter their initial run(s).
Creating/Editing/Deleting Delete Workflows

To Edit or Create a new Delete Workflow
- Enter a name for your workflow
- Select "Delete Playback Assets" type for New archives.
- Select the destination File Store.
- Select the existing show search for the shows to be affected by this workflow.
- Select the inactive days until the archive workflow triggers.
- Click
Saveto save the workflow.
To Delete a Delete Workflow, click the Delete button.
Mirror Workflow
A Mirror Workflow will copy all playback assets from the source File Store to the desintation File Store. As assets are added or removed from the source File Store this Workflow will add or remove them from destination File Store. This keeps the destination File Store in sync with the source File Store providing a constant backup of the source File Store.
Creating/Editing/Deleting Mirror Workflows
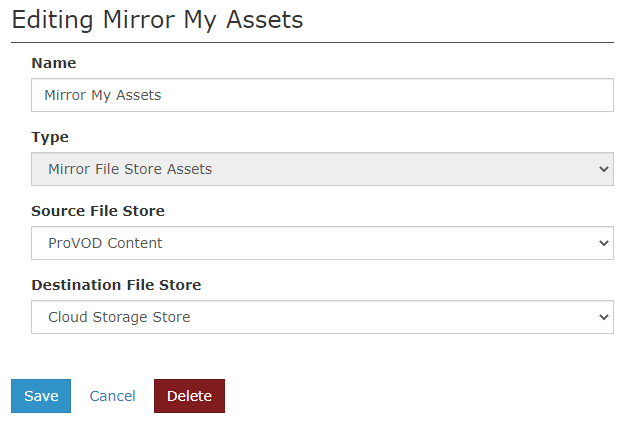
To Edit or Create a new Mirror Workflow
- Enter a name for your workflow
- Select "Backup Playback Assets" type for New archives.
- Select a source File Store.
- Select a destination File Store.
- Click
Saveto save the workflow.
To Delete a Mirror Workflow, click the Delete button.
Batch Functions
Batch Functions allow you to perform common tasks on multiple items at a time.
- Copy Shows: Creates multiple copies of a single Show.
- Clear Shows: Clears all Shows between the specified ShowIDs.
- Create Series: Creates multiple copies of a single Show. This is a more advanced version of the function.
- Auto Schedule: Automatically schedules a series of Shows based on simple rules. This can be effectively used with the function in order to create and schedule a series of Shows.
- Clear Schedule: Removes all Schedule runs from the specified between the specified dates.
- Find and Replace: Replaces all instances of one Show with another Show on the specified between the specified dates.
- Fill gaps with Project: Uses Shows from the specified to fill in gaps in the Schedule on the specified channel.
- Clear Filled Gaps: Removes runs from the Schedule that were originally created using the function.
Reporting
The reporting section allows you to generate reports and export data from Cablecast.
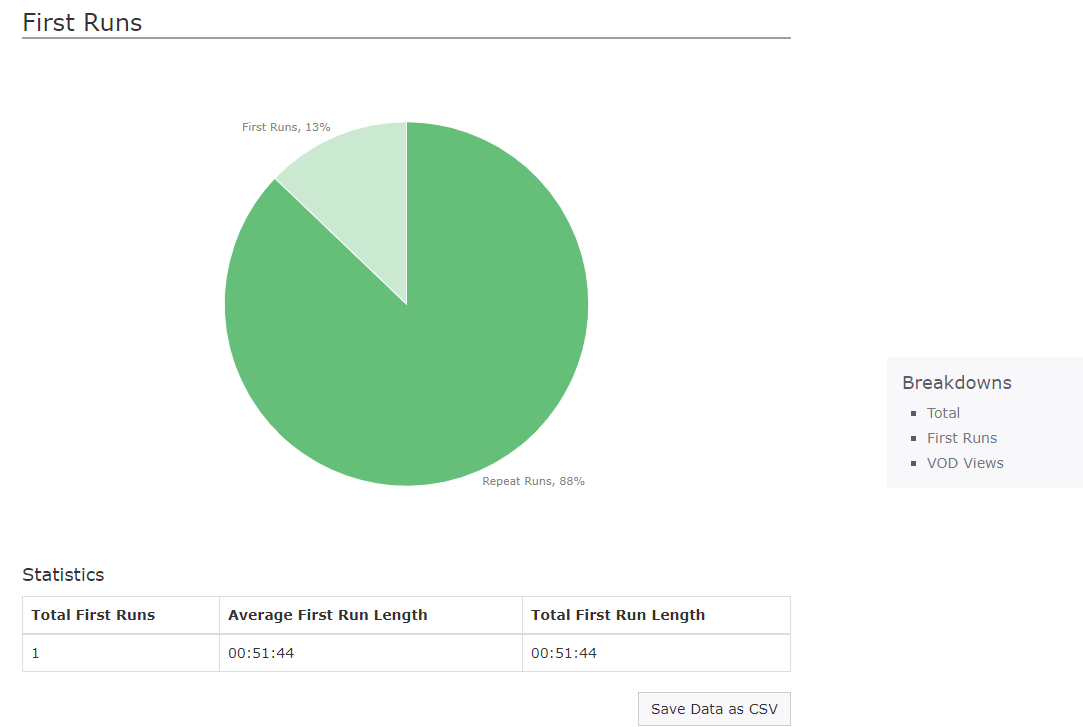
The following reports are available:
- Schedule Report: Generates a report based on all Shows that have aired between the selected dates.
- Shows Report: Generates a report based on Shows with an that is between the selected dates.
- Export TV Guide X-List: Creates a file that can be sent to TV Guide for inclusion in their guide data.
- Export Data: Exports data from Cablecast so that it can be used in an external system. Various options are available.
- Audience Measurement: Create reports measuring number of viewers and total viewing time for VODs and Live Streams.
Schedule & Show Report
You can edit the criteria for your report from within the menu in the following ways:
| Item | Description |
|---|---|
| Schedule Dates or Event Date | Select the start and end dates which the report will pull report information from. |
| Filters | Select the Locations or Channels that you would like the report to show. |
| Breakdowns | Preconfigured report breakdowns based on a variety of criteria. Enable the ones you would like to show in the report. Configure them further if you'd like. |
| View Report | Click this blue button at the bottom of the page to view the report for your selected criteria. |
Within the report that was just generated, you'll see each breakdown that was selected. The following buttons are available on this report:
- Edit Report: This brings you back to edit the report criteria.
- View Public: Opens up a new tab showing your report. The web address in this tab is public and can be copied/pasted and shared with others who may wish to view the report.
- Print Report: Opens up a print dialog within your web browser to send the report to your selected printer.
- Breakdowns: Click on the name of a Breakdown on the right side to jump to that section of the report.
TV Guide X-List
This tool generates CSV formatted reports so your Cablecast schedule can send schedules to TV Guide.
- X-List Station ID: The X-List Station ID you are generating your report for
- Channel: Which channel on your cablecast system to generate off the schedule
- Start Date: Start date for the report
- End Date: End date for the report
- Description Field: Which field on Cablecast to generate the text for the X-List Description Field
- Category Field: Which field on Cablecast to generate the text for the X-List Category Field
- Subcategory Field: Which field on Cablecast to generate the text for the X-List Subcategory Field
- Text for gaps in schedule: What to show on X-List for gaps in your programming schedule
Audience Measurement Report
The Audience Measurement Report allows station operators to gain valuable insights on their Video On Demand and Live Stream views. Reports are generated from viewer telemetry directly from the Reflect CDN. This means it doesn't matter how viewers engage with the station's content, as long as the content is streamed through the Reflect CDN the views are counted. This includes viewers watching on the Cablecast Web Player, Cablecast Streaming Apps, Branded Streaming Apps and even custom player integrations.
Note Audience Measurement Reports require a Reflect or Reflect+ CDN subscription. If you do not yet have Reflect or Reflect+, please reach out to the Cablecast Sales team at sales@cablecast.tv for more info.
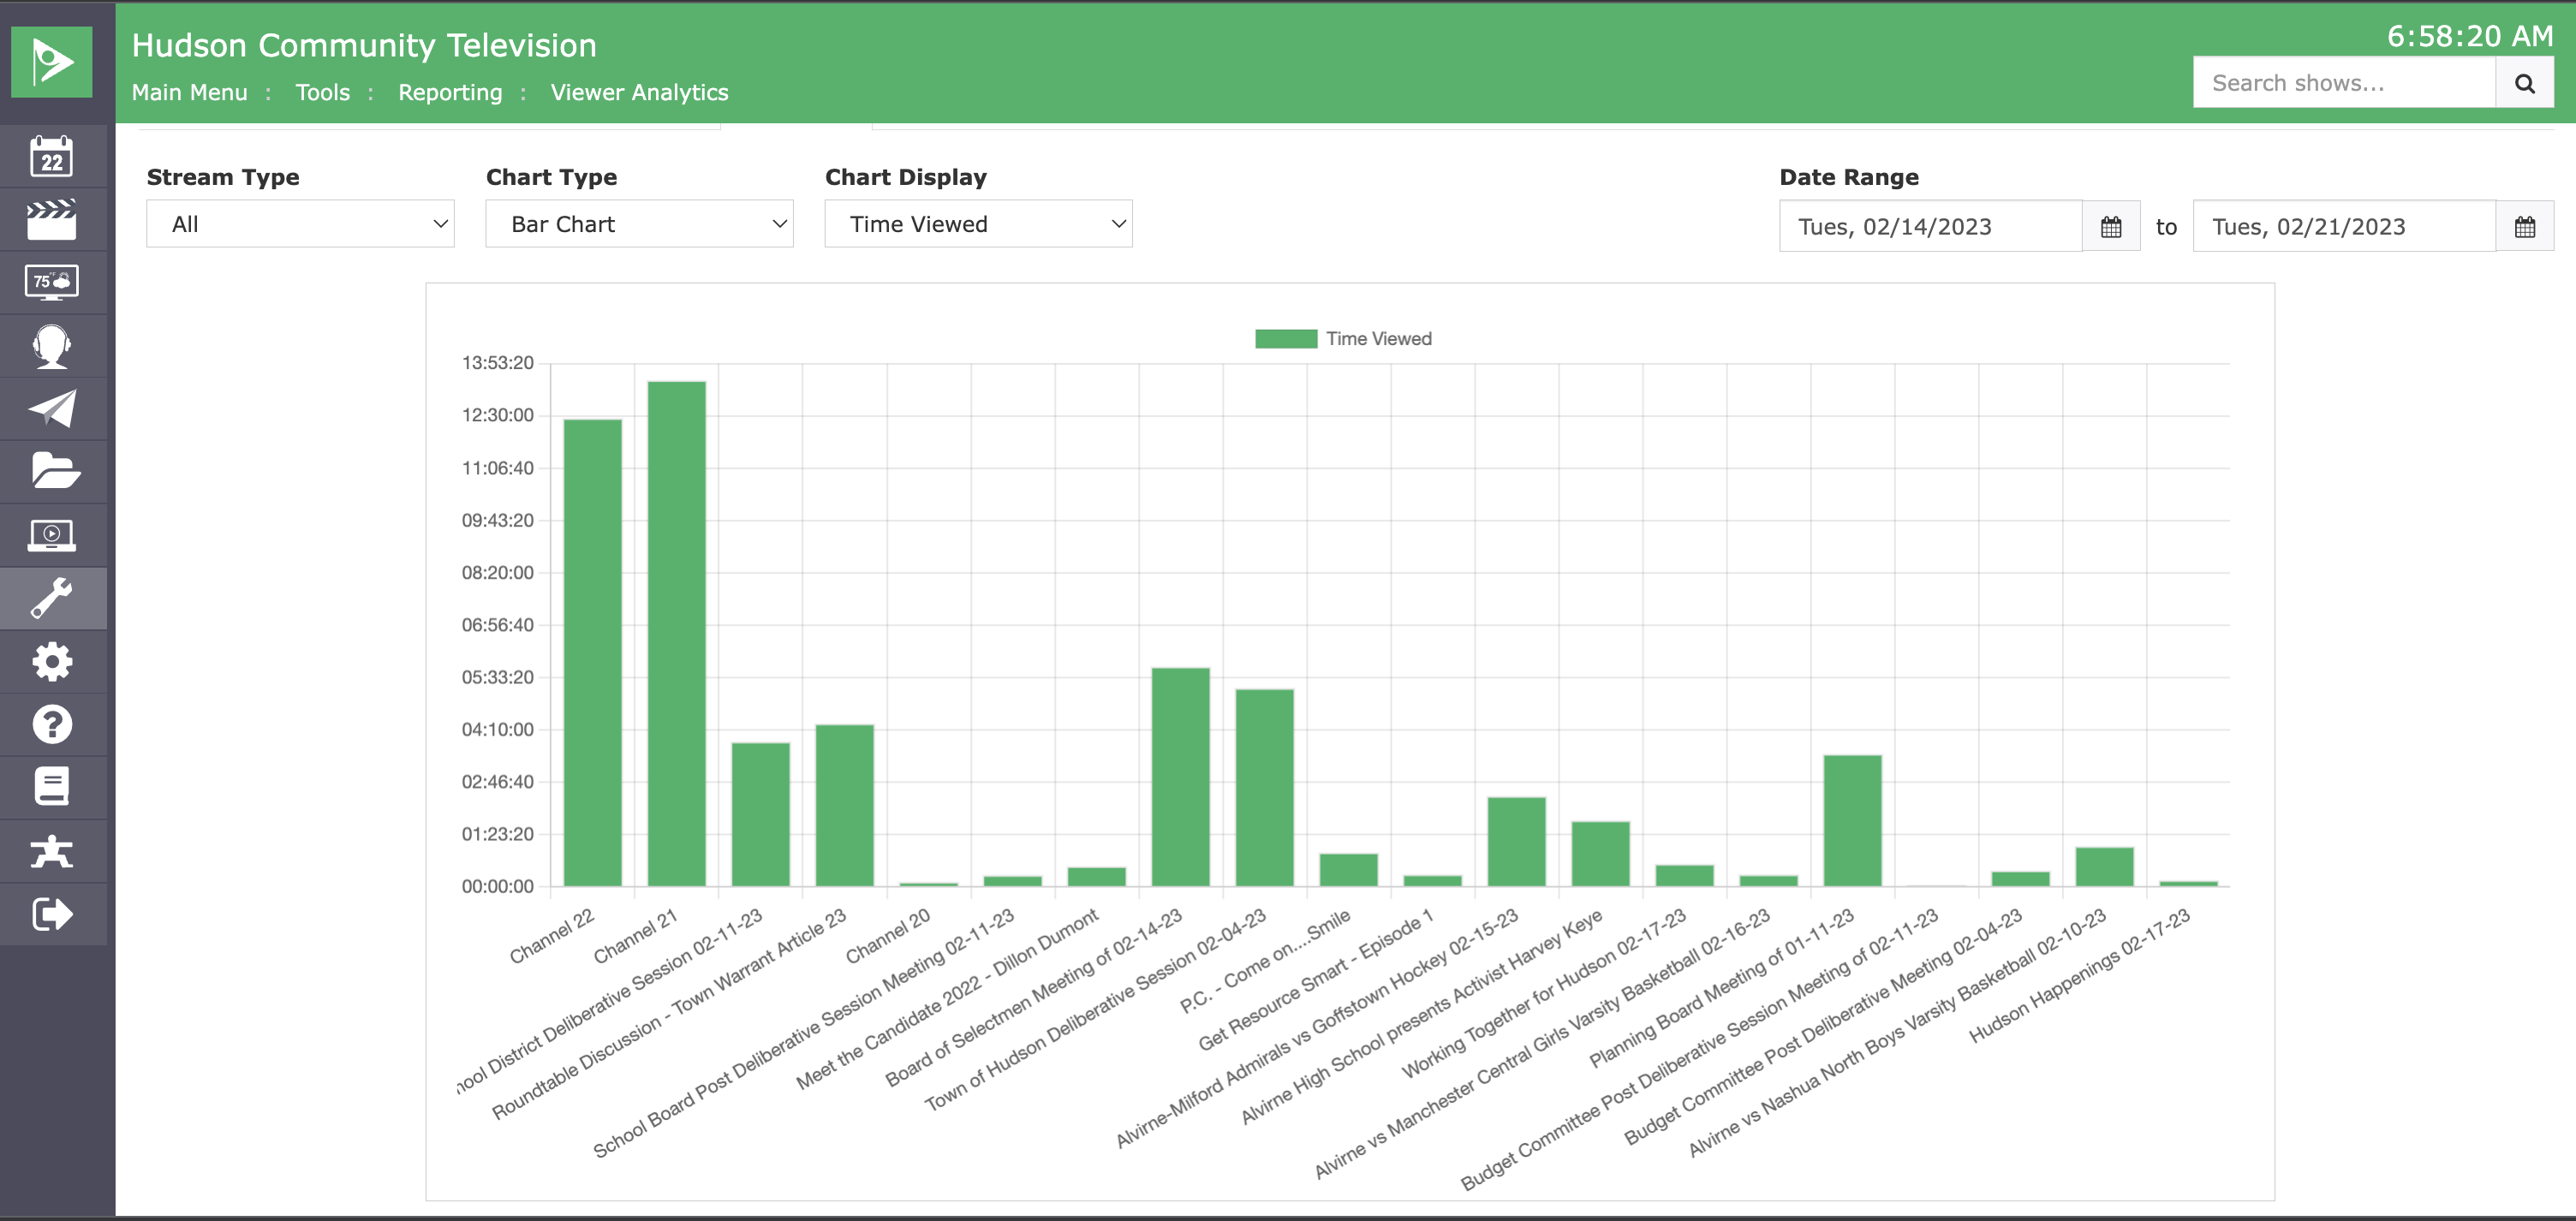
What data is collected
Audience Measurement Reports collect Viewer Count and Time Viewed for Live Streams and Video On Demand content. These metrics are periodically rolled up by the Reflect CDN and then pulled into the Cablecast system to be made available for reporting. For Video On Demand content rollups are for a twenty-four hour period, while live streams have a rollup period of thirty minutes.
How is the data presented
Audience Measurement Reports have three main sections, plus a tool bar that helps setup and filter the report.
The Toolbar
The toolbar at the top of the screen has several drop downs that control how the Graph is presented, and the time range of the report.

The Graph
The graph is a visual representation of the top 10 selected streams in the report's time range. The graph is available in two displays.
- Bar Chart: Displays top items along the x-axis and uses the chosen metric from Chart Display as the y-axis in an easy to read bar chart.
- Time Series: Displays top items with the x-axis being the selected time range of the report and the y-axis being the metric chosen from Chart Display. Allows seeing when a stream was viewed most in time.
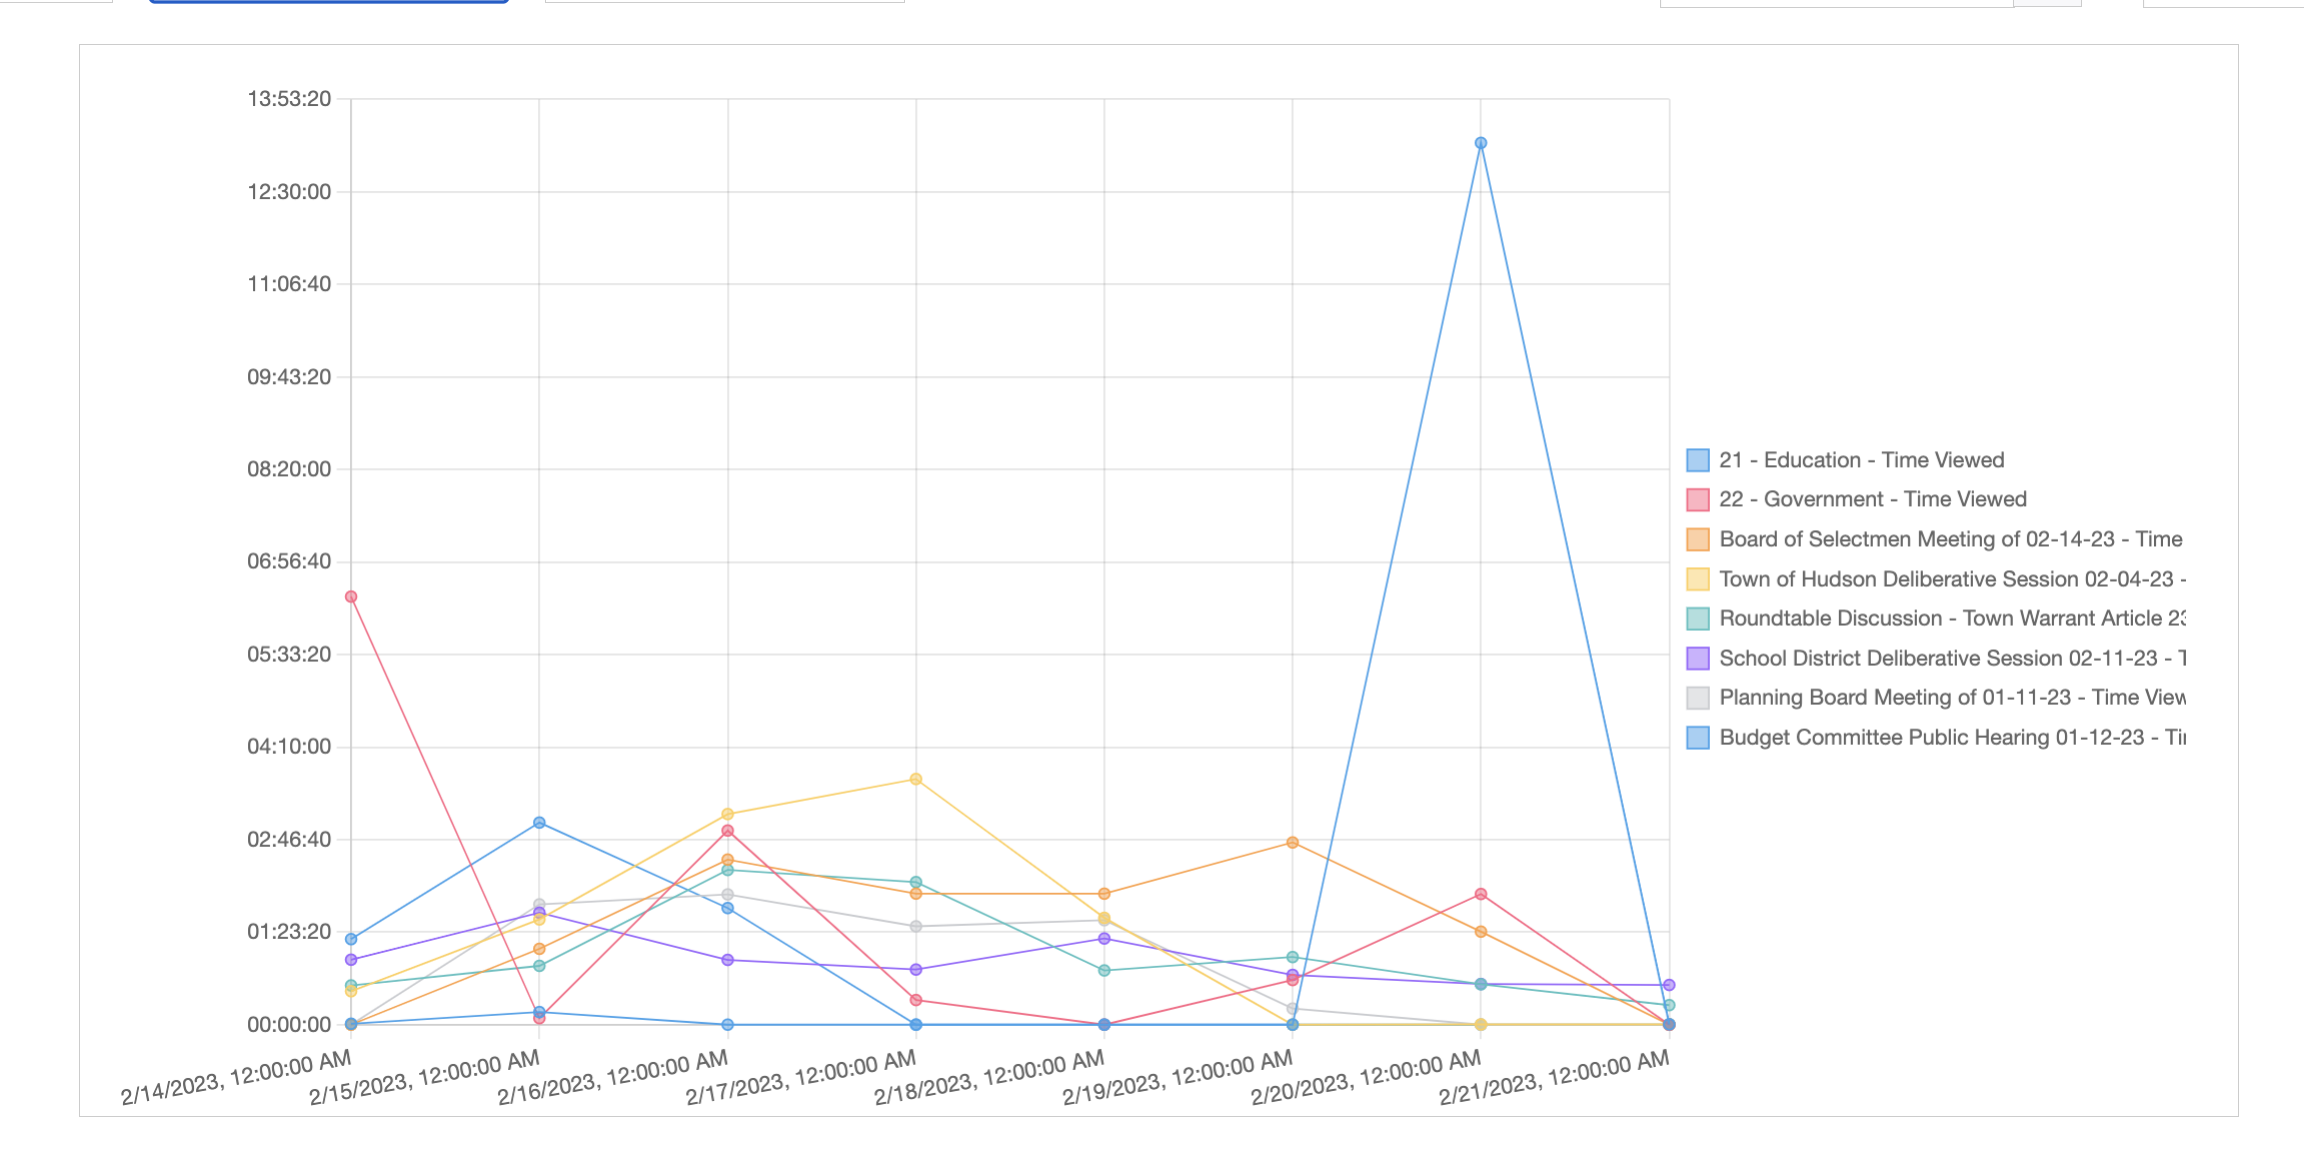
Stats Summary
The stats summary provides quick, at a glance, easy to read summary of total streaming for the selected time range.

Data Table
The data table gives access to raw numbers of the streaming metrics for the report's time range. Individual streams can be expanded to see metrics for individual data rollups. The data table can also be downloaded as a CSV for import into spreadsheet programs such as Excel or Google Docs.
Quick Tips
Want to see how many viewers tuned into a live event?
Switch Stream Type to Live Streams and the Chart Type to Time Series and set the Date Range of the report to the day of the live event. When viewing a single day the Time Series chart will switch to an hour by hour breakdown to really help narrow in on live stream views.
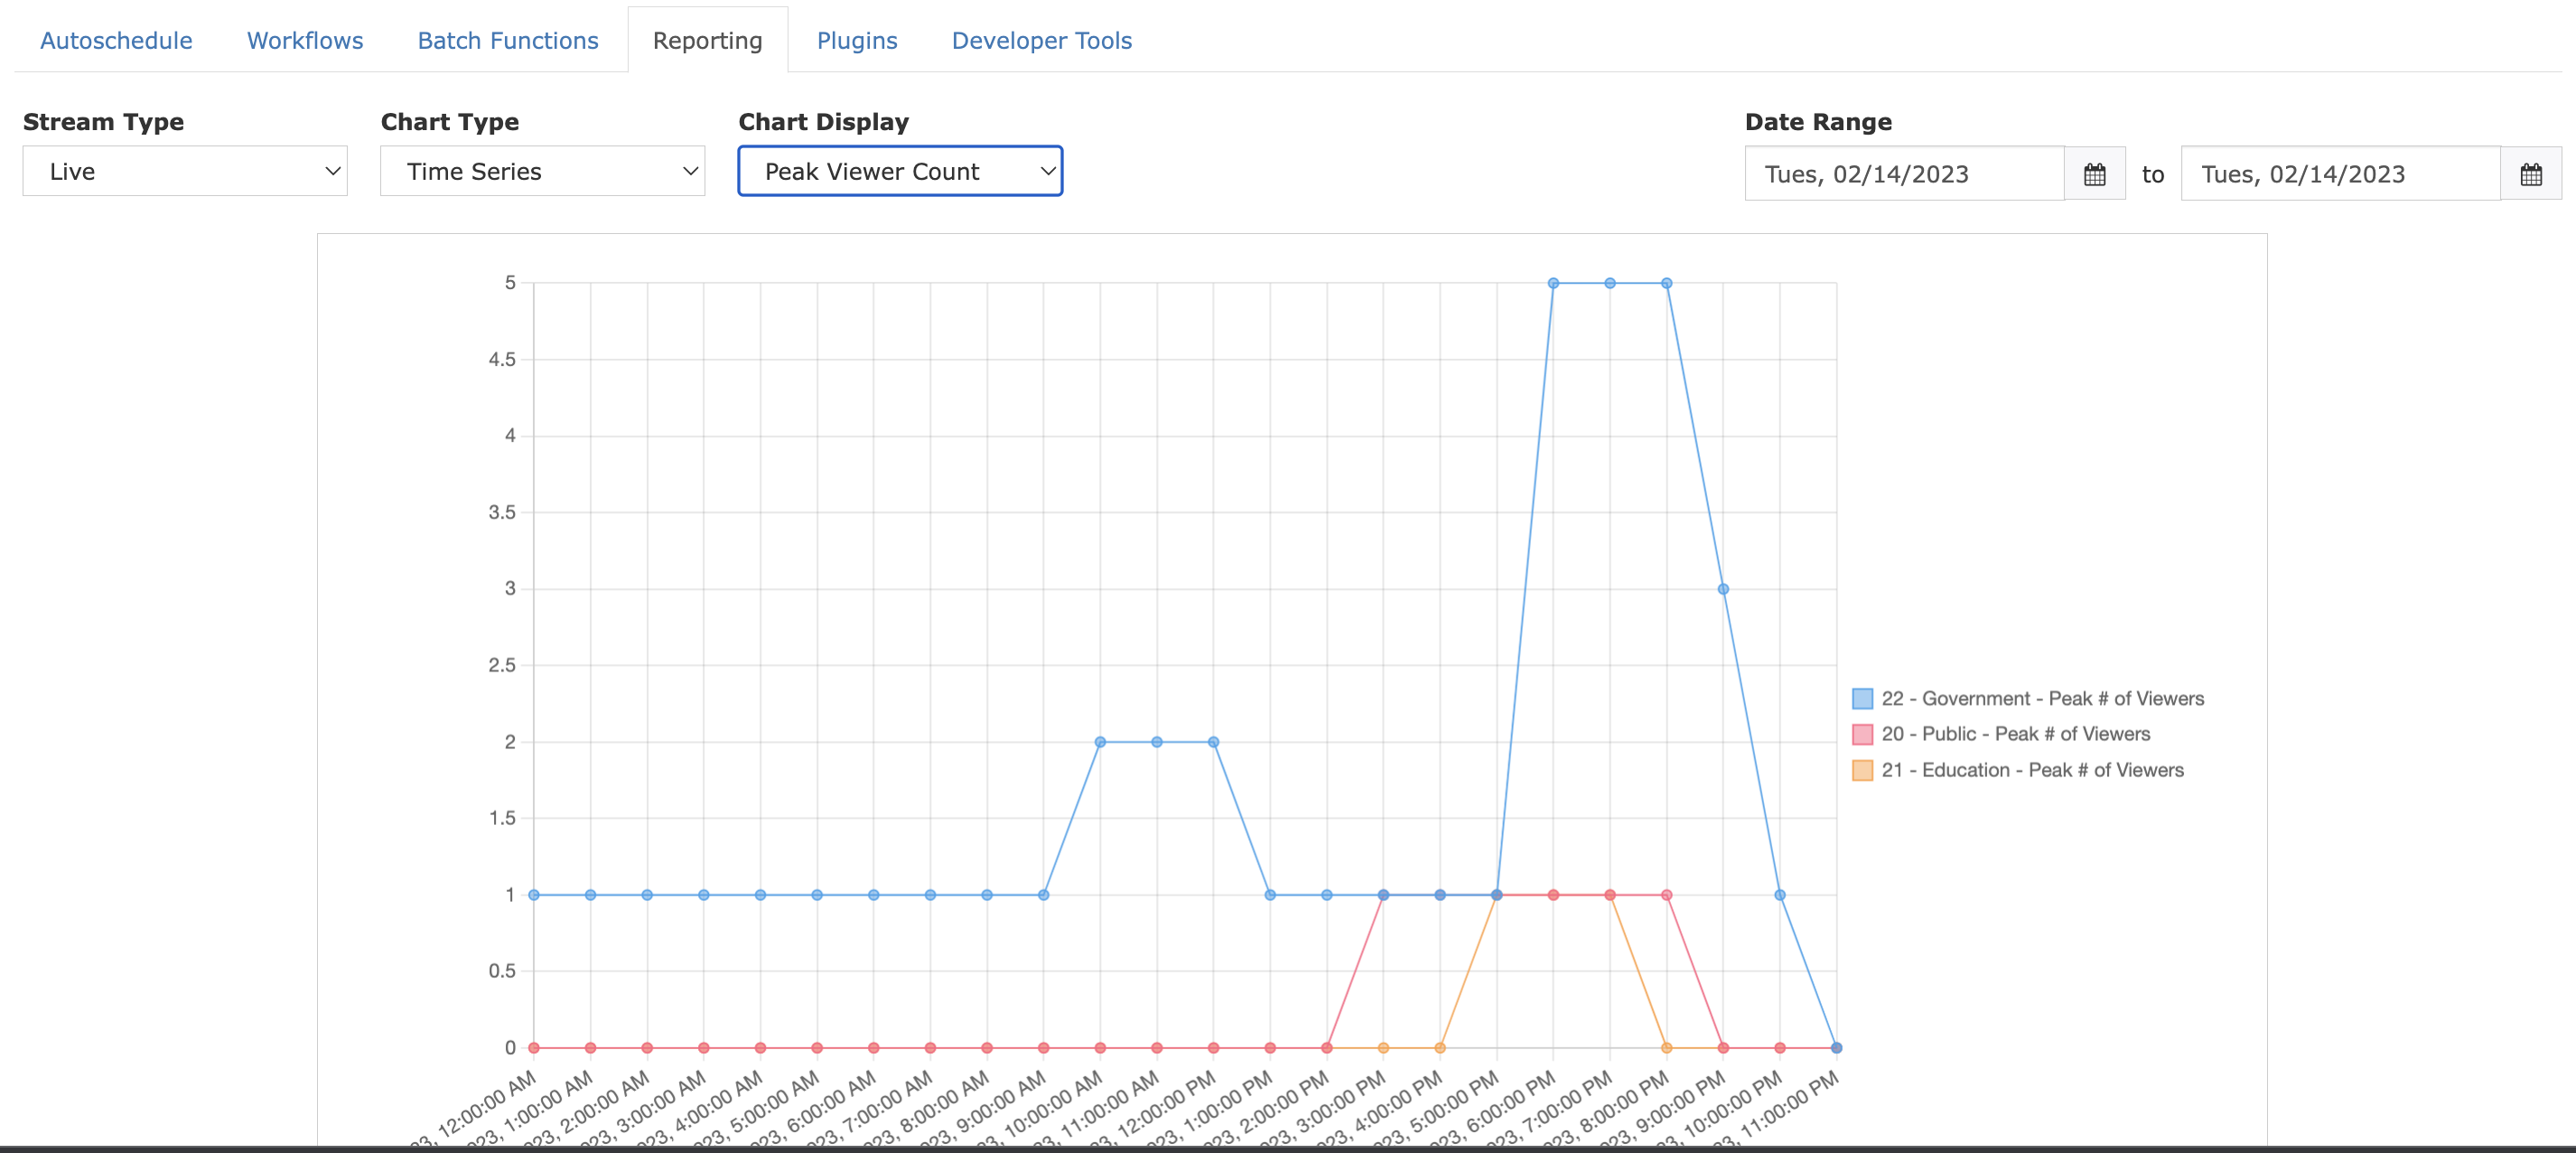
Plugins
The Plugins screen shows various plugins that are loaded on your system.
Default Plugins
Cablecast includes many plugins by default. The source code for these plugins is included and you are free to modify them if you would like to modify their functionality.
Some plugins are a legacy feature, and could be subject to removal in a future software version of Cablecast. Use at your own cautions.
The following plugins are included with Cablecast:
- Dashboard Widget: Allows you to download and install a Mac OS Dashboard widget that shows the upcoming schedule for your channel.
- Facil Import: Allows you to import data into Cablecast from Facil.
- iCal Schedule: Allows you to generate an iCal compatible schedule of your channel’s programming.
- Label Printer: Allows you to print labels for physical media using the data from Cablecast. You can create your own layouts that fit your workflow.
- Print Schedule: Allows you to print formatted schedules of your programming.
- RSS Schedule: Generates an RSS feed of upcoming schedule information.
- Web Schedule: Generates a web page of upcoming schedule information.
Developer Tools
The Developer Tools area includes the following options:
- RESTful API: Links to the help for Cablecast's built-in RESTful API. The API can be used to integrate with external systems.
RESTful API
A REST API (also known as RESTful API) is an application programming interface (API or web API) that conforms to the constraints of REST architectural style and allows for interaction with RESTful web services. An API is a set of definitions and protocols for building and integrating application software. It’s sometimes referred to as a contract between an information provider and an information user—establishing the content required from the consumer (the call) and the content required by the producer (the response).
In the context of a Cablecast RESTful API, advanced users with knowledge of utilizing an API can integrate Cablecast into third-party technologies and custom solutions.
Settings
There four types of configurable settings:
- Location Settings
- System Settings
- Cablecast CG Settings
- User Settings
Location Settings
The menu provides access to settings specific to the current Location.
For more on multi-location setting systems see Locations.
- Location Settings
Shows Tab
Settings in the Shows tab are used to configure options available when creating and editing Shows using the Show Record.
Categories
A Category is an option used to group like Shows together. Sports, Meetings, Arts & Entertainment are all examples of categories.
From this screen, you can create a Category by clicking + New Category. Clicking on any Category in the list will bring up its details, where it can be changed or deleted.
Custom Fields
Custom Fields allow you to store additional data as part of a Show record. These fields are searchable within Cablecast and are available for public use through the Public Site, Reporting, and Cablecast APIs.
Cablecast supports unlimited Custom Fields. To create a new field click + New Custom Field. When creating a new field you can choose from the following field types.
- Text: Supports single line and multi-line text input. For example, a show description could be stored in a text field.
- List: Supports a pre-defined set of options. Use List fields to build drop down lists where you want to tightly control the format of the custom field value.
- Date: Supports entering a calendar date. For example, a production due date could be stored in a date field.
- Number: Supports entering a number including decimals. Use the number fields to store values, like production budget.
- File: Allows attaching a file to a show record. Combined with Public Site Show Fields you can attach a pdf and have it viewable in the public site.
- Producer: Allows associating a Cablecast Producer to a show record. Use producer fields to attach more than one producer to a show, such as a Camera person.
To edit an existing field click Edit next to the field you want to edit. The following options are available when editing or creating:
- Name: A descriptive name for the field.
- Select Options: Add and Remove options for the select list. Use the to add new options and the button next to an option to remove them. The order of the options can be controlled by dragging and dropping the three horizontal lines to the left of the option.
- Input: Text options allow selecting the type of input to use in the Show record. Multi-line input is for long form text while single-line text is for shorter pieces of text.
Dispositions
Dispositions set the current state of a piece of physical media.
Each Disposition has the following options:
- Name: A descriptive name for the disposition. This value will be shown throughout Cablecast.
- Allow Assignment: This setting determines if Autopilot will permit media having the given disposition to be assigned for playback.
Formats
A Format is used to link to the devices that can play it. The Formats screen can be used to add, edit, and delete Formats. The fields of a Format are described below.
- Formats: The name of the format. This value will be displayed in the dropdown when selecting a format.
- Primitive Format: The type of device the Format is compatible with. The Primitive Format will affect what Devices can use the Format. For more information see Primitive Formats.
The configuration options for a Format are described below.
- Generic: Use for devices that do not fall into any of the below categories. Generic devices do not require any special configuration to operate. Tape devices that do not support Timecode are an example of Generic devices.
- Timecode Tape: Use for tape devices that can be queued to a specified timecode.
- DVD: Use for DVD players and changers.
- Digital File: Use for video server devices that playback a piece of digital media requiring a filename such as the SX Video Servers.
- Live: Use for live inputs into the routing switcher such as studio and satellite feeds.
- Network Stream: Use for live sources that are delivered as a network stream. These streams will be played or recorded by a compatible video server.
IFrames
The IFrames settings screen allows you to configure sections of the Show Record that will display external websites. This is useful for integrating with 3rd party tools.
Each IFrame has the following settings:
- Title: The text that will be used for the heading of the Show Record section.
- IFrame Height: The desired height of the IFrame in pixels.
- URL: The page that should be used as the IFrame.
The field can include replacement patterns that will be replaced with data about the specific Show that is loaded. Click to see all available patterns.
Projects
Projects are groups of Shows, typically a series of programs.
- You can create a new Project by clicking
+ New Project. - You can click to select an existing Project to edit or delete it.
Each Project includes the following options:
- Name: A descriptive name for the Project.
- Description: A longer description of the project.
- Producer: The producer that normally creates episodes of this Project. You can still set the Producer of individual Shows within the Project.
- Podcast: If this box is checked, Cablecast will automatically expose an iTunes compatible Podcast feed for all episodes of this Project.
Schedule Tab
The Schedule tab allows you to configure various Schedule related settings.
Blocks
Blocks serve as a template for the Advanced Paste operation in the Schedule. You can create a new block by clicking + New Block. You can click an existing block in order to edit it.
Each block has the following settings:
- Block Name: A descriptive name for the Block. This name will show up in the Advanced Paste screen.
- Given Run at: Source Day: Sets the date that the rest of the fields will base their calculations on.
- Given Run at: Source Time: Sets the time that the rest of the fields will base their calculations on.
- Paste To: Add as many individual dates as needed. After a date has been added you may add times.
I/O Tab
The I/O Tab allows you to configure your system's devices, router, inputs, outputs, video on demand and live streaming.
Control Module Sets
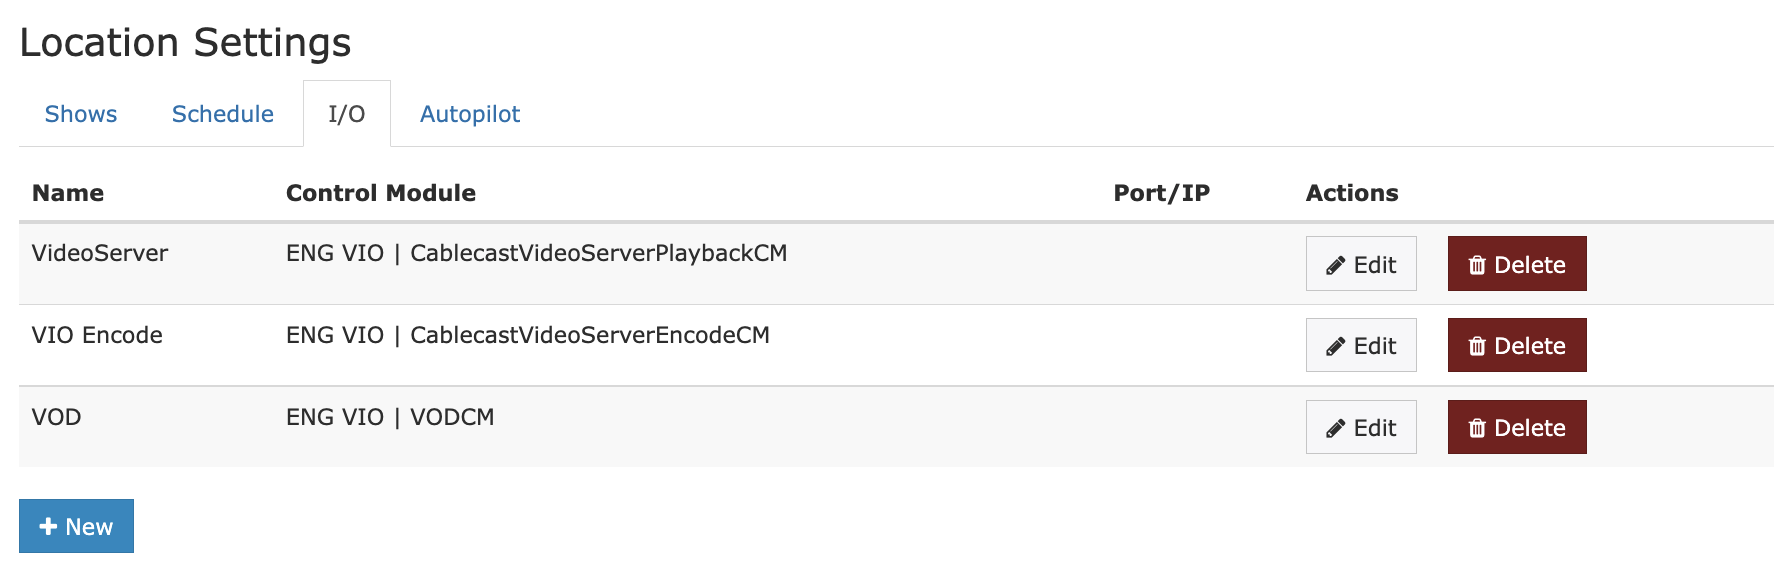
The Control Module Sets screen allows you to configure the Control Modules that will be used to control the various devices that comprise your system. Each row in the table represents a Control Module that is running on a Server. Each Control Module controls a specific type of device.
The following settings are available for each Control Module Set:
- CMS Name: A descriptive name. This field is the label that will be shown throughout Cablecast.
- Control Module: Select the Server / Control Module combination needed for your device. This list includes every Control Module that is running on each configured Server.
- See Servers for more information.
- Port/IP: The IP address and port of the resource on the network.
- Actions: Methods of interaction with this Module.
For detailed information about configuring individual Control Modules see the Cablecast Control Module Reference.
Router
This screen allows you to select which Control Module Set controls the Routing Switcher.
Devices
The Devices screen allows you to configure the Inputs of your Routing Switcher as well as the devices that are connected to them.
Each row in the table includes the following fields:
- Router Input: The Routing Switcher input that the device is connected to. This field will be empty for devices.
- Name: The descriptive name for the device. Clicking the will open the Device Edit screen which is described in Editing Devices.
- Runs: The total number of Shows that the device has played.
- Active: Indicates whether or not this device is available for use.
Editing Devices
The Device Edit screen hides and displays various fields depending on the options you choose. Not all of the following fields will be shown at the same time.
The following fields are available:
- Name: A descriptive name for the device. This field is used as a label throughout Cablecast.
- Active: Sets whether or not this device is available for use.
- Device Function: Sets what functions the device is able to perform. See Device Functions for an explanation of possible values.
- Device Type: Sets the class of device that is connected. See Device Types for an explanation of possible values.
- Router Input: The Routing Switcher Input number that this device is connected to.
- Router Output: (Only shown for devices that support recording) Sets the routing switcher output that is connected to this device.
- Device CMS: Sets which Control Module Set is responsible for controlling this device. Multiple devices can be configured to use the same CMS.
- See Control Module Sets for more information.
- Shadow CMS: Sets a secondary Control Module Set which can be used to provide redundancy in the event that the primary device fails. Both devices will receive identical events from Autopilot.
- Device Address: This field is only required for certain Control Modules. Sets the sub-device that is to be controlled when multiple Devices are using the same Control Module Set.
- Device Formats: Select up to three that the device is capable of playing. See Formats for more information.
- Wake Device: Tick this box if this device has a power-saving function that needs to be deactivated before playback can start.
- Wake Duration: Sets the amount of time (in seconds) that should be allotted for the Wake Sequence to complete.
- Load Duration: Sets the amount of time that is required for this device to complete a Load command. You will need to manually time the device in order to find the appropriate value.
- Jump Duration: Sets the amount of time that is required for this device to complete a Jump command. For linear devices such as a Timecode VTR this field should be set to the maximum amount of time that it could take, such as cueing from the end of a tape to the start.
- Take Delay: Sets the interval (in seconds) between the Play command to the device and the Take command to the routing switcher. Some devices (such as VTRs) take a few seconds to actually start playback. Correctly setting this value will prevent the tape startup from appearing on-air.
- Post Roll: Sets the interval (in seconds) between the end Take command to the routing switcher and the user-defined .
- Device End Action: Select one or more Actions that should be performed at the end of a scheduled playback.
For Video Server Playback Devices:

- Device Resolution: This settings determine the resolution of the output signal.
- Audio Normalization: Determines whether audio normalization will be applied to the playback signal. If enabled, the Target Loudness is used to set the normalization level. The value is in LUFS.
- Volume Adjustment: If Audio Normalization is not enabled, the Volume Adjustment is used to set the absolute audio adjustment applied to the playback. The value is in dB's.
- NDI Output: If this box is checked the video server will generate an NDI output stream for this device.
For Video Server Record Devices:
- Volume Adjustment: The Volume Adjustment is used to set the absolute audio adjustment applied to the encoder input. The value is in dB's.
Device Functions
- No Device: Instructs Cablecast that there is no controllable device connected to this input. This setting is almost never used.
- Playback Only: This device is used for automatic playback of scheduled programming.
- Record Only: This device is used for automated recording.
- Playback & Record: This device is capable of both playback and recording functionality. Note: this option implies that the device cannot perform both tasks at the same time. If your device is capable of both (like most video servers) you will need to create two separate devices.
- GPI: This device is a GPI interface device which can be automated using Manual Events.
Device Types
- Generic: Represents a standard VTR, or devices that perform similarly. This device will receive a Play command to initiate playback.
- VTR(TC): Represents a VTR that is capable of cueing tapes based on Timecode. This device will receive a Cue command prior to playback followed by a Play command.
- VTR(TC-Multitape): Represents a Timecode-capable VTR that can hold multiple tapes simultaneously. This device will receive a Load command to load the correct tape, a Cue command to cue it to the correct segment, followed by a Play command to initiate playback.
- DVD: Represents a DVD player. This device will receive a Jump command which sets the Title and Chapter to be played followed by a Play command to initiate playback.
- DVD(Multidisc): Represents a DVD changer. This device will receive a Load command to load the correct disk, a Jump command to select the appropriate Title and Chapter followed by a Play command to initiate playback.
- Digital File: Represents a video server. This device will receive a Cue command to select the correct file and start position followed by a Play command to start playback.
- Live: Represents a Live source. No command is sent to start playback for live sources.
- Bulletin Board: Represents a source that is available at all times such as an on-air character generator.
File Stores

Different devices can specify different File Stores (if applicable). If the device is "Playback and Record", you'll be able to select both types of File Stores. However, if the device is playback only, or record only, you'll only see their respective settings.
You can select the File Stores by clicking on the items within the list. To select multiple File Stores, hold control on your keyboard while selecting items. To commit your changes to the File Store(s), Save the device by selecting Save at the bottom of the page UI.
Network Streams
The Network Streams screen allows you to configure Network Streams that can be used throughout Cablecast.
The following fields are displayed in the table:
- Name: The descriptive name of the Network Stream.
- URL: The uniform resource locator for the stream.
- Edit: Button for editing that stream
Editing Network Streams
The following fields are displayed:
- Name: A descriptive name for the stream. This value will be displayed throughout Cablecast.
- Type: The type of Network Stream (RTP, HLS Live/VOD, NDI, RTMP, RTSP, YouTube Live)
- Address: The host's IP address or DNS name for the stream.
- Generate Captions: Select to enable caption generation for this stream.
- Provider: Which Captioning appliance to automatically generate captions with.
- Vocabulary: Which custom vocab to use (If configured)
- Standby Graphic: Which graphic to use as a standby graphic when source is not playing
Outputs
The Outputs screen allows you to configure the outputs of your routing switcher.
The following fields are displayed in the table:
- Router Address: The routing switcher output number.
- Name: A descriptive name for the output. This field is used as a label throughout Cablecast. Clicking the Name will open the Edit Output screen as described in Editing Outputs.
- Active: Determines if this output is currently available for automation or not.
Editing Outputs
The following fields are displayed:
- Router Address: The routing switcher output number.
- Name: A descriptive name that will be used as a label throughout Cablecast.
- Type: Either Preview or Channel. An output that is configured as Channel will be the final destination for a schedule, while a Preview output is used for internal monitoring of sources.
- Default Input: The Device that should be on-air when nothing is scheduled, such as a bulletin board.
- Primary Device: The video server Device that will air all the channel's video server content. It will also be used to passthrough video from available encoders on the same server.
- Fade CMS: The Control Module Set that controls fade-to-black for this channel.
- Rating CMS: The Control Module Set that controls V-Chip rating insertion for this channel.
- Default Rating: Sets the V-Chip rating that should be used if one is not set for a specific show.
Video On Demand
This screen allows you to configure Video on Demand for your station.
The following settings are available:
- Video on Demand Server CMS: The Control Module Set for the Video on Demand server.
- Store New VODs: The File Store where newly transcoded Videos on Demand are placed.
- Store Additional VODs: One or more File Stores where newly transcoded Videos on Demand are placed if the primary store becomes full.
- Maximum Resolution: Sets the transcoding quality that will be used if one is not set in the specific Show.
- Multiple Audio Program: Sets the default behavior for VODs with more than one audio source. Individual VOD MAP configurations will override this configuration. Setting this configuration to Default will have VODs defer to System Settings.
- Primary Audio Label: The primary audio source's display label.
- Primary Audio Language: The primary audio source's language.
- Secondary Audio Label: The secondary audio source's display label.
- Secondary Audio Language: The secondary audio source's language.
- Embed Template: Sets the HTML that will be used to generate embed codes for VOD files. Clicking will set the back to the factory default setting.
- Template Tokens: These tokens can be utilized within the in order to further customize it.
Live Streaming
This screen allows you to create and delete Live Streaming Configurations using the new and delete buttons.
Clicking on the name of a stream will open the Edit Live Streaming Configuration screen.
Edit Live Streaming Configuration
This screen allows you to adjust the settings for a particular Live Streaming Configuration.
The following fields are available:
- Name: A descriptive name. This field is used as a label throughout Cablecast.
- Channel: Select the Channel that this stream will show.
- Device: Sets the device which will run the Live Stream.
- Multiple Audio Program: Enable for Live Streams with more than one audio source.
- Primary Audio Label: The primary audio source's display label.
- Primary Audio Language: The primary audio source's language.
- Secondary Audio Label: The secondary audio source's display label.
- Secondary Audio Language: The secondary audio source's language.
- Stream Resolution: Sets the input resolution that the encoder should be configured to use. This must match the resolution of the video connected to the encoder's input.
- Qualities: Sets the encode qualities that should be used. You may select more than one quality.
- Live Streaming Exempt Paused Template: The HTML template that should be displayed when an on-air program is set as Live Streaming Exempt.
- Stopped Template: The HTML template that should be displayed when the stream is stopped.
- Embed Template: The HTML template that should be displayed when a user views the stream.
- Restore Default: Resets the given template to the factory-default value.
- Template Tokens: These tokens can be used in any of the templates to further customize the.
Network Stream Destinations
This screen allows you to create and configure Network Stream Destinations. Network Stream Destinations enable the ability to publish server outputs to a third party. If your Cablecast Cloud Services is configured with one or more Social Integrations, you will be able to publish to social platforms, such as YouTube and Faceboook.
Editing Network Stream Destinations
Click + New Stream Destination or Edit on an existing Network Stream Destination to create or reconfigure.
The following fields are available:
- Stream Type: The type of Network Stream Destination.
- Generic RTMP(s): Publish to a generic Real-Time Messaging Protocol.
- YouTube: Publish to YouTube.
- Facebook: Publish to Facebook.
- Integration: The Social Integration this destination is attached to. Only present for non-Generic RTMP(s).
- Name: Name of the Network Stream Destination.
- Stream URL: Network stream URL. Only present for Generic RTMP(s).
- Stream Key: Network stream key. Only present for Generic RTMP(s).
Configuring Social Integrations
If you have not yet created a Social Integration on Cablecast Cloud Services, please reach out to the Cablecast Sales team at sales@cablecast.tv for more info.
Social Integrations require your Organization in Cablecast Cloud Services to have authenticated with the platform in question. Once at least one integration has been authenticated and your Network Stream Destination is configured to a social platform Stream Type, you will see your integration under the Name dropdown. The Stream URL and Stream Key configuration options will no longer be present, as they will be automatically populated by Cablecast on Save.
To manually refresh the status of your Social Integrations within Cablecast, click the Refresh button.
Utilizing Network Stream Destinations

After you have configured a Network Stream Destination, it's time to schedule the broadcast. Scheduling a live Show on the Schedule will now show a new Sattelite icon to the right of your run for you to create the broadcast event. Clicking this button will bring up the Run Details Overlay with the Network Broadcast Settings tab open. Choose your Social Integration, Network Stream Destination, hit Save, and Cablecast will send the event to the social platform during the next Autopilot send so it will be ready to go live.
Autopilot Tab
One option is available here:
- Configuration: Configuration settings for this system's Autopilot feature
Autopilot
The Autopilot settings screen includes default options that will be use when Sending Autopilot. If you find that you are adjusting the parameters of your Autopilot send each time, you might consider changing these defaults.
The following settings are available:
Autopilot Send Settings
- Range: How many days out an Autopilot send should default to.
- Bump Warning: Controls the Send Report screen that appears after the send finishes and adjusts the warning threshold based on bump length.
- Use Sticky Devices: Tick this box if you would like Sticky Devices enabled by default. See Sticky Devices for more information.
- Send Events to Hardware: This box should normally be ticked. You may sometimes want to disable sending events to hardware for troubleshooting purposes.
- Clear Bumps: Ticking this box will cause Cablecast to reset the bumps on all Shows when Autopilot is sent. For best results, you should keep this box ticked.
- Automatically Send Autopilot: Allows Autopilot to automatically send based on a custom schedule.
- Time: Time of day to send Autopilot.
- Days: Which days of the week on which to send Autopilot. You can select as many as you see fit.
When using automatic Autopilot sends, it's recommended you also configure email notifications. In the event of errors or failures, you will receive an email detailing the issue.
Email Notifications
For this feature to work, make sure your Email Server Settings are configured properly in FrontDoor.
You can list email addresses to get reports when there is an Autopilot send failure or error. This is most useful when paired with the automatic Autopilot send feature.
Control Rooms
Control Rooms are where rooms can be edited, deleted, or created.
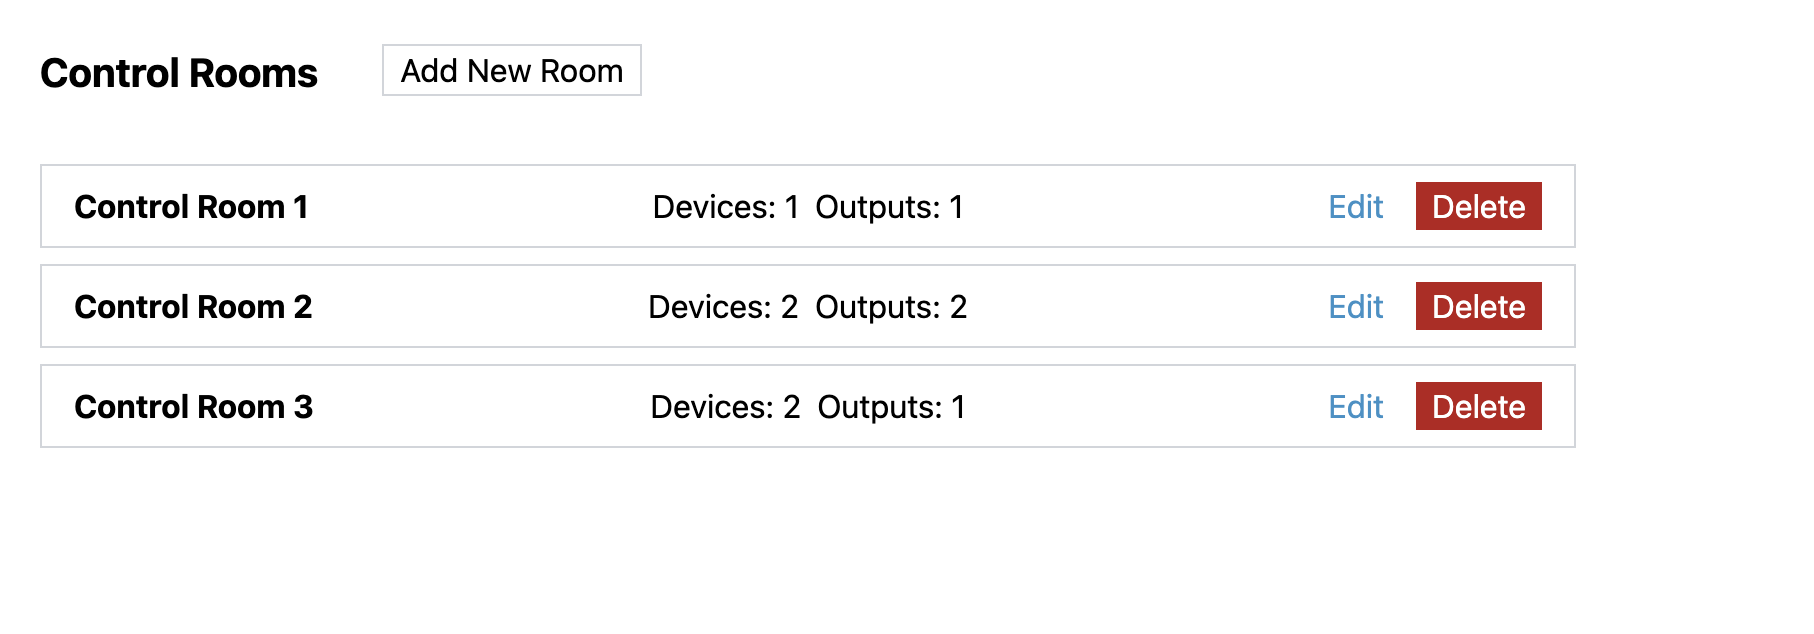
Editing a Control Room
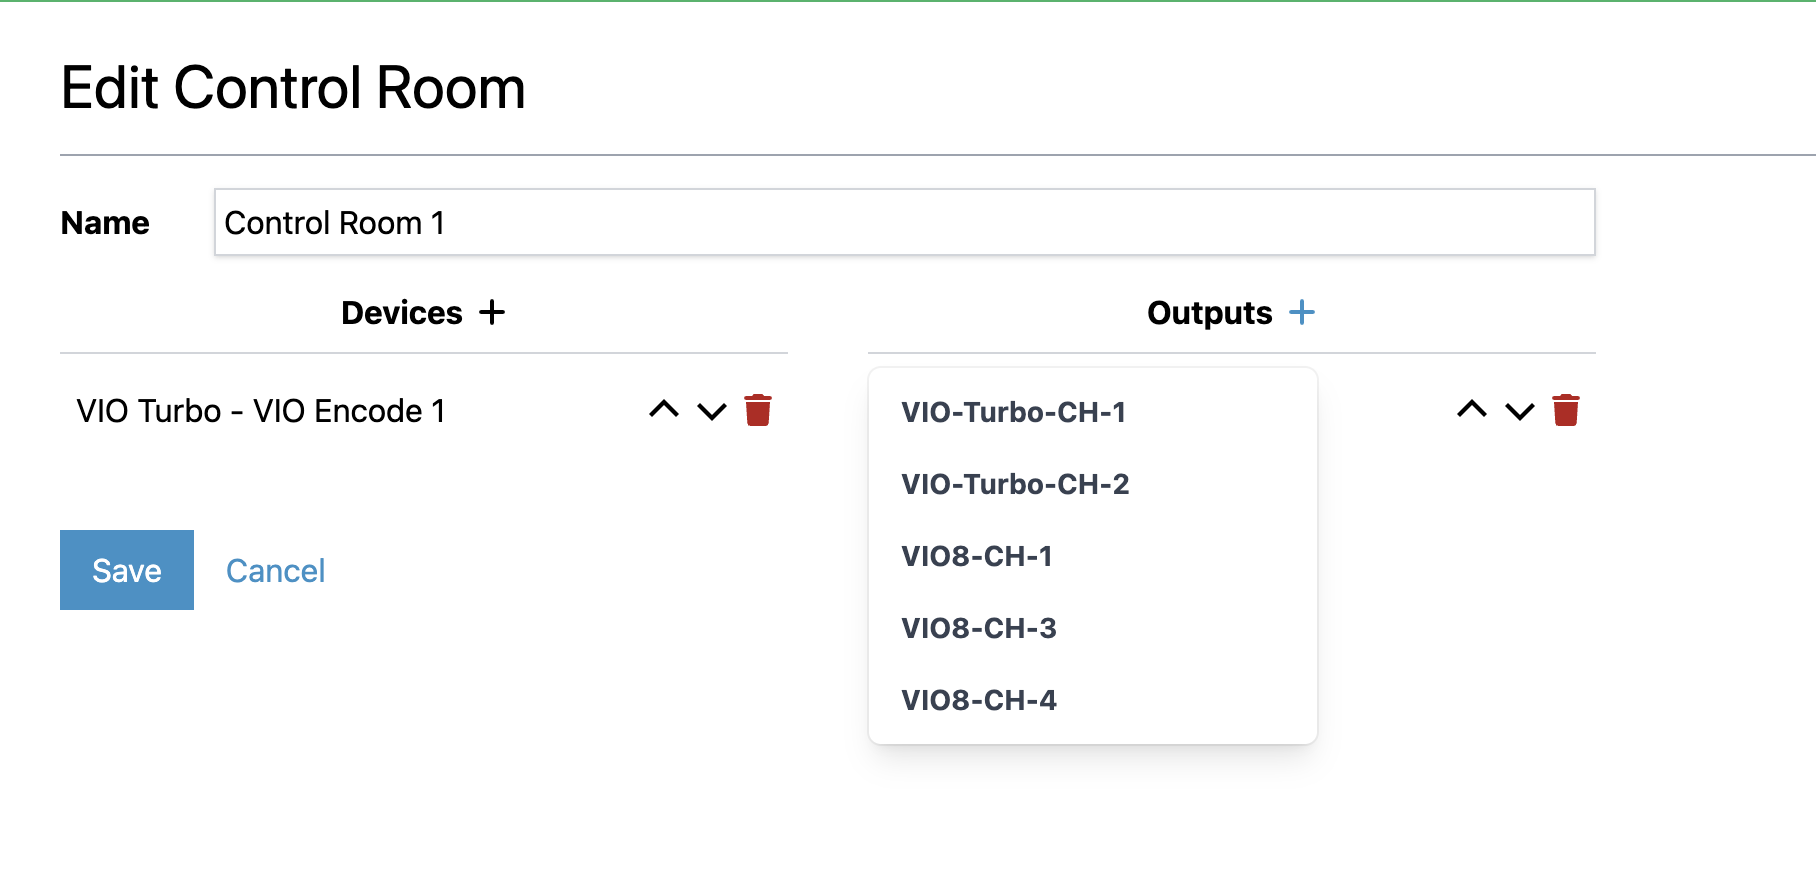
- Name: Change the name of the Control Room.
- Devices:
- Add: To add a new device, click on the plus icon next to Devices.
- Delete: To delete a device, click on the red trashcan icon of the device you would like to delete.
- Edit Device Order: Click on the up chevron to move a device up in order, and the down chevron to move a device down in order.
- Outputs:
- Add: To add a new output, click on the plus icon next to Outputs.
- Delete: To delete an output, click on the red trashcan icon of the output you would like to delete.
- Edit Output Order: Click on the up chevron to move an output up in order, and the down chevron to move an output down in order.
- Save: Click to save any changes.
- Cancel: Click to cancel any changes.
- Macros:
- Add: To add a new macro, click on the Add Macro button.
- Delete: To delete a output, click on the red trashcan icon of the output you would like to delete.
- Edit Order: Click on the up chevron to move a output up in order, and the down chevron to move a output down in order.
Macros

Macros are custom commands that run a set of predefined events. You can utilize macros while operating in a Control Room.
Hitting the Add Macro or Edit buttons will bring up an overlay to configure a macro. You can assign each macro a name and a hotkey with which to activate it. Hit the Add Step button to add an additional event for the macro to run. These steps can be re-ordered by hitting the arrow icons and edited by hitting the edit icon.
Editing a step in a macro will allow you to change the step's name and type. The step's type will determine what other information is required. For example, choosing Device Action will prompt you to select the Device Source and what Action to perform on the device.
Hit Done after editing both your steps and macros to persist your changes.
System Settings
The System Settings menu allows you to adjust options that effect the Cablecast system as a whole. This settings UI is broken out into headers with their respective settings beneath.
System Configuration
Locations
Locations allow your Cablecast system to perform complex automation involving multiple head ends. You could have one head end at City Hall and another on the other side of town. For example, Cablecast can be configured for network-style contribution routing allowing programs to originate from either Location and play on a single shared channel.
If you feel that additional Locations would be useful for your system, please contact our support department for more information.
To create a new Location:
- Click
New. - Click to edit the new Location.
- Enter a descriptive name for the new Location.
- Click
Save.
To delete a Location:
- Tick the box next to the Location that you would like to delete.
- Click .
- Click to confirm that you would like to delete the Location.
Channels
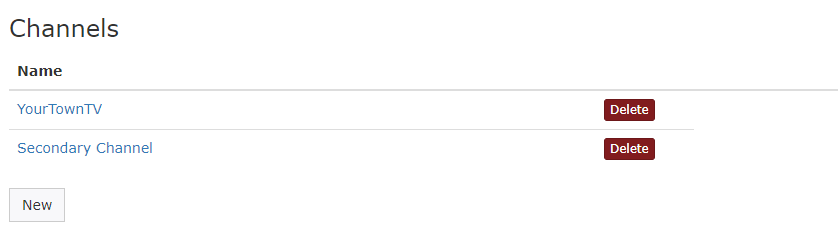
Each Channel in Cablecast represents an automation destination. Each Channel has its own independent schedule and settings.
To create a new Channel:
- Click
New. - Click on "New channel" in order to edit it.
- Click
Channel Details. - Enter a descriptive name for the new Channel.
- Click
Save.
To delete a Channel:
- Click
Deletenext to the Channel that you would like to delete. - Click to confirm that you would like to delete the Channel.
Clicking the name of a Channel will open the Channel settings screen.
Channel Details
- Channel Name: Sets the name that will be used for this Channel throughout Cablecast.
- Interstitial Length: Defines a minimum gap between programming on the Schedule. Setting this to will disable interstitial gaps and allow true back-to-back playback.
Channel I/O
- Location: Sets the Location that produces the final channel output. If there is only one Location defined, this setting is disabled.
- Output: Sets the routing switcher output that is used as the final channel output. For more information on outputs see [Outputs](#sec: UiReference: Settings: LocationSettings: IOTab: Outputs).
DSK
- Show Bug Graphic: Determines when the Channel's bug will be active. Choose from: Always, Never or During Run.
Channel Languages
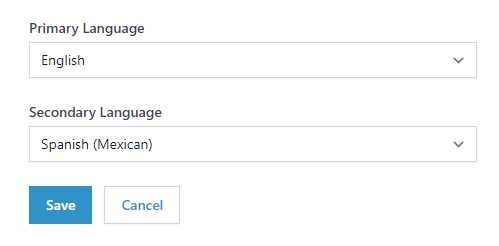
The Primary Language and Secondary Language settings determine which caption languages will be displayed in the CC1 and CC3 area of the SDI (i.e. Channel) and the Live Stream outputs. If a show is being played out and has captions matching the chosen languages the caption data will be sent, otherwise nothing will be displayed. If you are not doing translations the Secondary Language can be set to None. Most users will set the Primary Language to English and the Secondary Language to None or the language that is typically translated.
Note: Only the 7 supported broadcast caption languages are available in these settings.
Servers
The upper most section of this UI shows the configured servers as part of your Cablecast eco-system. This includes things like automation systems, video on demand systems, livestreamers and other Cablecast family hardware.
To create a new Server:
- Click
New. - Enter a descriptive name for the Server in the field.
- Enter the IP Address or DNS Hostname of the Server in the field.
- Click
OKto create the new server.
To edit a Server:
-
Click
Editfor the Server that you would like to edit. -
Update the desired field(s):
- Name: A name for the server
- Host Address: The IP address of this server on your network.
If the server is a model that supports video or CG playback you will have the following settings available for the Cablecast CG background audio:
- Audio Device: Choose any available line-in audio device on the server to be used for background audio.
- Volume Adjustment: Enter an amount of audio adjustment applied to the playing of background audio.
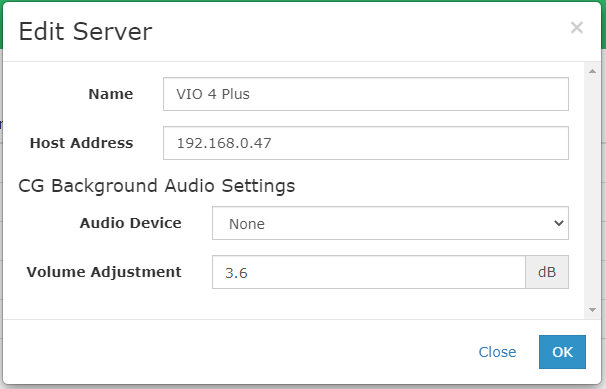
- Click
OKto commit the changes.
To delete a Server:
- Tick the box next to the Server(s) that you which to delete.
- Click
Delete. - Click to confirm.
Once Cablecast connects to a Server it will populate the remaining fields in the table. The displayed fields are:
- Name: The user-defined name of the Server. This value will be displayed throughout Cablecast.
- Host Address: The IP Address or DNS Hostname of the Server.
- Connection: Indicates the real-time status of the connection to the Server.
- RAID: Indicates the current status of any RAID storage volumes on the Server. This data is updated every few minutes.
- Volumes: Indicates the current status of free space on the Server's storage volumes.
- Last Update: Shows the time at which the system last updated information about this Server.
- Version: Shows the version of Cablecast that is installed on the Server.
- Time Difference: Shows the offset between the clock of the Server and the main Cablecast Server.
- Remote Access: Provides the remote access code that Cablecast tech support staff will need in order to connect to this server for troubleshooting.
- Edit: Click to update the details of the Server.
File Stores
File Stores are used to define different areas within your systems to store files. Files can include things such as video files for show records, video on demand content, recordings (encodes), and more. Additional File Store definitions can be configured within File Stores of a device.
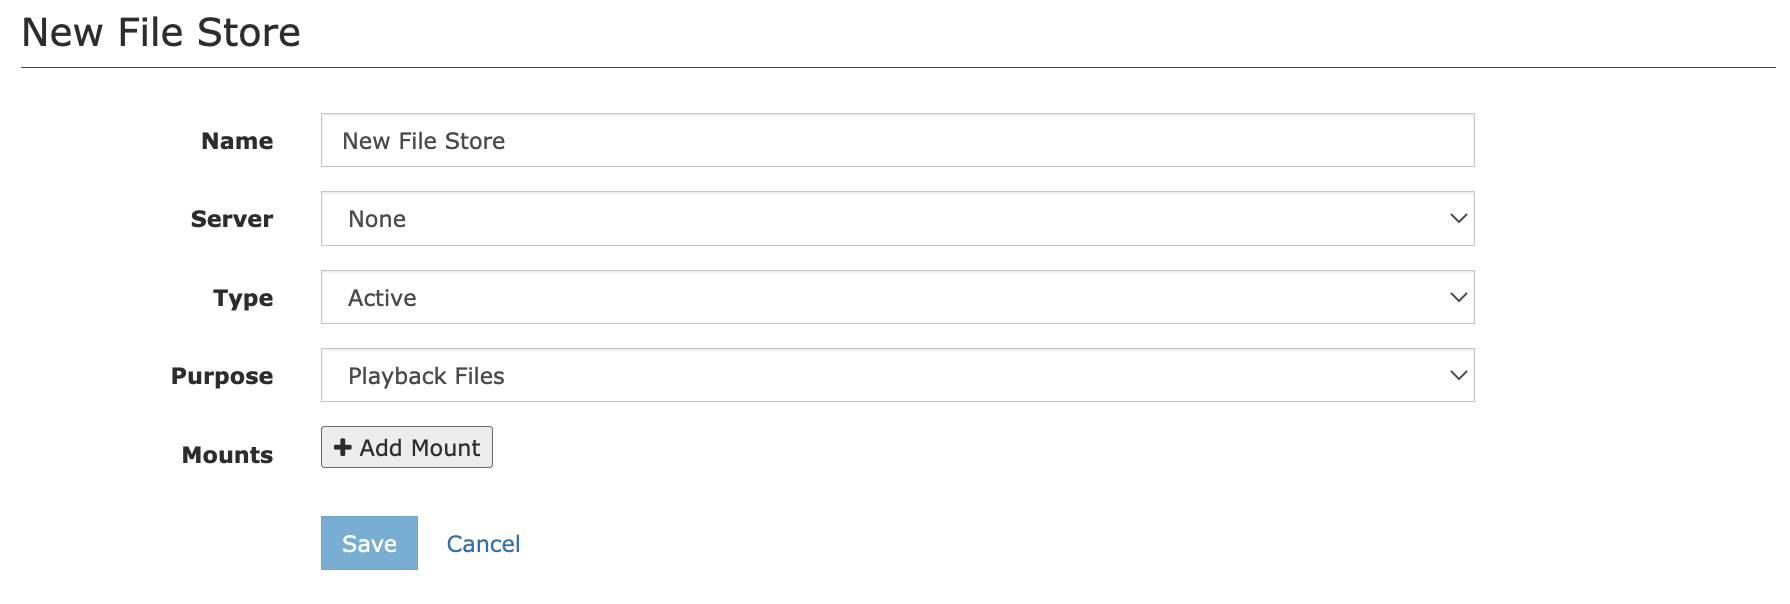
There are two different Types of File Stores:
- Cablecast Server: A File Store on one of the Cablecast servers in your Cablecast network.
- Local Network: A path to a directory somewhere on your local system. This doesn't have to be a Cablecast device.
To create a new File Store:
- Click
Newunder the File Stores section. - Define a "Name" for this File Store.
- If the File Store is located on a Cablecast Server, select the appropriate Server name from the dropdown.
- This cannot be changed after a File Store is created.
- Select the "Type" of File Store
- Active: Actively houses content that will be used for playback.
- Backup & Archive: Only used for the purposes of backing up and archiving of content.
- Select a "Purpose".
- Playback Files: The File Store contains video files and/or additional playback content.
- VODs: The File Store contains exclusively Video on Demand content.
- Create/Add at least one Mount for this File Store. Mounts are file locations on the server that will be used for the File Store.
- Local: Full directory paths on the system, i.e.
C:\vod - UNC: Shared network locations, i.e.
\\video-share\content
- Local: Full directory paths on the system, i.e.
- Click
Saveto save and create the File Store.
For example, let's say we want to create a File Store on our system called "Meetings". Lets assume our main Cablecast Server is called "Primary System" and the meetings folder is a sub-folder within the content drive.
- Create new File Store.
- Name the File Store "Meetings".
- Select the server "Primary System".
- Create a Local Mount with Path
E:\meetings. - Click
OKto save. - Finally, navigate to the File Stores of the device and select "Meetings" to allow playback on the Primary Server.
Integrations
Integrations provide Cablecast a way to communicate with outside products and services while incorporating some or all of their features into the Cablecast UI.

To create a new Integration:
- Click
Newunder theIntegrationssection. - Define a "Name" for this Integration.
- Select the "Integration Type" from the dropdown.
- Currently only Agenda Link is supported.
- Complete the form based on the type of Integration.
- Agenda Link
- Agenda Link Client ID: Client ID for your Agenda Link account.
- Agenda Link API Key: API Key for your Agenda Link account.
- Public Site: Select which Cablecast Public Site to display the Agenda Link Integration on.
- Agenda Link
- Click
Saveto create the Integration.
Agenda Link
Agenda Link is a "meeting management tool which allows users to create clear agendas, optimize time spent in meetings, and determine next steps." The Agenda Link Cablecast Integration allows for Shows and their VODs to be synced with Agenda Link. VOD Chapters can be generated from an Agenda Link Meeting and updated as needed from the Cablecast UI. The Cablecast Public Site can also display an embedded link to a Show's associated Agenda Link Meeting.
To make use of the Agenda Link Integration, a few steps are required:
- Create an Agenda Link Integration (see Integrations).
- Create a Custom Field of "Type"
Agenda Link Meeting(see Custom Fields). - Sync a Show with an Agenda Link Meeting.
- Navigate to the Show Page.
- The
Agenda Link MeetingCustom Field should be displayed under theBibliographic Infosection. - Choose
Select Meeting - Search for and select an Agenda Link Meeting.
- Save the Show.
- Sync VOD Chapters with an Agenda Link Meeting.
- Navigate to the VOD Page.
- In the
Chapterstab, press thePull Chapters From Agenda Linkbutton. This will populate the VOD Chapters with information from the associated Agenda Link Meeting. - The position visibility of these Chapters can be edited.
- Choose
Push Chapters To Agenda Linkto sync the edited Chapters with the Agenda Link Meeting.
- Display the Agenda Link Meeting on a Cablecast Public Site
- Navigate to the Cablecast Public Site Page.
- In the
Show Fieldstab chooseAdd Fieldto add a new Field Display.- Give the Field Display a "Label".
- The "Field" should be
Custom Field. - Select the Agenda Link Meeting Custom Field created earlier from the "Custom Field" dropdown.
- The "Display" should be
Embedded IFrame.
- Save the Internet Channel.
Multiple Audio Programs
The Multiple Audio Programs configuration screen allows you to set the global option for allowing a Multiple Audio Program to function in Cablecast. Enabling MAP here will allow Shows and VODs with multiple audio sources to be played and transcoded with a secondary audio source. For automated playback files with more than one audio program, it will play the first two audio programs. This setting can be overwritten by each individual Reel or VOD.
Network Configuration
Public Connectivity
This screen is where you define a hostname for the system, as well as configuring SSL settings and reviewing status.

The following hostname information is available:
- Hostname - Define the system hostname
- HTTP Port - Define the HTTP port for the management UI. (Default: 80) If using SSL, you must use port 80.
- Frame Ancestors - A comma separated list of external sites where Cablecast can be embedded.

SSL (Secure Sockets Layer) is a protocol for establishing authenticated and encrypted links between networked computers. An SSL certificate also includes identifying information about a website, including its domain name. The following SSL settings are available to you:
- Enable SSL - Enabled/disabled if the system should use SSL.
- Use Let's Encrypt - Enabled/disabled if the system should use Lets Encrypt for free / automatic SSL certificates. If you do not use Lets Encrypt, you'll be shown a file path where you should put your certificate file(s). This is typically in the
C:\TRMS\Certificates\directory. - Challenge Type - If using Let's Encrypt, this setting allows choosing either
HTTP-01orDNS-01challenge type.HTTP-01- This challenge requires opening port 80. No other configuration is necessary.DNS-01- If it is not possible to expose port 80 to the Internet aDNS-01challenge can be used. This challenge requires making changes to your DNS records. ACNAMErecord will need to be added to the DNS configuration with a._acme-challengesubdomain of the main domain. The value of theCNAMErecord should contain the record name with.cablecast.netappended to the end.
For example: A customer with the domaincablecast.portlandmedia.orgshould create aCNAMErecord with_acme-challenge.cablecast.portlandmedia.organd set the value to_acme-challenge.cablecast.portlandmedia.org.cablecast.net.
- Additional Domains - If you have additional domains that point to your system, provide a comma separated list here.
- Notification Email Address - Optional contact email address (if using Lets Encrypt).

The current "SSL Certificate" details are visible:
- Status: Will show if the current configured SSL certificate is valid, or otherwise.
- Last Checked for Renewal: The last date/time the SSL certificate was checked.
Time Syncing
This screen controls how often Cablecast sets the time on each of the configured Servers.
Closed Captioning
Languages
Languages screen allows for the configuration of which languages will be displayed in areas of the UI where Closed Caption and Translation languages can be selected. The user can limit the list to a smaller subset of languages that may be appropriate for their facility.
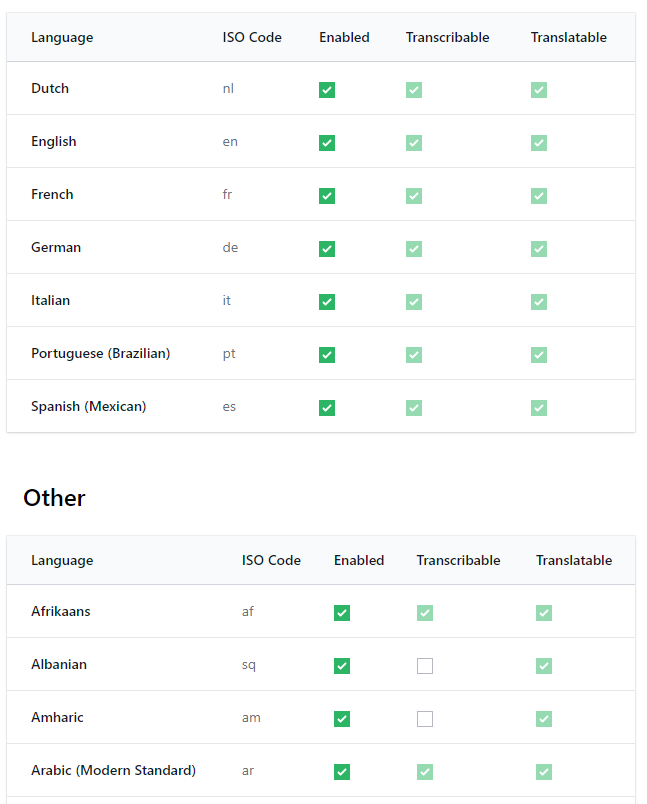
The Enabled checkbox allows you to select whether that language will be displayed in dropdown lists for the selection of languages in other areas of Cablecast.
The list is divided into two sections. The top section lists the 7 languages that are supported for display of captions on the SDI (i.e. channel) and Live Stream outputs. The languages below that listed under Other are additional languages that are supported with Video On Demand playback.
The right two columns in the table show the features that are available for each language.
- Transcribable - This language can be transcribed by Cablecast. Shows recorded with audio in this language can have captions generated in that language.
- Translatable - Cablecast can translate existing captions into this language.
Once the languages to enable and disable are selected, hit the Save button at the bottom of the screen.
Vocabularies
Vocabularies allow you to prime caption jobs with words/phrases, making them more likely to be transcribed correctly.
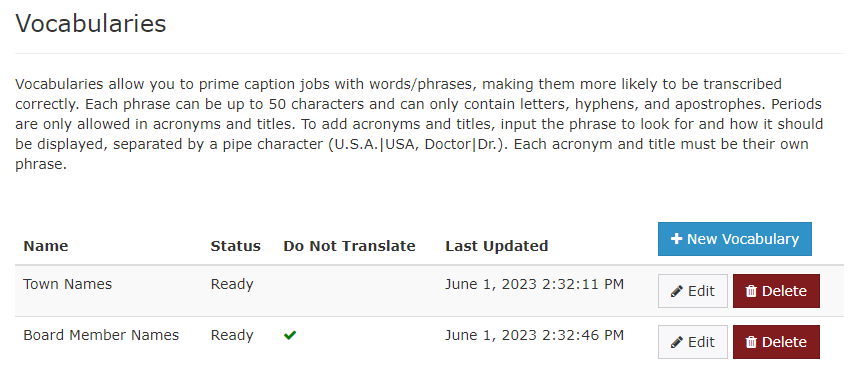
To create a new Vocabulary:
- Click
+ New Vocabulary - Give the Vocabulary a descriptive name
- Define phrases by enter a phrase, followed by the enter key
- A single phrase cannot exceed 50 characters
- Phrases can only contain letters, hyphens, apostrophes, and periods.
- To add acronyms, input the phrase to look for, a pipe character, and how it should be displayed (ex.: U.S.A.|USA).
- Remove defined phrases by clicking the trash can icon to the right
- Click the Do Not Translate checkbox if the all of the words in this vocabulary should not be translated into other languages during any Cablecast Translation jobs. Proper names are a good example of words that shouldn't be translated. If you wish to have only select words not translated add these in the Do Not Translate setting
- Click
Save
Creating a Vocabulary will require some backend cloud processing, and will display "Ready" once its completed. A custom Vocabulary cannot be used until its status shows "Ready". If a status shows "Error", check your Vocabulary for errors, or reach out to support for assistance.
To delete a custom Vocabulary:
- Locate the Vocabulary you wish to delete.
- Click
Delete - Confirm the deletion of the Vocabulary
Do Not Translate
The Do Not Translate configuration screen allows you to add words or phrases that will be excluded from any Cablecast Translation jobs. This can be useful for proper nouns, such as the names of people or places, that should not be translated to the equivalent foreign word.
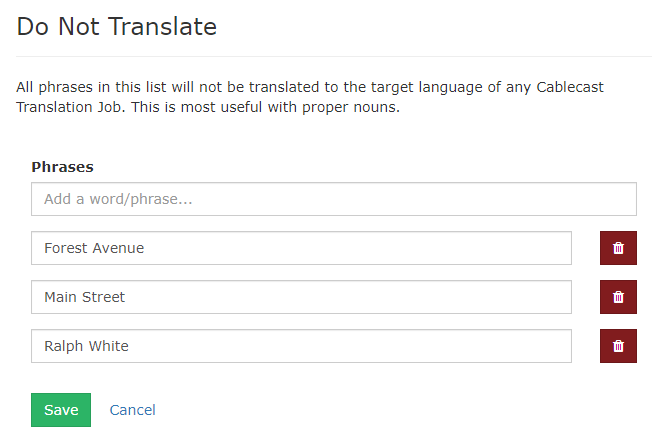
To add words or phrases to the Do Not Translate list, type them in Phrases box and hit the enter key.
To remove any existing entries, click the Trashcan button next to the item.
Click Save once you are done adding or removing items from the list.
Note: All the words in a Custom Vocabulary can also be excluded from translation. See Custom Vocabularies settings for details.
Data Backups
Database Backups
This screen allows you to configure automatic database backups. In the event of a hardware failure or accidental data loss, these backups provide a possible means of data recovery. There is no charge for this service.
To enable automatic database backups:
- Tick "Backup my database".
- Enter the name of the person that is the main contact for your station in the field.
- Enter your station's name in the field.
- Enter your station's phone number in the field.
- Enter your station's ZIP code in the field.
- Click
Save
System Archives
This shows the last 7 system archive / backups of your different systems. A green check shows a successful archive backup was created, a red cross shows there was an error with the creation of the archive on that day. Archives are generally created late at night when system usage is lower.

Clicking on an archive will show:
- Location - The absolute path of that archive.
- Filesize - The file size of the archive on the disk.
- Created - The date & time the archive was created.
Software
Cloud Services
You can extend the functionality behind your Cablecast system by leveraging different services offered by "Cablecast Cloud Services". This settings screen will help you configure the connection, as well give you a status of each available service.
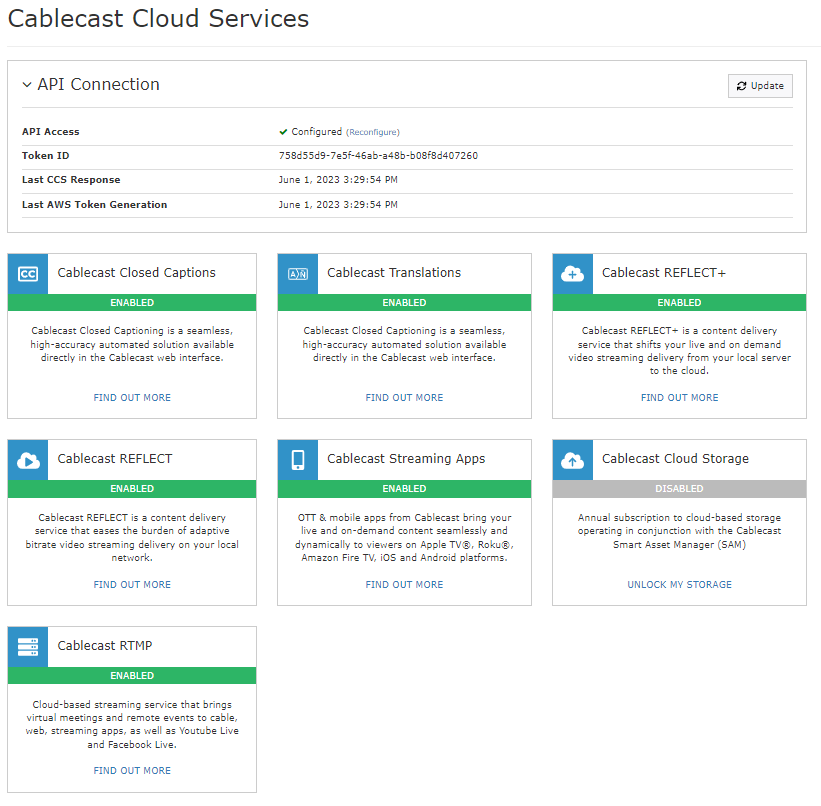
Within this section, you can setup the API connection for the first time, or manage new API Tokens between your server and cloud services. The current settings, if any, will be displayed:
- API Access: Will show unconfigured or configured, click "Reconfigure" to change token/secret.
- Token ID: The Token ID defined during setup. The secret cannot be viewed for security purposes.
- Last CCS Response: The last successful check-in with Cablecast Cloud Services.
- Last AWS Token Generation: The last time an AWS token was generated for use by certain Cablecast Cloud Services.
Reconfiguring API connection will present you for your Token ID and Token Secret. This only needs to be done once, or if you regenerated new tokens. It's recommended not to share your token ID and secret as shared access could incur unauthorized charges.
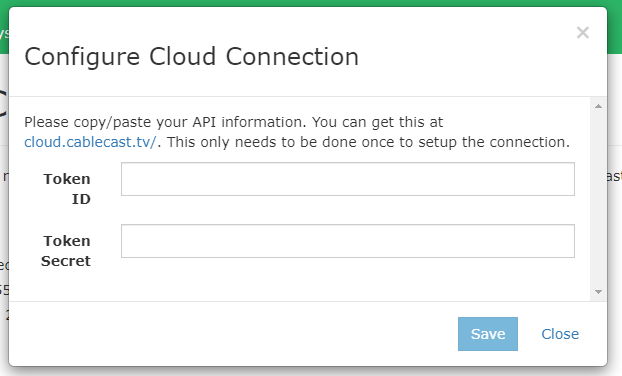
To configure / reconfigure API access:
- Generate tokens on cloud.cablecast.tv or with support
- Copy & paste your token ID
- Copy & paste your token secret
- Click
Save
The rest of the screen displays whether any of the optional Cablecast services are enabled. Click on the FIND OUT MORE link on each service to be directed to the Cablecast web site.
License Info
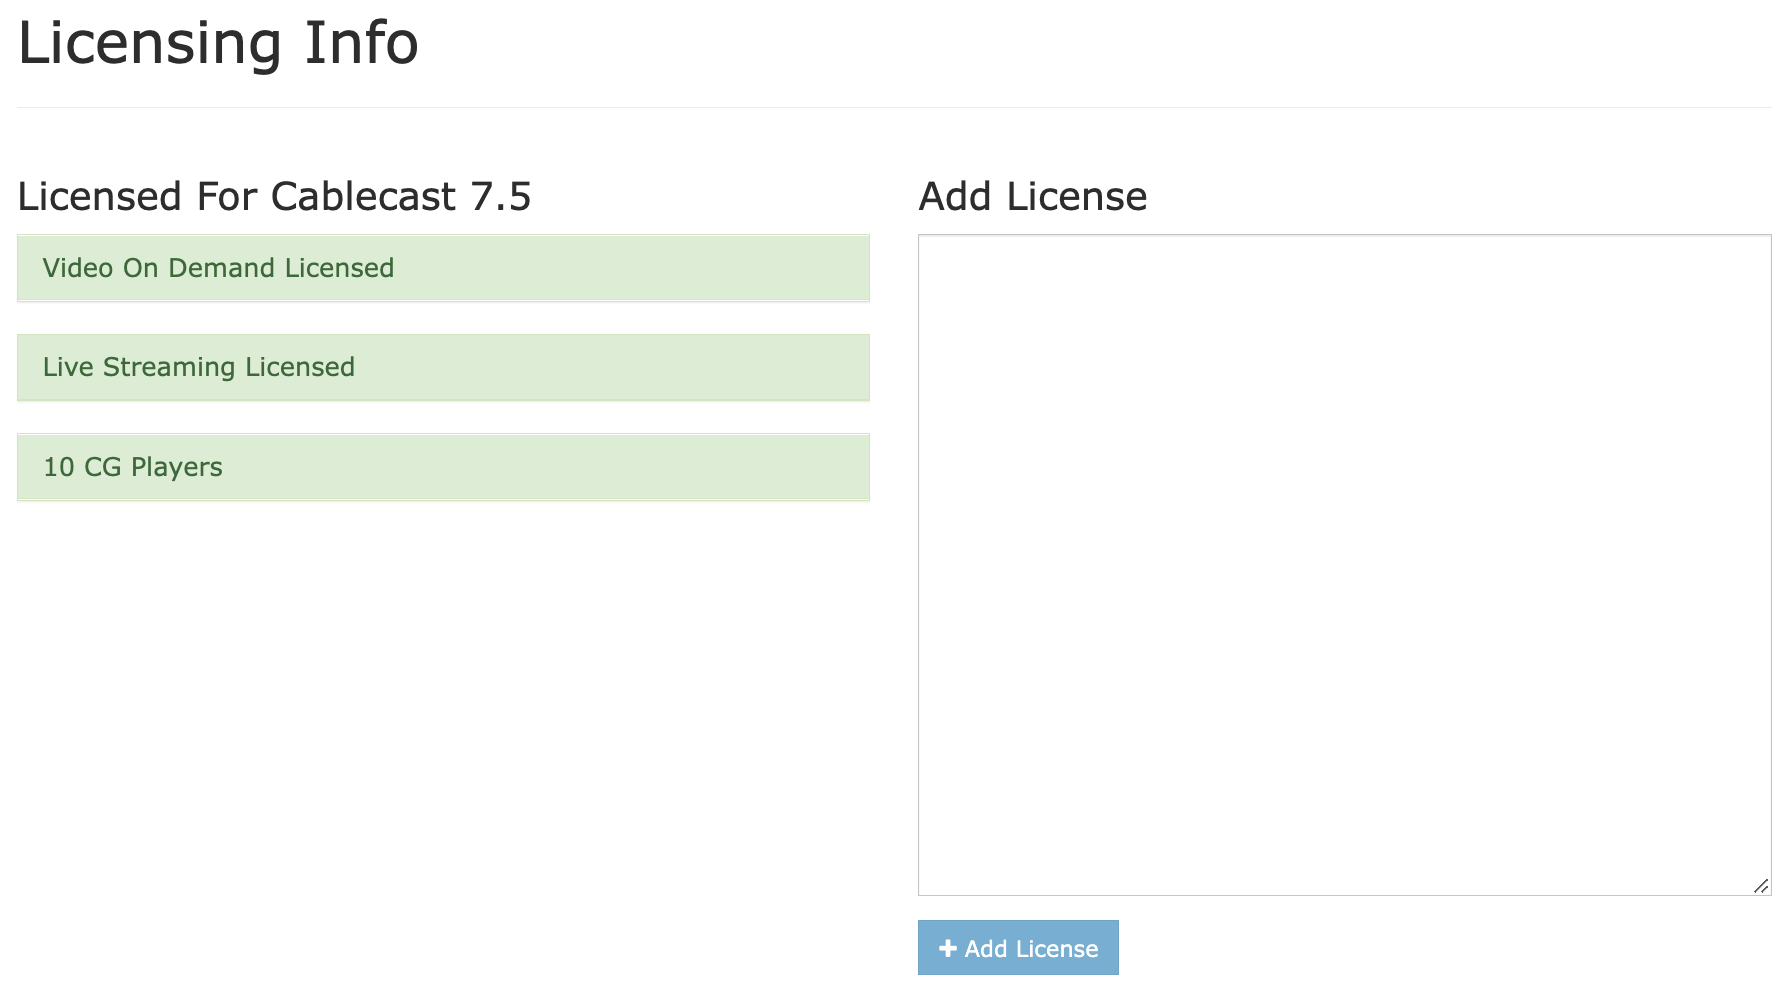
This is where you can see the license information for your Cablecast system, and the ability to change licensing if desired.
- Current License:
- The highest Cablecast version your licensed for (Example: Cablecast 7.5)
- Feature sets included in license
- Number of CG players licensed. (Example: 4 CG Players)
Software Updates
Cablecast has a system to manage the automatic download and installation of Cablecast software updates. The update process has three phases:
- Notification: Cablecast will present a notification when a new version of the software is available for the system.
- Download: Downloading an update will retrieve the installation files from the cloud and distribute them to all Cablecast servers in the system.
- Installation: Once the installers are downloaded they can be run either manually or automatically.
Update Notification

If an update is available, the following information is available:
- Version Number: The version number of the update available to you.
- Release Channel: Typically this will show "Release" unless you are a beta user.
- Summary: A summary of the update.
- Details Button: View more about the update, and options for download.
Clicking on the Details button will present a window showing more information about that update including the version, release channel, release date, and more detailed release notes for that version. A button will be available to initiate the download of the installers.
Download Update
When ready to begin the updating of the Cablecast system, click the "Download" button. This will initiate the process of pulling down the installer file to the primary Cablecast server. Once that download is completed it will be distributed to all of the other servers on the system.
You'll be able to watch the progress of the update until it reaches 100%. You may continue to use your system while the update downloads. The installer files will be copied to the C:/TRMS/CablecastInstallers folder on each server. After the installers are distributed, a button will be available that can be used to automatically run the installers on all of the systems.

Install Update
Once the installers are available on all of the Cablecast system, the user can choose whether to manually run the installers or let Cablecast automatically do the installs.
If it is preferred to run the installers manually, proceed to each server and access the installers in the C:/TRMS/CablecastInstallers folder. Use Windows to remove the current Cablecast installation. Then launch the installer and let it proceed.
If it is preferred to have Cablecast automatically run the installers on each server, click the "Install" button. This will first run the installer on all of the non-primary servers. Once they all complete the installer will be run on the primary server. While the installers are running video server playback, recording, and live streams will briefly be interrupted.
During the automated installation process interaction with the Cablecast user interface will be locked out. A screen showing the update progress on each server will be presented.
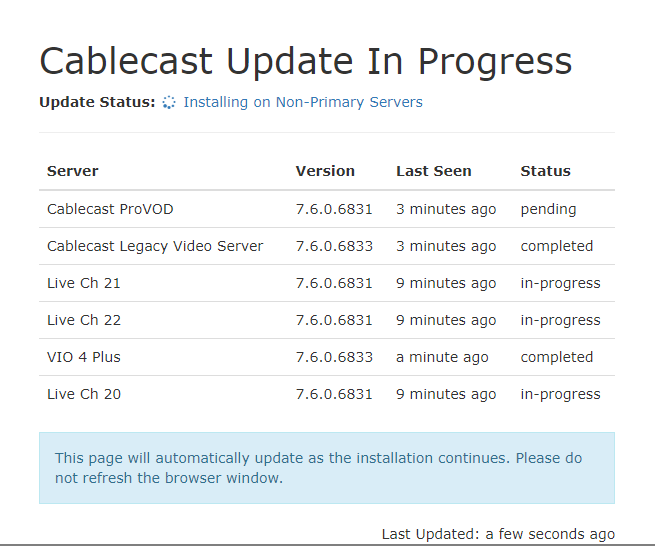
Once the installers have completed on all of the secondary servers and then finished on the primary server the screen will indicate a successful update. Click the "Dismiss" button to acknowledge the update completion and return to the Cablecast user interface.
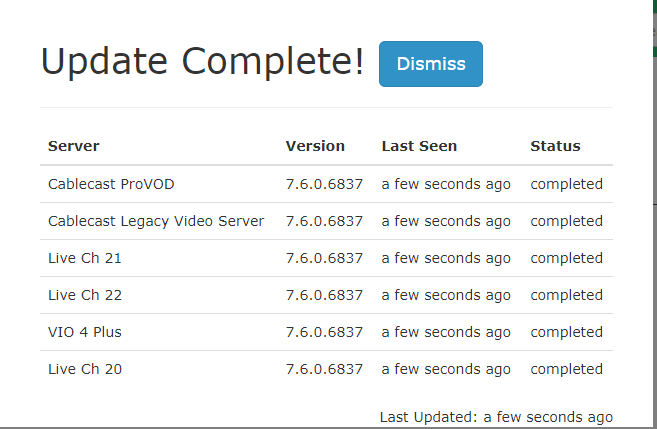
A successful installation on all of the servers in the system can be verified by navigating to the "Servers" section in the "System Settings". The currently installed Cablecast version will be displayed for each server.
If there are any issues or errors reported during the download or installation process please contact Cablecast Customer Support by email at support@cablecast.tv.
Monitoring
Server Jobs
This screen shows you the previous 50 server jobs performed on your Cablecast system(s). A server job is a series of actions performed on the backend for various different operations, such as generating captions, completing system archive backups, or sending files to Cablecast Cloud Services. This screen allows insight into those server jobs to help with troubleshooting, and system health. If this screen is showing errors or failures, ensure the corresponding configuration for that Job Type is correct. Otherwise contact support for assistance.
The list of jobs will show the following information at a glance (clicking on a job number will show more details):
- Job Number: Jobs increment with each new job. This shows the corresponding job number. Clicking this will go into more details.
- Job Type: What type of job was.
- Status: The status of the job. Various value are Pending, Processing, Success, and Failure.
- Server: Which server in your cablecast ecosystem this job belongs to.
- Started: The date / time the job started processing.
- Completed: The date / time the job completed.
Clicking on the job shows additional information. The additional information includes:
- Client Data: The client data associated with the job.
- Created: The date / time the job was created for processing. This is not the date / time it was started for processing.
- Job Data: The job data associated with the job.
- Job Result: The result of a completed (or failed) job.
User Settings
User settings allow you to customize Cablecast to your preference. These settings apply to the currently logged-in user, each user can set them individually.
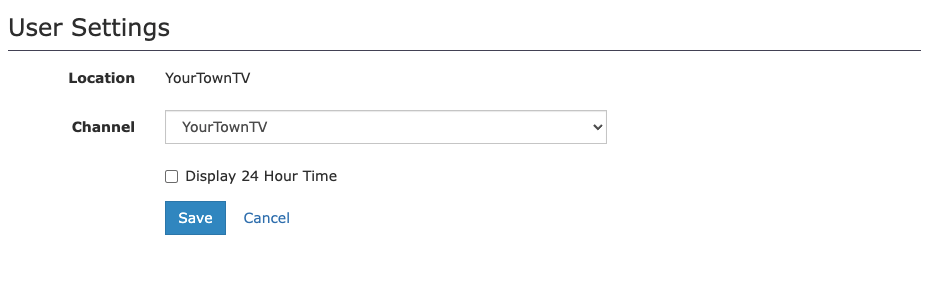
- Location: Select the default Location that you would like to use when you first log into Cablecast.
- This can only be changed if your system has multiple locations configured.
- Channel: Select the default Channel that you would like to see when you first load the Schedule.
- Time Format: Select whether or not you would like to use 24-hour time.
Upon changing settings / fields, click Save to commit the changes, otherwise click Cancel to navigate away without saving changes.