Show Schedule
The schedule mode is used to schedule runs of Shows. In the section below, the parts of a run are described from left to right.
- Show Actions
- Run Types
- Timeslot
- Filler Block
- Right Side Pane
- Adding Runs
- Copy & Paste
- Moving Runs
- Editing Runs
- Filling Gaps
- Record Schedule

| Item | Description |
|---|---|
| Checkbox | Indicates if the run is selected. Selected runs can be moved, deleted, or copied as a single block using the Schedule Toolbar. |
| Run Status | Circle to the right of the selection checkbox is used to indicate if the run has been committed via Autopilot. Gray indicates the run is in the past, red indicates the run is uncommitted, green indicates the run is committed, and blue indicates the run is on air. |
| Run Type | Icon to the right of the indicates what type of device will be used for playback of the run. and their icons are described in table Described in Run Types |
| Start | The time the run is scheduled to start. The time can be changed by entering a new time directly in the form field. |
| ID | The ShowID of the scheduled show. The ID can be changed by entering a new ID or searching for a Show title in the form field. |
| Title | The title of the scheduled show. |
| TRT | The total run time of the scheduled show. |
| End | The time which the run will end. This field is calculated from the runtime. |
| Actions | Buttons which perform actions on the run. |
Scheduled Show - Actions

| Action | Description |
|---|---|
| Bump & Unbump | Use to move the run so it does not conflict with the previous run. The icon is only displayed if there is a conflict. The icon is only displayed if the run has been bumped, and the conflict is resolved. |
| Locked & Unlocked | Locked indicates that the run is currently locked. Locking a run will prevent Autopilot from bumping the run because of conflicts. Unlocked indicates that the run may be bumped, if needed. |
| CG & CG Exempt | Use to control whether runs will be presented on public facing schedules. indicates that the run will be publicly viewable. indicates that the run will be excluded from public schedules. |
| DSK & DSK Disabled | Displayed if DSK data exists for the run. indicates that there is no DSK data for the run. Clicking this icon will bring up the pane to allow editing of the DSK info to add down stream key data (crawl text and bug text) to a run. |
| Record & Recording Disabled | is displayed if there is a record event associated with the run. is displayed if there is no record event associated with the run. Clicking will create a record event and open the Run Details pane for editing. |
| Move Up & Move Down | Use to move a run. moves a run, so it begins when the previous run ends. moves a run, so it ends when the next run begins. |
| Delete | Use to delete the run from the Schedule. |
| Edit | Use to open the Run Details pane. |
| Network Broadcast Settings | Displayed if the run can utilize Network Stream Destinations. Brings up the Run Details Overlay for you to setup your Network Broadcast Events. |
Run Types
| Run Type | Icon | Description |
|---|---|---|
| Valid File | Indicates that this Show is a valid digital file. | |
| Invalid File | Indicates that this Show is an invalid digital file. | |
| Missing File | Indicates that this Show is set to use a digital file, but that the file does not exist. | |
| Tape | VHS Icon | Indicates that this Show will play back from tape. |
| DVD | Disc Icon | Indicates that this Show will play back from DVD. |
| Live | Indicates that this Show will play live. | |
| Network Stream | Indicates that this Show will play from a Network Stream. | |
| Manual | M | Indicates a Manual Event. |
Timeslot
Timeslots are used to schedule new runs as described in Clicking Timeslots Timeslots also contain the button allowing a single gap to be filled.
Filling gaps is covered in section Filling Gaps.
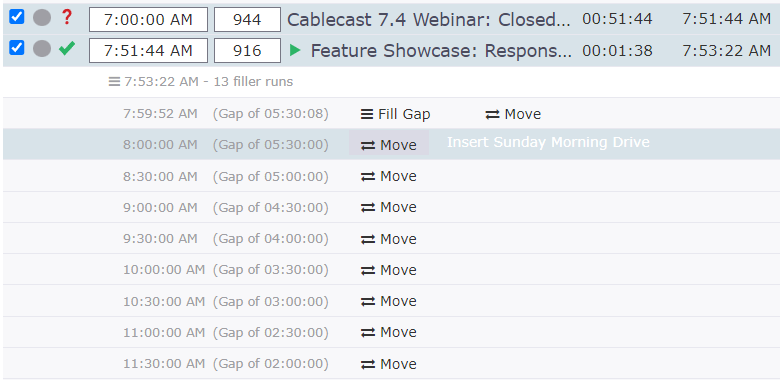
Filler Block
When a gap has been filled as covered in Filling Gaps, all the runs are summarized by default, decluttering the schedule. A filler block is shown in Filler Block section.
- Up & Down Arrow: Allows expanding and collapsing the runs in the filler block.
- Trash Can: Will delete all the filler runs.
Right Side Pane
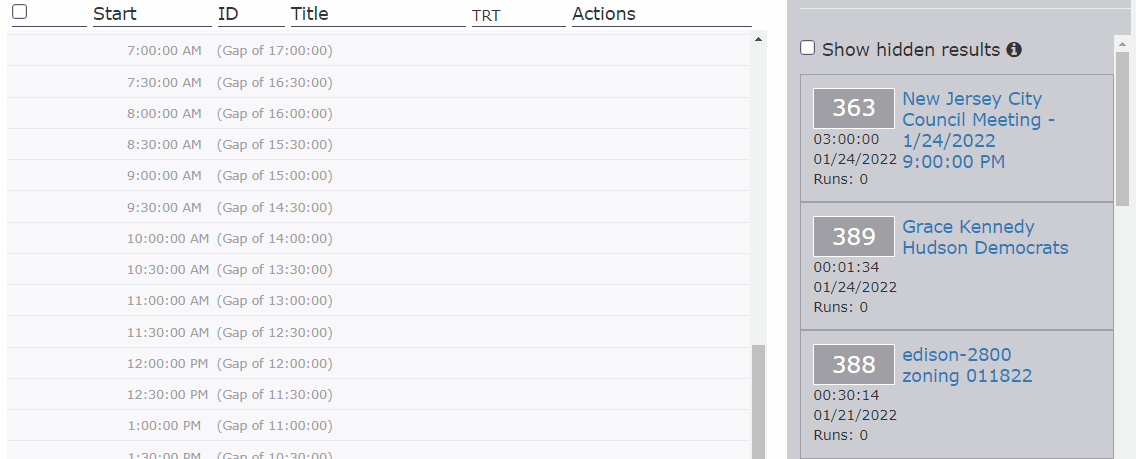
To the right of the runs in the schedule is a pane used for searching Shows and contextual controls for pasting, moving and editing of runs. The side pane in its default search mode. Click Shows, Saved, or Advanced buttons to bring up the different search options described next.
- Shows: Type a search term into the box and click the magnifying glass to search.
- Saved: List previously constructed Saved Searches
- Advanced: Build a custom query to filter available Shows by numerous different properties of a Show.
Adding Runs
There are three ways to schedule a new run, as follows:
Select and Schedule
Selecting a Show from the search results in the right side pane and then clicking a time slot is the simplest way to schedule a show.

- Find the Show you wish to schedule using any of the search methods in the Right Side Pane.
- Click anywhere in the Show card. The card will be highlighted blue.
- Click anywhere in a time slot to schedule the show. While your mouse is over a time slot it will be highlighted blue if the Show can fit in the time slot, or red if scheduling the Show here would create a conflict.
Add Button
The button in the Schedule Toolbar can be used to add empty runs to the Schedule. These runs can then be edited manually to update the and fields. This is an efficient way to schedule, if you already have a list of start times and ShowIDs.
- Click the
+ Addbutton in the toolbar. The side pane will open on the right. - Enter the number of new runs desired in the form field.
- Click to create the empty runs. They will be placed at 12:00:00 AM
- Fill in the newly created fields.
- Start time & showID should be populated to your desired values
Clicking Timeslots
Any time slot in the Schedule can be clicked to create an empty run at that time. Then, the of a Show can be entered manually. This is useful if you already know the of a Show and know when the time should be.
- Click a time link in the time slot you wish to schedule the Show. An empty run will be placed at that time.
- Enter the of the Show you wish to schedule.
Deleting Runs
There are two ways to delete runs in the Schedule.
Deleting Individual Runs
You can delete any individual run in the Schedule by clicking the delete icon for the run. A full list of run actions can be viewed in the Schedule Actions Table.
Deleting Multiple Runs
You can delete multiple runs in the Schedule by clicking the selection checkbox for any run that should be deleted. Then, clicking the button, in the Schedule Toolbar will delete the selected runs.
Copy and Paste
The and functions of the Schedule allow for duplicating runs. Runs can be duplicated from one day to any other day in the Schedule.
Copying Runs
- Tick the checkbox on the runs you wish to copy to add the runs to the current selection.
- Click the button on the [Schedule Toolbar](#sec: UiReference: Schedule: Toolbar) or on your keyboard. :::
Pasting Runs
When runs are in the clipboard, they can be pasted either by opening the or by clicking the button in any timeslot.
Paste Runs Pane
The interface allows for multiple options of pasting.
- Original: Runs will be scheduled at the same time, but on the current schedule date. This option is useful for repeating blocks of programming at the same times but on different dates.
- To Time: Runs will be scheduled starting at a user defined time while keeping the time between programs in a block the same. This option is useful for repeating blocks of programming at different times and days.
- Advanced: Runs will be duplicated to multiple dates and times while keeping the spacing between programs in a block the same. This option is useful to repeat the same block of programming multiple times for a defined schedule. Read more about pasting in Advanced Paste.
Advanced Paste
Choosing from the Paste Runs pane allows you enter multiple dates and times to repeat a block of runs using the advanced paste builder. The fields in the advanced paste builder are:
- Load Blocks: This dropdown allows you to load pre-defined blocks of paste targets. See blocks for more information on creating blocks.
- Pick a Day: The date picker allows for creating a new paste day.
- Date: The Date at the top of a paste day displays what calendar date the copied runs will be pasted to.
- X: The in the upper right will remove an entire paste day from the advanced paste builder.
- Time: Each paste day contains a list of times at which runs will be duplicated.
- Remove: The link removes an individual time from a paste day.
- Cancel: Close the without pasting any runs.
- Reset: Remove all paste days and paste times.
- Paste: Perform the paste, duplicating any runs in the clipboard to each of the date time combinations defined in the paste builder.
Time Slot Paste Button
When runs are copied and in the clipboard, a Paste button will be available on all time slots. Clicking this button will paste the copied runs to that time.
Moving Runs
Existing runs can be moved in three different ways.
Moving Individual Runs
You can move any individual run in the schedule by clicking the or buttons in the section of a run. See the Actions Table for details about the and actions.
Moving Multiple Runs
You can move multiple runs in the Schedule by clicking the selection checkbox for any run that should be moved. Then, clicking the button in the Schedule Toolbar to open the pane. All selected runs will be moved, so the time in-between runs is maintained. The options for the pane are listed below.
| Option | Description |
|---|---|
| Move Up | Moves selected runs, so the first run in the selection begins when the previous run ends. If there is no previous run, the first run in the selection will be moved to 12:00:00 AM. |
| Move Down | Moves the selected runs, so the last item in the selection ends when the next run begins. If there is no next run, the last item in the selection will be moved so it ends at 12:00:00 AM on the next day. |
| Move To | Opens a prompt for a start time. The first run in the selection will be moved, so it starts at the specified time. |
| Move By | Opens a prompt for a timecode. The first run in the selection will be moved by the entered value. Negative values will move the run earlier in time. |
Time Slot Move Button
When runs are selected, a Move button will be available on all time slots. Clicking this button will move the selected runs to that time. This is equivalent to using the feature in the Schedule Toolbar.
Run Details Overlay

Hit the Edit icon on any run to bring up the Run Details Overlay. This overlay allows you to modify many different settings pertaining the scheduled run. Each tab covers a different type of setting. The tabs are as follows:
- Run Details: The basic settings of a run, like Show ID, Start time, and CG Exempt. Located under these settings is a list of all Control Rooms you have access to. Clicking one of the Open buttons will redirect you to the Control Room with the current schedule run selected as the event within the Control Room.
- DSK Settings: The DSK settings similar to the Show Record configuration.
- Record Settings: You can configure your run as a Record Run here, instead of opening up the Record Schedule.
- Caption Settings: Enable live closed captioning and live translations here with the associated dropdowns.
- Network Broadcast Settings: Create Network Broadcast Events to utilize your Network Stream Destinations. Ensure you hit Save and send Autopilot for your events to be synced with social platforms.
Hit Save to persist your changes.
Filling Gaps

Using ether Fill Gaps button on the toolbar or the Fill Gap button on the schedule will open a dialog allowing you to define the criteria used to fill the gap. The different fields are defined below:
| Function | Description |
|---|---|
| Dates | Allows defining a and date range in which to fill gaps. These fields are only shown when using the button in the Schedule Toolbar. |
| Fill Gap With Shows From | Allows selecting a Saved Search from which to pull content from when filling the gap. |
| Fill Mode | Determines if programs are allowed to repeat within the same gap. |
| Show Advanced Settings | Clicking this link will reveal advanced settings described below. |
When is clicked it will reveal several additional options for controlling how gaps are filled:
| Function | Description |
|---|---|
| Open Gap With Search | If populated, a single random show will be used from the search at the beginning of each gap. |
| Close Gap With Search | If populated, a single random show will be used from the search at the end of each gap. |
| Insert Before Fill With Search | If populated, a single random show will be used from the search before each inserted filler. |
| Insert After Fill With Search | If populated, a single random show will be used from the search after each inserted filler. |
| Maximum Bump | Values greater than zero allow filler to be scheduled even if it would cause the next program to bump. Useful for completely filling a gap even if a search doesn't contain results that perfectly fit. |
Record Schedule
The Schedule can be switched to viewing record events by choosing from the dropdown in the Schedule Toolbar. The fields of a record event are described from left to right below.
- Checkbox: Indicates if the record event is selected. Selected record events can be deleted, or copied as a single block using the Schedule Toolbar.
- Start: The time that the record event will begin to display.
- Name: A user-defined name for the record event. This is useful to be able to distinguish several record events on the same day.
- Length: The duration in hours:minutes:seconds that the record device will be recording for.
- End: The time that the record event will stop. Calculated by adding the to the properties.
- Device: The name of the device that will be recording.
- Actions: The delete button, can be used to delete an individual record event. The edit button, will open the side pane.
Creating Records

Creating a new record event is easy.
- Navigate to the desired date for the new record event.
- Click Create New Record Event in the right side pane.
- Fill out form. The fields of the form are described below.
- Click to save the new record event.
Create Record Event Side Pane
The fields of the Record Event Side Pane are described below
- Name: The user defined name of the record event.
- Start: The time which the record event will start.
- Length: The duration, in hours:minutes:seconds the record device will record for.
- Source - Device: The device that will be recorded.
- Destination - Device: The device that will perform the record.
- Destination - Stream: The Network Stream that should be used as a source for the recording.
- Destination - File Key: The name of the file that will be created if recording to a video server device.
- Destination - Cue: Duration in hours:minutes:seconds that the record device will record prior to the actual start time of the record.
- Caption Settings - Enable Live Captions: Enables live closed captioning for this record run. This brings up more form fields for you to fill out the Source Language, Provider, and optional Vocabulary.
- Caption Settings - Enable Live Translations: Enabled live closed captioning translations for this record run. This will bring up an additional for field for you to select the Translation_Language .
Editing Records
To edit an existing record event, click the edit button. This will open the form described in Record Events Side Pane. You can also edit a record run from the Record Settings tab of the Run Details Overlay.
From here, make the desired changes and click Save.
Deleting Records
Deleting record events is the same as deleting runs described in Deleting Runs.
- Single Record Event: To delete a single record event, click the delete button, in the section of the record event you wish to delete.
- Multiple Record Events: To delete multiple record events, click the checkbox of each record event you wish to delete adding it to the current selection. Then, click in the .