Force Matrix
The Force Matrix screen allows you to manually control your routing switcher as well as your playback and record devices. You can also use this screen to determine what is currently happening in real-time.
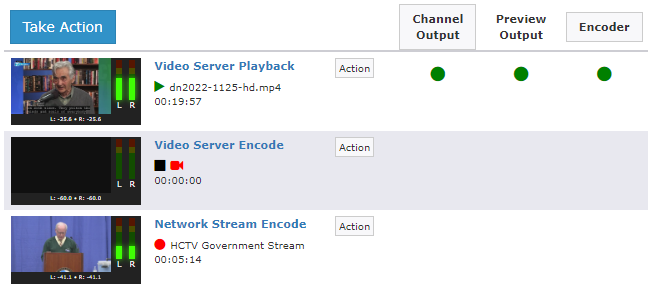
Each row in the Force Matrix screen represents a single device in your system & Each row contains the following controls:
| Control | Description |
|---|---|
| Confidence Monitor Thumbnail | If an output device on the playback server, you can see a live preview thumbnail of the output source. |
| Device Name and Status | The first column shows the user-defined name of each device as well as the status of the device. |
| Action Button | Clicking this button will open the Force Matrix action modal with the selected device pre-populated. |
| Crosspoint Buttons | One column of buttons will be shown for each router output that you have defined. A green button indicates the currently active crosspoint. Clicking a gray button will open the Force Matrix action modal with a switch pre-populated with the selected crosspoint. |
Clicking on a devices name (blue text) will show you some information in the Device Status Window.
Device Status Window
When clicking on the device name, you will see the some more information about that device, including:
- Confidence Monitor Preview
- "Patched To" destination
- Device Info
- Name
- Device Type
- Router Input
- Control Module Details
- Name
- Control Module Name
- Server Details
- Name
- Host Address
- Remote Access ID
Confidence Monitor
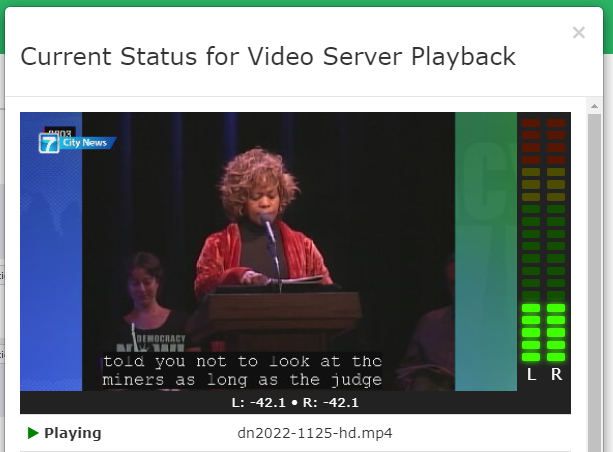
The Confidence monitor on Cablecast gives you a real-time preview of the output or input devices on the video server. Audio levels of the signal will be displayed on the bar graphs to the right of the image and the actual values will be displayed below. If available, the monitor will also show a live preview of the captions on the output.
Please note that the preview updates every 2 seconds and should only be used as basic preview of the source out of the server, and not to be used to guarantee the output to your channels / livestreams.
Action Window
There are 2 ways to open the action modal.
- Clicking
Take Actionin the upper left. - Clicking a device's
Actionbutton.
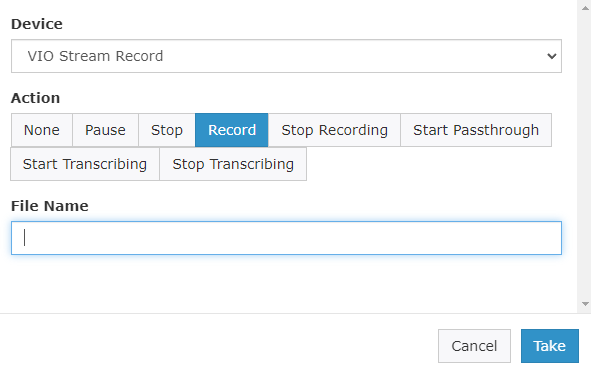
The action window can be used to send a command to a device, have the router perform a switch, or both. Once the window is open fill out the form and click Take to perform the action. The field(s) of the window are described below.
| Fields | Description |
|---|---|
| Device | The device the command will be sent to. |
| Action | The command to send to the device if device supports actions. |
| File Name | The filename of the media to be played. |
| Output | Selects an Output for Start Passthrough action. |
| IP Stream Name | The network stream to be played. Select New to create a new Network Stream. |
| Source Language | For Transcribing action, selects the sources language being live captioned. |
| Translate Language | For Transcribing action, selects the language to live translate to. |
| Switch To | The destination Output for a switch command. Leave blank to perform an action only. |
Actions
The following actions can be taken, depending on the device:
| Actions | Devices | Description |
|---|---|---|
| Play | Output | Play a specific file out on the selected device, as specified by its File Key. |
| Play Stream | Output | The network stream to play or record, if controlling a compatible video server. Optionally, a new network stream can be created. |
| Stop | Output | Stop the source playout on the selected device. |
| Start RTMP Output | Output | Start sending the selected device's output to a Network Stream Destination. |
| Stop RTMP Output | Output | Stop one or all active Network Stream Destination outputs. |
| Play CG | Output (W/ CG) | If the device is equipped with CablecastCG, Play the CG Channel on that device. |
| Record | Encoder | Record the current source going through the encoder, with the specified filekey as filename. |
| Stop Recording | Encoder | Stop the recording event currently set on the encoder. |
| Start Passthrough | Encoder | Start passthrough from this encoder to the specified output device. |
| Start Transcribing | Encoder | Start a live captioning transcription or translation on the encoder device. |
| Stop Transcribing | Encoder | Stop the live captioning transcription or translation on the encoder device. |
Override and Resume
Each router output that is defined as a channel will offer the option to Override and Resume automation.
Clicking the channel's name will place the specified channel into Automation Override mode. While in this mode, the channel's router output will skip any scheduled Take events.
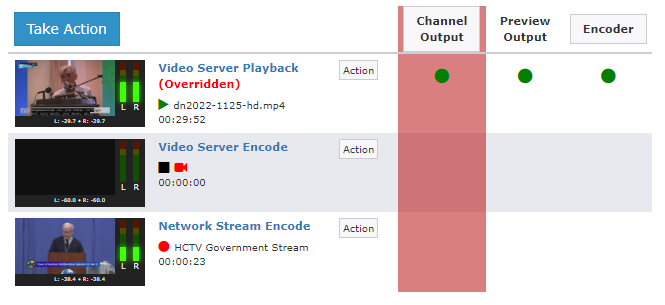
While the channel is overridden, the playback schedule will continue to operate normally but the routing switcher won't switch to new sources. In this way, when the live event is finished, you can seamlessly switch back to the originally scheduled programming already in progress.
Clicking the channel's name again for a channel that is currently in Automation Override mode will show the following screen:
| Item | Description |
|---|---|
| Execute Last Switch | Tick this box if you would like the routing switcher to automatically switch to the programming that was originally scheduled to be on-air now. |
| Enable Crawl | Tick this box to enable the crawl defined in the field. |
| Crawl Text | Set the text that should be displayed if is ticked. |
| Crawl Duration | Set the length of time for which you would like to run the crawl defined in . The default is (two minutes). |
Simple Mode
On large systems with lots of devices and outputs, the amount of cross-points can be cumbersome to work with. Use simple mode to display the devices and outputs side by side. All of the same status information and control options are available. To activate simple mode, click on the toggle (three lines button) in the lower right of the page.